Serpentine Belt Diagram 2007 Buick Lacrosse
The serpentine belt is a critical component in your 2007 Buick LaCrosse, responsible for powering numerous engine accessories. Understanding its routing and operation is paramount for effective maintenance and troubleshooting. This article will delve into the serpentine belt diagram specific to your vehicle, providing you with the knowledge to confidently diagnose issues, perform replacements, and appreciate the intricacies of your engine's accessory drive system. We have a copy of the actual diagram available for download (link at the end). This diagram isn't just a drawing; it's your roadmap to efficiently maintaining key systems.
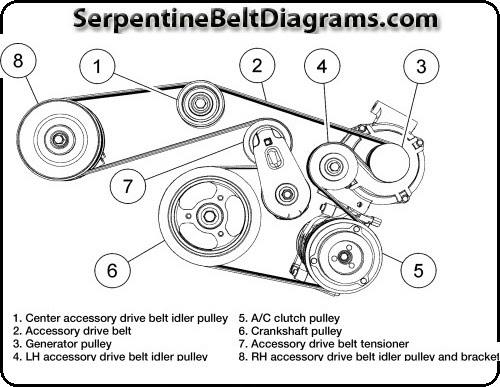
Purpose of the Serpentine Belt Diagram
The serpentine belt diagram serves several crucial purposes:
- Repair and Replacement: The primary function is to illustrate the correct routing of the serpentine belt. When replacing a worn or broken belt, the diagram ensures you reinstall the new belt properly. Incorrect routing can lead to accessory failure and potentially engine damage.
- Troubleshooting: The diagram helps in identifying the specific accessories powered by the belt. If a particular component (like the power steering or alternator) isn't functioning correctly, the diagram allows you to quickly determine if the belt is the source of the problem.
- Preventative Maintenance: Regularly inspecting the belt and its routing, guided by the diagram, allows you to identify potential issues (wear, misalignment, etc.) before they lead to a complete breakdown.
- Understanding System Function: The diagram gives you a quick overview of your engine's accessory drive. Knowing which accessories are connected to the belt helps understand its function and where to look for issues.
- Learning: For those interested in understanding how their vehicle operates, the diagram provides a visual representation of the belt's path and the accessories it drives.
Key Specs and Main Parts
While the exact belt length varies slightly based on engine configuration (3.8L Series III V6 or 3.6L DOHC V6), certain key specs remain important:
- Belt Length: Varies based on engine; typically between 90-100 inches. Always refer to the part number for your specific engine configuration.
- Belt Width: Standardized to fit the pulley grooves.
- Rib Count: Specifies the number of grooves on the belt. Ensuring the correct rib count is crucial for proper engagement with the pulleys.
- Material: Usually made from EPDM (Ethylene Propylene Diene Monomer) rubber for durability and resistance to heat, oil, and cracking.
The main parts involved in the serpentine belt system include:
- Crankshaft Pulley: The driving pulley, connected to the crankshaft and transferring engine power to the belt.
- Alternator Pulley: Powers the alternator, which charges the battery and provides electrical power to the vehicle.
- Power Steering Pump Pulley: Drives the power steering pump, which assists in steering.
- Air Conditioning Compressor Pulley: Engages and disengages the A/C compressor, responsible for cooling the cabin.
- Water Pump Pulley: Drives the water pump, which circulates coolant through the engine to regulate temperature.
- Idler Pulley(s): Smooth pulleys that guide the belt and maintain tension.
- Tensioner Pulley: A spring-loaded pulley that automatically maintains the correct tension on the belt. The tensioner pulley is critical; a worn tensioner can cause belt slippage and noise.
Symbols and Diagram Conventions
Understanding the symbols used in the serpentine belt diagram is crucial for accurate interpretation:
- Solid Lines: Represent the path of the serpentine belt. The width of the line doesn't usually have a specific meaning.
- Arrows: Indicate the direction of belt rotation. Pay close attention to these arrows to ensure proper routing.
- Circles/Discs: Represent the pulleys. Different sizes might indicate pulley diameter, but this isn't always consistent.
- Text Labels: Identify each pulley (e.g., "Alternator," "Crankshaft," "Tensioner").
- Schematic Representation: The diagram is a simplified representation of the actual engine layout. It may not perfectly reflect the physical location of components.
- Colors (If Present): While not always present, colors might be used to highlight specific sections or components. A legend should explain the meaning of each color.
The diagram is a flat
representation of a 3D system. Imagine the belt wrapping around these components to truly understand the routing.
How It Works
The serpentine belt system is a relatively simple yet crucial power transmission system. The crankshaft, driven by the engine's combustion process, rotates the crankshaft pulley. This pulley, in turn, drives the serpentine belt. The belt then transfers rotational force to all the other pulleys connected to it. Each pulley drives its respective accessory.
The tensioner pulley plays a vital role in maintaining consistent belt tension. It automatically adjusts for belt stretch and wear, ensuring optimal power transfer. Without proper tension, the belt can slip, leading to reduced accessory performance and potential damage.
The order in which the belt wraps around the pulleys is carefully designed to maximize efficiency and minimize belt wear. The diagram illustrates this specific routing, ensuring that each accessory receives the necessary power.
Real-World Use and Basic Troubleshooting
Here's how you can use the serpentine belt diagram for real-world troubleshooting:
- Squealing Noise: A common symptom of a worn or slipping belt. Refer to the diagram to inspect the belt's condition and tension. Check for cracks, glazing, or missing ribs. Ensure the tensioner pulley is functioning correctly. Belt dressing is generally NOT recommended; it's a temporary fix that often masks underlying problems.
- Accessory Failure: If the power steering is not working, consult the diagram to verify that the belt is properly routed around the power steering pump pulley. Check the belt for slippage or breakage.
- Visual Inspection: Regularly inspect the belt for signs of wear and tear. Compare the actual belt routing to the diagram to ensure it's correct.
- Belt Replacement: When replacing the belt, use the diagram as your guide. Follow the routing precisely to avoid damaging the accessories or the belt itself. Consider taking pictures before removing the old belt, just in case.
- Tensioner Check: When replacing the belt, check the tensioner pulley for play, noise or free movement. Replace the tensioner at the same time as the belt for best results.
A slipping belt can cause the alternator to not properly charge the battery which will lead to starting issues. The A/C compressor won't cool effectively. The power steering pump will be less effective. And, the water pump will not cool the engine efficiently possibly leading to overheating and major engine damage.
Safety Considerations
Working with the serpentine belt system involves inherent risks. Always observe the following safety precautions:
- Disconnect the Battery: Before working on any part of the engine, disconnect the negative battery cable to prevent accidental electrical shock.
- Engine Off and Cool: Ensure the engine is completely off and cool before attempting any repairs. The engine and exhaust components can become extremely hot.
- Moving Parts: Be extremely cautious of moving parts. Keep your hands, clothing, and tools clear of the belt and pulleys when the engine is running.
- Tensioner Spring: The tensioner pulley is spring-loaded and can snap back with considerable force. Use the appropriate tools to relieve tension safely.
- Eye Protection: Wear safety glasses to protect your eyes from debris.
- Belt Dust: The brake dust created by belts can be harmful. Wear a mask when inspecting and handling worn belts.
- Proper Tools: Use the correct tools for the job to avoid damage to the belt, pulleys, or other components.
The tensioner has a lot of stored energy so be very careful when removing or installing a new belt and tensioner. The alternator, A/C, and water pump pulleys can be hot depending on how long the car has been running. Be careful.
The serpentine belt diagram for your 2007 Buick LaCrosse is an invaluable tool for maintenance, repair, and understanding your vehicle's accessory drive system. By understanding the diagram's symbols, components, and operating principles, you can confidently troubleshoot issues, perform replacements, and ensure the long-term reliability of your engine's accessories.
We have the full resolution diagram available for download. (Link to diagram download goes here).