Serpentine Belt Diagram For A 2001 Ford Taurus
Alright, let's dive into the serpentine belt diagram for your 2001 Ford Taurus. This is crucial information whether you're tackling a repair, diagnosing a weird noise, or just expanding your automotive knowledge. A clear understanding of this diagram can save you time, money, and potential headaches. We're going to break it down like I would for a seasoned DIYer, so get ready for some tech talk.
Purpose of the Serpentine Belt Diagram
The serpentine belt diagram isn't just a pretty picture. It's your roadmap for replacing or inspecting the serpentine belt, also known as the accessory drive belt. This belt is responsible for powering several critical engine components. Knowing the correct routing is paramount. Incorrect routing can lead to component failure, belt damage, and potentially serious engine problems. It also allows you to identify the various components driven by the belt and their relative positions.
- Repair and Replacement: The primary purpose is to ensure you reinstall a new belt correctly after removing the old one. For many, a photograph before removal is sufficient, but having the diagram guarantees accuracy.
- Diagnosis: By referencing the diagram, you can quickly identify which accessory a squealing belt might be affecting. For example, a consistent squeal that changes with steering input could indicate an issue with the power steering pump.
- Education: Understanding the belt routing teaches you about the layout of your engine and the interconnectedness of its systems.
Key Specs and Main Parts
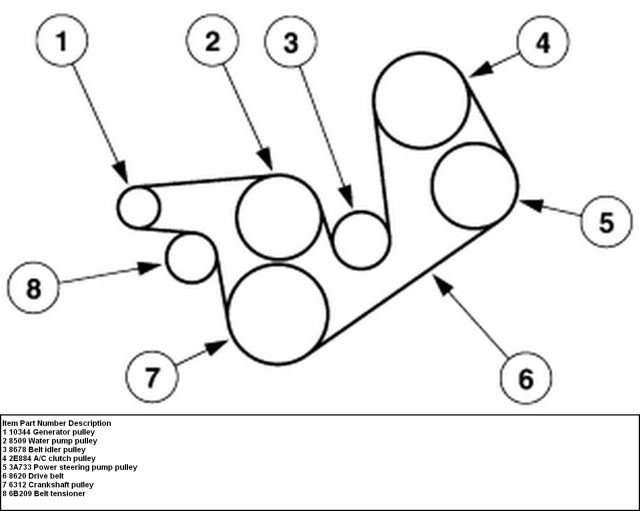
The 2001 Ford Taurus, with its 3.0L Vulcan or Duratec engine, uses a specific serpentine belt. While lengths may vary slightly depending on optional equipment (like AC), understanding the components remains the same.
Here's a breakdown of the key parts involved:
- Serpentine Belt: The main component; a long, continuous belt made of reinforced rubber. It transfers rotational power from the crankshaft to the various accessories.
- Crankshaft Pulley (Harmonic Balancer): Located at the bottom of the engine, this pulley is driven directly by the engine's crankshaft. It's the origin of the power that drives the serpentine belt. The harmonic balancer also dampens torsional vibrations from the crankshaft.
- Alternator: This component charges the battery and powers the electrical system when the engine is running.
- Power Steering Pump: Provides hydraulic assistance for steering, making it easier to turn the wheel.
- Air Conditioning Compressor (if equipped): Compresses the refrigerant for the air conditioning system.
- Water Pump: Circulates coolant throughout the engine to prevent overheating.
- Idler Pulley(s): Smooth, non-driven pulleys that guide the belt around the various components and maintain proper tension and alignment.
- Tensioner Pulley: A spring-loaded pulley that automatically maintains the correct tension on the serpentine belt. This is crucial for optimal performance and belt life. A failing tensioner can cause belt slippage, noise, and premature wear.
Understanding Serpentine Belt Diagram Symbols
Diagrams can seem cryptic at first, but once you understand the basics, they become much easier to decipher. Here's what to look for:
- Solid Lines: Typically represent the belt itself, showing the path it takes around the various pulleys. The thickness of the line isn't usually significant.
- Pulleys: Circles represent the pulleys. Some diagrams might differentiate between smooth pulleys (like idler pulleys) and grooved pulleys (like the crankshaft pulley or the alternator pulley). The direction of rotation may be indicated by an arrow within the circle.
- Arrows: Indicate the direction of belt travel around each pulley. Pay close attention to these, as they are crucial for ensuring correct routing.
- Component Labels: Each pulley will be labeled with the corresponding component it drives (e.g., ALT for alternator, P/S for power steering, A/C for air conditioning).
- Tensioner Indicator: The tensioner pulley is often indicated with a spring symbol or a note indicating its function. Some diagrams will show the direction in which to move the tensioner to release tension for belt removal.
How It Works: The Serpentine Belt System
The serpentine belt system is a simple yet crucial power transmission system. The crankshaft, driven by the engine's combustion process, spins the crankshaft pulley. This rotational force is then transferred to the serpentine belt. The belt, in turn, wraps around and drives all the other pulleys connected to essential accessories. The tensioner pulley ensures the belt remains taut, preventing slippage and maintaining optimal performance of all the driven components. Without proper tension, the alternator won't charge correctly, the power steering will be weak, the A/C won't cool, and the water pump won't circulate coolant effectively.
Real-World Use: Basic Troubleshooting Tips
Okay, let's get practical. Here are some common serpentine belt issues and how the diagram can help you diagnose them:
- Squealing Noise: A squealing belt often indicates slippage. Check the belt for cracks, glazing (a shiny, smooth surface), or wear. Also, inspect the tensioner pulley to ensure it's functioning correctly. A weak tensioner can cause slippage. Refer to the diagram to identify each pulley and visually inspect them for damage.
- Cracked or Frayed Belt: A cracked or frayed belt needs immediate replacement. The diagram helps you determine the correct routing for the new belt.
- Accessory Malfunction: If an accessory like the alternator or power steering pump isn't working correctly, check the belt routing and tension first. A loose or incorrectly routed belt could be the culprit.
- Belt Jumping Off: This can be caused by a misaligned pulley, a worn belt, or a faulty tensioner. Use the diagram to visually inspect the alignment of each pulley.
When diagnosing issues, always start with a visual inspection. Look for signs of wear, damage, or misalignment. If you're unsure about the condition of the belt or tensioner, it's best to replace them preventatively.
Safety Considerations
Working on the serpentine belt system can be risky if you're not careful. Here are some crucial safety precautions:
- Disconnect the Battery: Always disconnect the negative battery terminal before working on any electrical components, including the alternator. This prevents accidental shocks.
- Engine Off and Cool: Never work on the serpentine belt system while the engine is running or hot. The moving belt and hot engine components can cause serious injury.
- Keep Hands and Clothing Clear: Be extremely cautious when working near the belt. Loose clothing, hair, or tools can get caught in the moving belt, leading to severe injury.
- Eye Protection: Wear safety glasses to protect your eyes from debris.
- The Crankshaft Pulley: Be especially careful around the crankshaft pulley. This component has high rotational inertia and can cause serious injury if it suddenly starts spinning.
The spring-loaded tensioner can also be a potential hazard. Always use the correct tool to release the tension and avoid getting your fingers caught in the mechanism.
Remember, if you're not comfortable performing any of these procedures, it's always best to consult a qualified mechanic.
Understanding the serpentine belt diagram for your 2001 Ford Taurus is a valuable skill that empowers you to perform basic maintenance and troubleshooting. By following the steps outlined in this article and prioritizing safety, you can confidently tackle serpentine belt-related issues.
We have the complete, high-resolution diagram available for download. Contact us, and we will provide the file to you!