
Serpentine Belt Diagram Ford Windstar
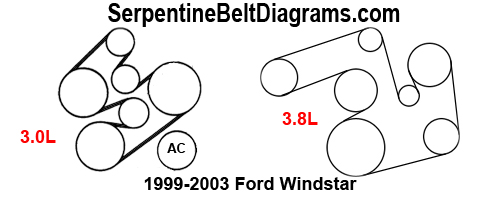
Welcome, fellow gearheads! Today, we're diving deep into the serpentine belt system of the Ford Windstar. This unassuming rubber belt is a critical component, responsible for powering numerous engine accessories. Understanding its routing and how to interpret the serpentine belt diagram is essential for efficient maintenance, troubleshooting, and even certain engine modifications. We'll break down everything from its purpose and key components to practical troubleshooting and safety tips.
Purpose of the Serpentine Belt Diagram
The serpentine belt diagram is essentially a roadmap for your Windstar's accessory drive system. It visually represents how the serpentine belt is routed around the various pulleys driven by the crankshaft. This diagram is invaluable for:
- Repairing or replacing the serpentine belt: The most obvious use. It ensures you install the new belt correctly.
- Identifying potential issues: A misaligned belt or worn pulleys can often be diagnosed by visually comparing the actual belt routing to the diagram.
- Replacing or troubleshooting accessories: If you're working on the alternator, power steering pump, A/C compressor, or other driven components, the diagram helps you understand their relationship within the drive system.
- Learning engine mechanics: For the aspiring mechanic, understanding the serpentine belt system is a fundamental step in comprehending engine operation.
Without the diagram, replacing a serpentine belt can become a frustrating and potentially damaging ordeal. Incorrect routing can lead to belt slippage, accessory failure, and even catastrophic engine damage.
Key Specs and Main Parts
Before we dissect the diagram, let's familiarize ourselves with the major components involved in the serpentine belt system. The exact configuration may vary slightly depending on the year and engine of your Windstar, but the core components remain consistent.
- Crankshaft Pulley (or Damper): The heart of the system. Driven directly by the engine, it provides the rotational force to power all other accessories. This pulley has a harmonic balancer, which helps dampen engine vibrations.
- Alternator Pulley: The alternator generates electrical power for the vehicle.
- Power Steering Pump Pulley: Powers the hydraulic system that provides power assist to the steering.
- Air Conditioning (A/C) Compressor Pulley: Compresses the refrigerant used in the A/C system.
- Idler Pulley(s): Smooth, non-driven pulleys that guide the belt and maintain proper tension. They help navigate the belt around other components.
- Tensioner Pulley: A spring-loaded pulley that maintains consistent tension on the serpentine belt. This is crucial for proper operation and prevents slippage. Failure to properly release the tensioner during belt removal/installation can cause serious injury.
- Serpentine Belt: A single, continuous belt made of reinforced rubber that transmits power to all the driven components. Its ribbed design provides excellent grip.
Serpentine belts are specified by their length and number of ribs. The correct belt for your Windstar is crucial for proper tension and accessory operation. Always consult your owner's manual or a reputable parts supplier for the correct part number.
Decoding the Serpentine Belt Diagram: Symbols and Conventions
Serpentine belt diagrams use standardized symbols to represent the different components. Here's a breakdown:
- Solid Lines: Represent the path of the serpentine belt. The direction of the line indicates the direction of belt travel.
- Circles/Ovals: Represent pulleys. The size of the circle may or may not be proportional to the actual pulley size.
- Labels: Each pulley is usually labeled with an abbreviation indicating its function (e.g., ALT for alternator, P/S for power steering, A/C for A/C compressor, IDL for idler, TEN for tensioner, CRANK for crankshaft).
- Arrows: May indicate the direction of rotation of the pulley. This is important for understanding how the belt transmits power.
- Tensioner Symbol: The tensioner pulley is often depicted with a spring symbol, representing its spring-loaded mechanism.
While color coding isn't typically used on serpentine belt diagrams, some aftermarket diagrams might use different colors to highlight specific sections or components. The key is to always refer to the diagram's legend or notes to understand the specific conventions used.
How the Serpentine Belt System Works
The serpentine belt system operates on a relatively simple principle: power transmission through friction. The crankshaft pulley, driven by the engine, rotates, imparting its rotational force to the serpentine belt. The belt, in turn, wraps around the other pulleys, causing them to rotate and drive their respective accessories.
The tensioner pulley plays a crucial role in maintaining optimal belt tension. As the belt wears or stretches over time, the tensioner automatically adjusts to compensate, ensuring consistent contact between the belt and pulleys. This prevents belt slippage, which can lead to reduced accessory performance and premature belt wear.
The routing of the serpentine belt is carefully designed to maximize contact area and minimize slippage. Notice how the belt often wraps around pulleys at different angles to increase grip. The idler pulleys are strategically placed to guide the belt around obstructions and maintain proper alignment.
Real-World Use: Basic Troubleshooting Tips
A serpentine belt diagram can be your best friend when troubleshooting common belt-related issues:
- Squealing or Chirping Noise: This is often a sign of belt slippage. Check the belt tension. If the tensioner is functioning correctly, the belt may be worn or glazed. Compare the belt's routing to the diagram to ensure it's correctly installed. Also, inspect the pulleys for damage or contamination. A small amount of coolant or oil on the belt can cause significant slippage.
- Belt Damage (Cracks, Fraying, Missing Ribs): Inspect the belt regularly for signs of wear and tear. Replace the belt immediately if you notice any significant damage. Using the diagram, visually check the alignment of all pulleys; misalignment will cause premature and uneven wear.
- Accessory Failure: If an accessory isn't functioning correctly, check the serpentine belt. A broken or slipped belt can prevent the accessory from receiving power. Use the diagram to verify the belt is routed to the accessory in question.
- Visual Inspection Against the Diagram: This is a powerful diagnostic tool. Ensure the belt follows the correct path around each pulley as shown in the diagram. Look for any deviations, such as the belt running off-center on a pulley or rubbing against other components.
Remember, preventative maintenance is key. Regularly inspect your serpentine belt and replace it according to the manufacturer's recommended interval.
Safety Considerations
Working on the serpentine belt system involves several safety hazards:
- Rotating Parts: The engine must be OFF and the key removed from the ignition before working on the serpentine belt. The crankshaft pulley and other accessories rotate at high speeds when the engine is running, posing a significant risk of injury.
- Spring-Loaded Tensioner: The tensioner is under considerable spring pressure. When releasing the tensioner, use the correct tool and technique to avoid injury. Always wear safety glasses to protect your eyes.
- Hot Engine Components: The engine and exhaust system can remain hot for some time after the engine is shut off. Allow the engine to cool completely before working on the serpentine belt system.
Specifically, the tensioner is a common cause of injuries when replacing the belt. Incorrect use of the tensioner tool or failure to properly secure it can result in the tool slipping and causing injury. Always refer to your vehicle's service manual for specific instructions on releasing the tensioner. If you're not comfortable performing this task, seek the assistance of a qualified mechanic.
We hope this article has provided you with a comprehensive understanding of the Ford Windstar's serpentine belt system and the importance of the serpentine belt diagram. With this knowledge, you'll be better equipped to maintain, troubleshoot, and repair your vehicle's accessory drive system.
We have the file and diagram in PDF format, simply contact us to request to download it.