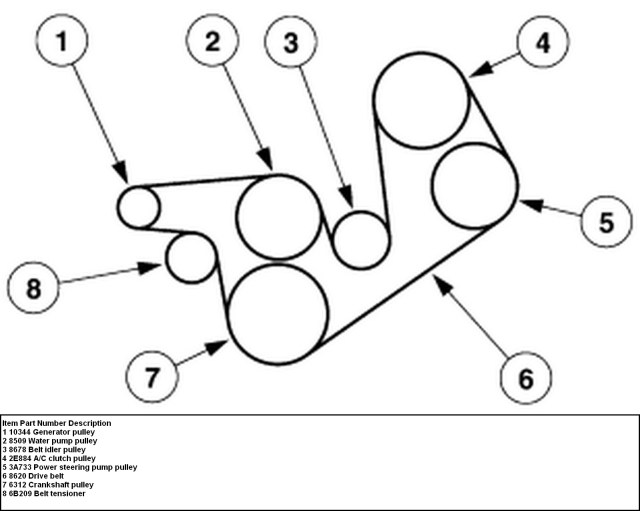
Serpentine Belt Routing Diagram 2001 Ford Taurus
Alright, let's dive into the serpentine belt routing diagram for your 2001 Ford Taurus. This is a crucial piece of information, whether you're tackling routine maintenance, diagnosing a squealing noise, or just trying to understand how the various accessories in your engine compartment are driven. Knowing the correct belt path is absolutely essential. We're assuming you're comfortable wrenching on your car but might need a refresher or some extra clarity. We'll cover the purpose, key components, diagram symbols, how it all works, some real-world troubleshooting, and of course, safety considerations. And the best part? We've got the actual diagram available for download (link at the end of this article!).
Purpose of the Serpentine Belt Diagram
Why bother with a serpentine belt diagram? The answer is multifaceted. First and foremost, it's indispensable when replacing the serpentine belt. Installing the belt incorrectly can lead to serious problems, including accessory failure, engine overheating, and even belt breakage, potentially causing further damage. A correct serpentine belt diagram ensures the belt follows the proper path around all the pulleys, maintaining correct tension and driving all the components at the designed speed.
Beyond replacement, the diagram is helpful for:
- Troubleshooting Accessory Issues: If your air conditioning isn't blowing cold, your power steering feels weak, or your alternator isn't charging the battery, the diagram helps you confirm that the belt is properly engaged with each component.
- Inspection and Maintenance: Regular inspection involves checking the belt for wear, cracks, or fraying. The diagram helps you identify each pulley and its corresponding accessory, making it easier to systematically inspect the entire system.
- General Engine Understanding: Studying the diagram provides valuable insight into the layout and operation of your engine. Understanding the belt's path will show you the location and purpose of the pulleys and attached components.
- Preparation for Other Repairs: Knowing the serpentine belt routing makes removing or adjusting accessories far easier. Whether you're replacing an alternator or A/C compressor, you'll need to know how to remove and reinstall the belt.
Key Specs and Main Parts of the 2001 Ford Taurus Serpentine Belt System
Let's break down the key components typically found in the 2001 Ford Taurus serpentine belt system. Keep in mind that the exact configuration might vary slightly depending on the specific engine (typically either the 3.0L Vulcan or the 3.0L Duratec V6).
- Crankshaft Pulley (Harmonic Balancer): This is the driving force. It's connected directly to the crankshaft and is the primary pulley that spins the serpentine belt. It's crucial that the harmonic balancer is in good condition.
- Alternator Pulley: Powers the electrical system. A failing alternator pulley (or the alternator itself) can cause belt slippage or noise.
- Power Steering Pump Pulley: Provides hydraulic assistance for steering. A worn or leaking power steering pump can put extra strain on the belt.
- Air Conditioning Compressor Pulley: Engages and disengages to cool the cabin air. This pulley contains a clutch mechanism which can seize up.
- Idler Pulley(s): These smooth, unpowered pulleys provide additional belt support and routing. They're essential for guiding the belt around the various accessories and maintaining optimal tension.
- Tensioner Pulley: This spring-loaded pulley maintains the correct tension on the belt. A faulty tensioner can cause belt slippage, noise, and premature belt wear. The tensioner allows for easy belt removal and installation. The condition of the tensioner is critical to proper belt function.
- Water Pump Pulley: Circulates coolant through the engine to maintain proper temperature.
- Serpentine Belt: The "star" of the show. Made from reinforced rubber, this belt transmits rotational power from the crankshaft to all the accessories. The belt specification, including its length and number of ribs, is crucial for compatibility and proper function. A typical 2001 Taurus might use a belt around 90-93 inches in length, but always verify the correct spec for *your* specific vehicle.
Understanding the Serpentine Belt Routing Diagram Symbols
Serpentine belt diagrams use specific symbols to represent the components and the belt's path. Knowing these symbols is key to interpreting the diagram correctly.
- Solid Lines: Represent the path of the serpentine belt itself. The line shows the belt's continuous loop around all the pulleys.
- Arrows: Indicate the direction of belt rotation. Pay close attention to these arrows to ensure you're routing the belt in the correct direction around each pulley. If the arrow points clockwise, the pulley rotates clockwise.
- Circles or Rounded Shapes: Represent the pulleys. Each pulley will usually be labeled with an abbreviation indicating the component it drives (e.g., ALT for alternator, P/S for power steering, A/C for air conditioning).
- Shaded or Highlighted Areas: May indicate the grooved (ribbed) side of the belt making contact with the pulley. This clarifies which side of the belt should be in contact with which pulley.
- Tensioner Symbol: Usually depicted as a spring-loaded arm with a pulley. It's often labeled with "Tensioner" or a similar abbreviation. It's also often highlighted because knowing its location is key to easy belt removal and installation.
- Idler Pulley Symbol: Plain circles with the label "Idler" or a variant.
Color coding is sometimes used to differentiate between the belt and the pulleys, but generally on simplified diagrams. The most important thing is to clearly identify the components and the belt's direction of travel.
How the Serpentine Belt System Works
The serpentine belt system is a relatively simple, yet critical, mechanism. The crankshaft provides the rotational power. As the crankshaft spins, it turns the crankshaft pulley. The serpentine belt, wrapped tightly around the crankshaft pulley, is forced to rotate. This rotation is then transferred to all the other pulleys in the system, driving the corresponding accessories (alternator, power steering pump, A/C compressor, water pump). The tensioner pulley maintains constant pressure on the belt, ensuring sufficient grip on all the pulleys to prevent slippage. The idler pulley helps guide the belt. All working in tandem, this system efficiently powers several critical vehicle components from a single belt driven by the engine's crankshaft.
Real-World Use and Basic Troubleshooting
Let's consider some practical scenarios where the serpentine belt diagram comes in handy:
- Squealing Noise: A common symptom of a worn or loose serpentine belt. Check the belt for cracks, glazing, or missing ribs. Use the diagram to verify the belt is properly routed and that the tensioner is applying sufficient force. If the tensioner is weak, replace it along with the belt.
- Accessory Failure: If your A/C stops working or your power steering fails, check the serpentine belt first. The diagram will help you quickly confirm that the belt is properly engaged with the affected accessory's pulley. It is possible that the pulley has become separated from the device it is intended to drive.
- Belt Slippage: Evidenced by a burning rubber smell and/or a loss of accessory function, this indicates that the belt isn't gripping the pulleys properly. This could be due to a worn belt, a faulty tensioner, or a contaminated pulley (e.g., oil leak). Clean pulleys with brake cleaner (with the engine OFF and COOL, of course!).
- Belt Coming Off: If the belt repeatedly jumps off the pulleys, it's a serious problem. It could indicate a misaligned pulley, a damaged pulley, or a faulty tensioner. Check all pulleys for wobbling or excessive play. A bent pulley bracket can also cause this.
Remember: Always consult the diagram *before* replacing the serpentine belt. A digital photo of the old belt's routing is also highly recommended!
Safety Considerations
Working on the serpentine belt system can be dangerous if you're not careful. Here are some key safety precautions:
- Disconnect the Negative Battery Terminal: This prevents accidental starting of the engine while you're working. Always disconnect the negative terminal first.
- Engine MUST Be Cool: Never work on the engine when it's hot. Wait for it to cool down completely to avoid burns.
- Keep Hands and Tools Clear of Moving Parts: Obviously, *never* start the engine with your hands or tools near the serpentine belt or pulleys. Even a brief brush against a moving belt can cause serious injury.
- Beware of the Tensioner: The tensioner pulley is under spring tension. Use the appropriate tool (usually a wrench or socket) to relieve the tension *slowly* and *carefully*. Releasing the tension abruptly can cause the tool to slip and result in injury.
- Wear Safety Glasses: Protect your eyes from debris and potential projectiles.
The serpentine belt system drives some vital accessories; a failure of one of them can cause loss of control of the vehicle, or at least render it inoperable. The cooling system and the power steering system are two systems to which a driver must pay close attention.
By using this guide in conjunction with the correct diagram, you’ll be able to perform all of the needed tasks on the serpentine belt system on your 2001 Ford Taurus.