
Shovelhead Starter Relay Wiring Diagram
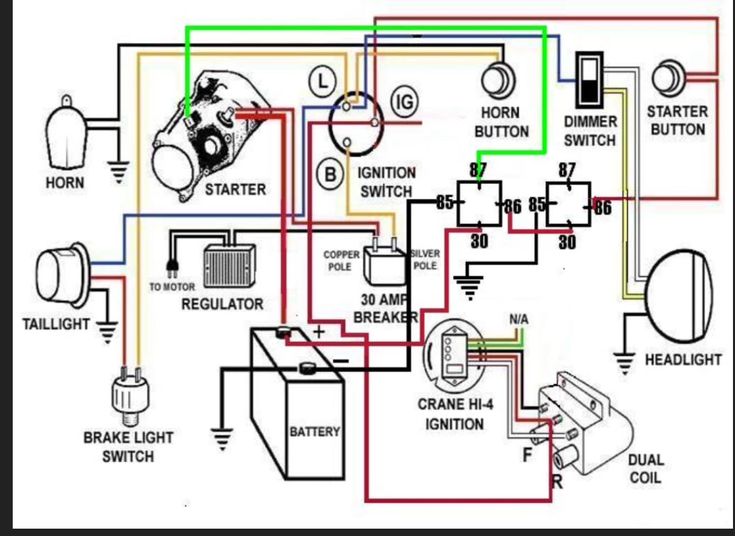
Alright, let's dive into the often-overlooked but critical component of your vintage Harley: the Shovelhead starter relay wiring diagram. Whether you're wrestling with a stubborn starter, performing routine maintenance, or just expanding your knowledge of these classic machines, understanding this diagram is essential. It's the roadmap to getting your Shovelhead reliably roaring to life.
Purpose and Why It Matters
Why bother with a wiring diagram? Simple. It's your lifeline for diagnosing electrical problems. A misbehaving starter can stem from a multitude of issues – a weak battery, corroded connections, a faulty solenoid, or a broken wire. Without a diagram, you're just stabbing in the dark. With it, you can systematically trace the circuit, identify the culprit, and get your bike back on the road. Furthermore, if you're planning any modifications or upgrades to your electrical system, understanding the existing wiring is crucial to prevent frying something expensive or causing a bigger problem down the road.
Key Specs and Main Parts of the Shovelhead Starter Relay Circuit
The Shovelhead starter circuit, while relatively simple compared to modern systems, comprises several key components. Let's break them down:
- Battery: The heart of the electrical system, providing the initial power. Expect a 12-volt lead-acid battery in good condition.
- Ignition Switch: Controls the flow of power to the starter circuit (and other circuits, of course).
- Starter Button: The momentary switch that, when pressed, completes the circuit to the starter relay.
- Starter Relay (Solenoid): A crucial component. This is an electromagnetic switch that uses a small current from the starter button to switch a much larger current from the battery to the starter motor. This protects the smaller starter button wiring from being overloaded.
- Starter Motor: The electric motor that spins the engine for starting.
- Battery Cables: Heavy-gauge cables delivering high current from the battery to the starter and frame.
- Wiring Harness: The bundle of wires connecting all components. Keep an eye out for brittle insulation or frayed wires.
- Fuses/Circuit Breakers: Protection devices against overcurrent. Crucial for safety!
Specific wire gauges vary, but the main power cables to the starter motor will be thick – typically 4 or 6 gauge – to handle the high amperage draw. The wiring from the starter button to the relay can be significantly smaller, like 16 or 18 gauge.
Decoding the Symbols: Lines, Colors, and Icons
A wiring diagram is a visual language. Let's translate:
- Lines: Represent wires. The thicker the line, generally the larger the wire gauge.
- Colors: Each color corresponds to a specific wire color in your harness. Common colors include red (battery positive), black (ground), yellow, blue, and green for various circuits. The diagram will typically have a legend explaining the color codes.
- Icons: These are simplified representations of electrical components. Look for standard symbols for:
- Battery (series of short and long parallel lines)
- Switch (a break in a line that can be closed)
- Relay (a coil and a switch contact)
- Motor (a circle with an "M" inside)
- Fuse (a zig-zag line enclosed in a rectangle)
- Ground (three lines decreasing in length, pointing downwards)
- Numbers/Letters: Often used to label wires or components, making it easier to trace specific parts of the circuit.
Understanding these symbols is fundamental to interpreting the diagram. Familiarize yourself with them before you start troubleshooting.
How the Shovelhead Starter Relay Circuit Works
Here’s the sequence of events:
- Ignition On: Turning the ignition switch to the "on" position allows power from the battery to flow to the ignition system and other circuits. It may or may not directly power the starter circuit, depending on the specific model year.
- Starter Button Pressed: When you press the starter button, you complete a circuit that allows a small amount of current to flow from the battery, through the ignition switch (if applicable), through the starter button, and into the coil of the starter relay (solenoid).
- Relay Activation: The current flowing through the relay coil creates an electromagnetic field. This field pulls a movable contact inside the relay, closing the high-current circuit between the battery and the starter motor.
- Starter Motor Engages: With the high-current circuit complete, the starter motor receives power and begins to spin. The starter motor's gear engages with the engine's flywheel (or starter clutch), cranking the engine.
- Engine Starts: Once the engine starts, you release the starter button, breaking the circuit to the relay coil. The relay contact opens, disconnecting the starter motor from the battery.
The starter relay acts as an amplifier, using a small current from the starter button to control a much larger current needed to power the starter motor. This prevents the small starter button contacts from burning out due to the high amperage draw.
Real-World Use: Basic Troubleshooting Tips
Let's say your Shovelhead won't start. Here's how the wiring diagram can help:
- No Crank, No Click: Check the battery voltage first! If it's low, charge or replace the battery. Then, inspect the battery cables for corrosion or loose connections. Use the diagram to trace the power flow from the battery to the ignition switch and then to the starter button. Use a multimeter to check for voltage at each point. If you're not getting voltage to the starter button, the ignition switch might be faulty, or there's a break in the wiring.
- Clicking Sound Only: This usually indicates a problem with the starter relay or a weak battery. Again, check the battery voltage. If the battery is good, the relay might be faulty. You can try bypassing the relay (carefully!) by using a jumper cable to connect the two large terminals on the relay. If the starter engages, the relay is bad. Replace it. Be VERY careful when doing this – use proper insulated tools.
- Starter Motor Spins But Doesn't Engage: This is likely a mechanical issue with the starter motor or the starter clutch, not an electrical one. But, use the diagram to confirm that the starter motor is receiving full voltage when the button is pressed.
- Fuse Keeps Blowing: This indicates a short circuit. Use the diagram to isolate the circuit where the fuse is blowing. Visually inspect the wiring for damaged insulation or wires touching the frame.
Remember to always disconnect the battery's negative terminal before working on the electrical system to prevent accidental shorts.
Safety Considerations: Highlighting Risky Components
The Shovelhead starter circuit carries high amperage, making it potentially dangerous. Here are some safety precautions:
- Battery: Lead-acid batteries contain corrosive acid and can produce explosive gases. Wear eye protection and avoid sparks near the battery.
- High-Current Cables: The battery cables and the wires to the starter motor carry significant current. Accidental shorts can cause severe burns or even fires. Disconnect the battery before working on these components.
- Relay Bypass: Bypassing the starter relay for testing should only be done with extreme caution. Use insulated tools and avoid touching any metal parts while the circuit is energized. A direct short to ground from the battery positive terminal is VERY dangerous.
- Fuses: Never replace a blown fuse with one of a higher amperage rating. This can overload the circuit and cause a fire. Always use the correct fuse size as specified in the service manual.
Always consult a qualified mechanic if you're uncomfortable working on the electrical system or if you encounter problems you can't diagnose.
We have a detailed Shovelhead starter relay wiring diagram available for download. Having a clear, accurate diagram is the single most valuable tool you can have when working on your bike’s electrical system. Just use the contact form to request the file. Safe wrenching!