
Silverado Trailer Plug Wiring Diagram
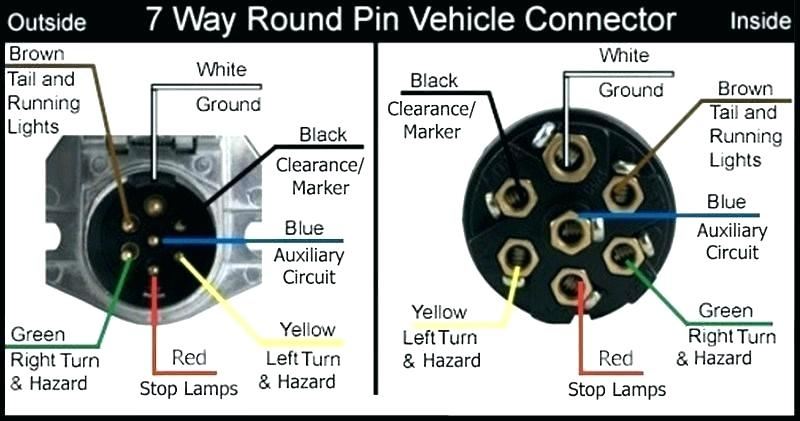
Understanding the Silverado trailer plug wiring diagram is crucial for any DIY enthusiast or mechanic working with trailer connections on these popular trucks. Whether you're performing routine maintenance, diagnosing electrical issues, adding aftermarket lighting, or even just trying to ensure your trailer lights are functioning correctly, this guide will provide a comprehensive overview.
Why Bother with the Wiring Diagram?
The Silverado trailer plug wiring diagram is essentially a roadmap for the electrical connections between your truck and the trailer. Knowing how the wires are routed and what each one does allows you to:
- Troubleshoot Lighting Issues: Pinpoint the source of problems like flickering lights, no brake lights, or a malfunctioning turn signal.
- Safely Install Aftermarket Accessories: Connect electric brake controllers, auxiliary lighting, or charging systems without risking shorts or damage to your truck's electrical system.
- Perform Repairs: Fix damaged wires or replace a faulty trailer plug with confidence.
- Understand System Operation: Gain a deeper understanding of how your trailer lights and braking systems interact with your Silverado.
- Avoid Costly Shop Visits: Armed with this knowledge, you can tackle many trailer wiring issues yourself, saving time and money.
Key Specs and Main Parts of the Silverado Trailer Plug
Silverado trucks typically utilize a 7-way round trailer connector, also known as a 7-pin connector. While older models might feature a 4-way flat connector for basic lighting, the 7-way is the standard for more modern applications, providing additional functionality like electric brakes and auxiliary power.
Main Components:
- 7-Way Round Connector (RV Blade Style): The physical interface between the truck and the trailer. It consists of seven pins or blades arranged in a circular pattern.
- Wiring Harness: The collection of wires that connect the trailer plug to the truck's electrical system.
- Fuses and Relays: Protective devices that prevent damage from overloads or short circuits in the trailer wiring. These are typically located in the truck's fuse box under the hood or inside the cabin. Knowing their location is critical.
- Electric Brake Controller (Optional): If your trailer has electric brakes, an electric brake controller is needed to proportionally apply the brakes. The wiring diagram will show how this controller integrates with the trailer plug.
Key Electrical Specifications:
- Voltage: Typically 12V DC (Direct Current).
- Amperage: Varies depending on the circuit (e.g., taillights, brakes, auxiliary power). The wiring diagram will often indicate the amperage rating for each circuit.
- Wire Gauge: The thickness of the wires is important. Thicker wires (lower gauge number) can handle more current. Using the correct wire gauge is vital for safety and performance.
Decoding the Symbols: A Wiring Diagram Primer
Understanding the symbols used in the Silverado trailer plug wiring diagram is crucial for interpreting the information accurately. Here's a breakdown of common symbols:
- Lines: Represent wires. A solid line indicates a direct connection, while a dashed line might indicate a shielded wire or a connection that's only active under certain conditions.
- Color Codes: Each wire is typically identified by a color code. Common colors include white (ground), brown (taillights), yellow (left turn/brake), green (right turn/brake), blue (electric brake), black (12V power), and red (auxiliary). The diagram will include a key that maps each color to its function.
- Connector Symbols: Represent the physical connector (the 7-way plug itself). The pins or blades are usually numbered or labeled to correspond with the wiring.
- Ground Symbol: Resembles an upside-down tree. Indicates a connection to the vehicle's chassis ground.
- Fuse Symbol: A wavy line inside a rectangle. Indicates a fuse. The amperage rating of the fuse is usually shown nearby.
- Relay Symbol: Consists of a coil and a switch. Indicates a relay, which is an electrically operated switch.
Important Color Code Note: While generally standardized, wire color codes can vary slightly depending on the year and model of your Silverado. Always refer to the specific wiring diagram for your vehicle.
How It Works: A Circuit-by-Circuit Explanation
The Silverado trailer plug provides several essential electrical circuits to operate the trailer's lights and brakes. Here's a basic overview of each circuit:
- Ground (White Wire): Provides a return path for all circuits. A good ground connection is essential for proper operation.
- Taillights (Brown Wire): Powers the trailer's taillights, which illuminate when the truck's headlights are on.
- Left Turn/Brake (Yellow Wire): Powers the trailer's left turn signal and brake lights.
- Right Turn/Brake (Green Wire): Powers the trailer's right turn signal and brake lights.
- Electric Brake (Blue Wire): Sends a proportional voltage signal to the trailer's electric brakes, allowing them to brake smoothly and effectively. This circuit is controlled by the electric brake controller in the truck.
- 12V Power (Black Wire): Provides a constant 12V power supply to the trailer. This can be used to charge a trailer battery, power interior lights, or operate other accessories. This circuit MUST be protected with a fuse.
- Auxiliary (Red Wire): This circuit can be used for a variety of purposes, such as backup lights or a separate accessory circuit.
The electric brake circuit is arguably the most complex. The electric brake controller senses the truck's braking action and sends a proportional voltage signal to the trailer brakes. The harder you brake, the more voltage is sent, and the harder the trailer brakes engage.
Real-World Use: Basic Troubleshooting Tips
Here are some basic troubleshooting tips for common trailer wiring issues:
- No Lights at All: Check the truck's fuses and relays related to the trailer wiring. Also, verify that the trailer plug is properly connected and that the ground connection is clean and secure.
- Flickering Lights: Often caused by a loose connection or a corroded ground. Inspect all connections and clean them with a wire brush.
- One Light Not Working: Check the bulb, the wiring to the bulb, and the corresponding circuit in the trailer plug. Use a multimeter to check for voltage at the bulb socket.
- Electric Brakes Not Working: Verify that the electric brake controller is properly configured and that the trailer brakes are adjusted correctly. Use a multimeter to check for voltage at the trailer brake magnets.
Using a Multimeter: A multimeter is an invaluable tool for troubleshooting trailer wiring problems. It can be used to check for voltage, continuity (a complete circuit), and resistance. Knowing how to use a multimeter is essential for effective diagnosis. Always disconnect the power supply before testing for resistance.
Safety First: Handle with Care
Working with electrical systems involves inherent risks. Here are some safety precautions to keep in mind:
- Disconnect the Battery: Before working on any electrical connections, disconnect the negative terminal of the truck's battery. This will prevent accidental shorts or shocks.
- Use Proper Tools: Use insulated tools designed for electrical work.
- Protect Your Eyes: Wear safety glasses to protect your eyes from sparks or debris.
- Don't Work in Wet Conditions: Avoid working on electrical systems in wet or damp conditions.
- Electric Brake Controller: When installing or troubleshooting an electric brake controller, follow the manufacturer's instructions carefully. Incorrect wiring can damage the controller or the truck's electrical system.
- High Current Circuits: The 12V power circuit can carry a significant amount of current. Always use the correct wire gauge and fuse size to prevent overheating or fires.
Identifying Risky Components: The 12V power circuit (black wire) is the riskiest due to its high current capacity. A short circuit in this wire can quickly lead to a fire. Similarly, the electric brake circuit can also be problematic if not wired correctly.
We understand the importance of having the correct wiring diagram for your specific Silverado model. We have access to a comprehensive database of wiring diagrams, and we can provide you with the diagram that matches your truck's year and trim. Contact us to download the specific Silverado trailer plug wiring diagram you need. You can use this to safely and effectively maintain your trailer connections and avoid costly repairs. Remember, understanding the system is the first step to tackling any repair. Good luck and be safe!