Spark Plug Wiring Diagram For Chevy 350
So, you're tackling the ignition system of your Chevy 350? Excellent choice. Getting the spark plug wiring right is absolutely critical for performance, fuel efficiency, and overall engine health. A miswired engine can lead to serious problems, from poor running to potential engine damage. This guide dives deep into the spark plug wiring diagram for a Chevy 350 small block, ensuring you understand every connection and can confidently troubleshoot any issues that arise. Consider this your go-to resource for mastering this fundamental aspect of engine maintenance and modification.
Why This Diagram Matters: Spark Plug Wiring Demystified
Why bother with a wiring diagram? Simple: accuracy. The firing order of your engine, dictates the sequence in which the cylinders fire and the correct placement of spark plug wires is absolutely critical. Using a diagram is necessary when:
- Troubleshooting Performance Issues: Misfires, rough idling, or a loss of power can often be traced back to incorrect wiring.
- Replacing Spark Plugs and Wires: It's easy to get wires mixed up during replacement, leading to immediate performance problems.
- Engine Swaps or Modifications: If you're working on a rebuilt engine or making modifications, verifying the wiring is essential.
- General Maintenance: Even if you're just checking your ignition system, understanding the diagram helps you ensure everything is connected properly.
- Learning Engine Fundamentals: Grasping the relationship between the distributor, firing order, and spark plugs deepens your understanding of internal combustion engines.
Key Specs and Main Parts: The Anatomy of Ignition
Before we dive into the diagram, let's identify the critical components involved. Understanding these will make the diagram much easier to follow.
- Spark Plugs: These are the final destination for the high-voltage electricity, igniting the air-fuel mixture in each cylinder.
- Spark Plug Wires: These high-tension (high voltage) wires carry the electrical pulse from the distributor to the spark plugs. Quality wires are essential for minimizing resistance and ensuring a strong spark.
- Distributor: The heart of the ignition system (on older engines), the distributor routes the high-voltage pulse from the ignition coil to the correct spark plug at the correct time. It contains a rotor that spins and makes contact with terminals connected to each spark plug wire.
- Ignition Coil: This component steps up the battery voltage (12V) to a much higher voltage (typically 20,000-40,000 volts) needed to create a spark across the spark plug gap.
- Firing Order: The sequence in which the cylinders ignite. For a Chevy 350, the standard firing order is 1-8-4-3-6-5-7-2. This is crucial!
- Cylinder Numbering: On a Chevy 350, the cylinders are numbered as follows:
- Driver's Side (Left): 1-3-5-7 (front to back)
- Passenger's Side (Right): 2-4-6-8 (front to back)
Decoding the Diagram: Symbols and Conventions
Wiring diagrams aren't always intuitive. Here's how to decipher the key elements of a typical Chevy 350 spark plug wiring diagram:
- Lines: These represent the spark plug wires. The thicker the line, the less resistance the wire offers (but resistance is actually a desirable trait in spark plug wires to suppress radio frequency interference – RFI).
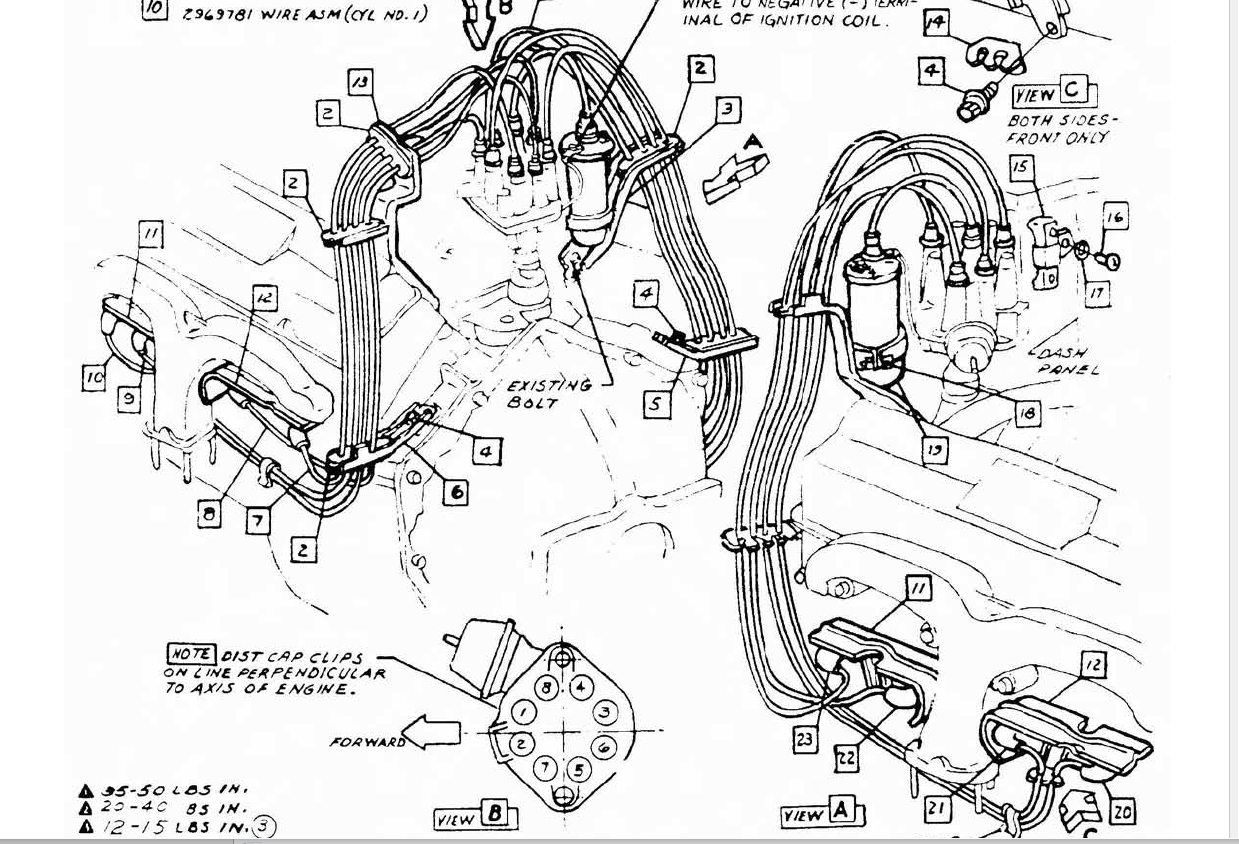
- Numbers: Numbers near the distributor cap terminals indicate which cylinder that terminal corresponds to. These numbers are essential for matching the firing order.
- Cylinder Icons: Some diagrams may include simplified illustrations of the engine block showing the cylinder locations.
- Distributor Cap: The diagram shows the shape of the distributor cap and the relative positions of the terminals. Note the location of the retaining clips.
How It Works: The Ignition Process
Let's break down the ignition process to understand the role of the wiring diagram:
- The ignition coil receives a low-voltage signal from the ignition module (or points in older systems).
- The coil amplifies this voltage to tens of thousands of volts.
- The high-voltage pulse is sent to the distributor.
- The distributor's rotor spins, making contact with each terminal inside the distributor cap, one at a time.
- When the rotor aligns with a terminal, the high-voltage electricity is sent through the corresponding spark plug wire to the correct cylinder.
- The spark plug creates a spark, igniting the air-fuel mixture, pushing the piston down, and driving the crankshaft to create power.
- This process repeats for each cylinder in the firing order.
The wiring diagram ensures that the high-voltage pulse reaches the correct cylinder *at the right time* in the engine's cycle. Incorrect wiring will throw off the timing, leading to misfires and poor performance.
Real-World Use: Troubleshooting Tips
Here are some common scenarios where a spark plug wiring diagram becomes invaluable:
- Misfire: If one cylinder isn't firing correctly, use the diagram to check the wiring to that specific spark plug. Make sure the wire is securely connected to both the distributor cap and the spark plug.
- Rough Idling: A general misfire across multiple cylinders could indicate a wiring problem. Verify the wiring order matches the firing order.
- Engine Won't Start: If the engine cranks but doesn't start, check the coil wire (the wire connecting the ignition coil to the distributor). If that wire is faulty, the distributor won't receive the necessary high-voltage pulse.
- After Replacing Wires: Double-check *every* connection against the wiring diagram after replacing spark plug wires to ensure correct placement. It’s very easy to make a mistake!
- Using a Timing Light: A timing light is used to check and adjust the ignition timing. The wiring diagram helps you identify the correct spark plug wire to connect the timing light to (typically #1).
Basic Troubleshooting Steps:
- Visual Inspection: Check for frayed wires, loose connections, and cracked distributor caps.
- Continuity Test: Use a multimeter to test the continuity of each spark plug wire. A broken wire will have infinite resistance.
- Resistance Test: Measure the resistance of each spark plug wire. Excessive resistance can weaken the spark. Consult your vehicle's repair manual for the acceptable resistance range.
- Swap Test: Carefully swap the wires of two adjacent cylinders (e.g., 1 and 8). If the misfire moves to the other cylinder, the problem is likely with the spark plug wire or spark plug.
Safety First: High-Voltage Hazards
Working with an ignition system involves high voltage, which can be dangerous. Take these precautions:
- Disconnect the Battery: Always disconnect the negative battery cable before working on the ignition system. This prevents accidental shocks.
- Avoid Wet Conditions: Never work on the ignition system in wet or damp environments.
- Use Insulated Tools: Use insulated tools to avoid electrical shock.
- Never Touch Live Wires: Never touch spark plug wires while the engine is running or being cranked. The high voltage can be fatal.
- Capacitor Discharge: Be aware that some older ignition systems may have a capacitor that stores a charge even after the battery is disconnected. Consult your vehicle's repair manual for proper discharge procedures.
The ignition system is a critical part of your engine, but it is not overly complicated. Knowing the correct wiring layout is more than half the battle. Take your time, double-check your work, and always prioritize safety. With a little patience and attention to detail, you can confidently maintain and troubleshoot your Chevy 350's ignition system.
We have a detailed Chevy 350 spark plug wiring diagram available for download. Having a visual reference will be invaluable as you work. Please feel free to reach out, and we will happily provide you with the file!