Starter Solenoid Wiring Diagram For Lawn Mower
For the experienced DIYer tackling lawn mower repairs or even modifications, understanding the starter solenoid wiring diagram is crucial. It's more than just connecting wires; it's about understanding the electrical flow and ensuring safety. This article breaks down the diagram, its components, and how it all works, giving you the confidence to diagnose and fix common starter issues.
Why This Diagram Matters
A starter solenoid wiring diagram is your roadmap to the lawn mower's starting system. Armed with this knowledge, you can:
- Diagnose Starting Problems: Is the mower clicking? Not turning over at all? The diagram helps you pinpoint the faulty component.
- Perform Repairs Correctly: Avoid costly mistakes by connecting wires in the right sequence.
- Understand the System: Gain a deeper understanding of how your lawn mower's electrical system operates.
- Make Modifications: Want to add a remote starter or bypass a safety switch for troubleshooting? The diagram is essential.
- Prevent Electrical Fires: Improper wiring can lead to shorts and potentially dangerous fires.
Key Specs and Main Parts
Before diving into the diagram, let's define the key components and their roles. Understanding these parts is critical for correctly interpreting the wiring diagram.
The Battery
The battery is the source of electrical power. A typical lawn mower battery is a 12-volt Direct Current (DC) battery. Its capacity, measured in Amp-hours (Ah), dictates how long it can deliver a specific current. Ensuring a fully charged and healthy battery is the first step in troubleshooting starting issues.
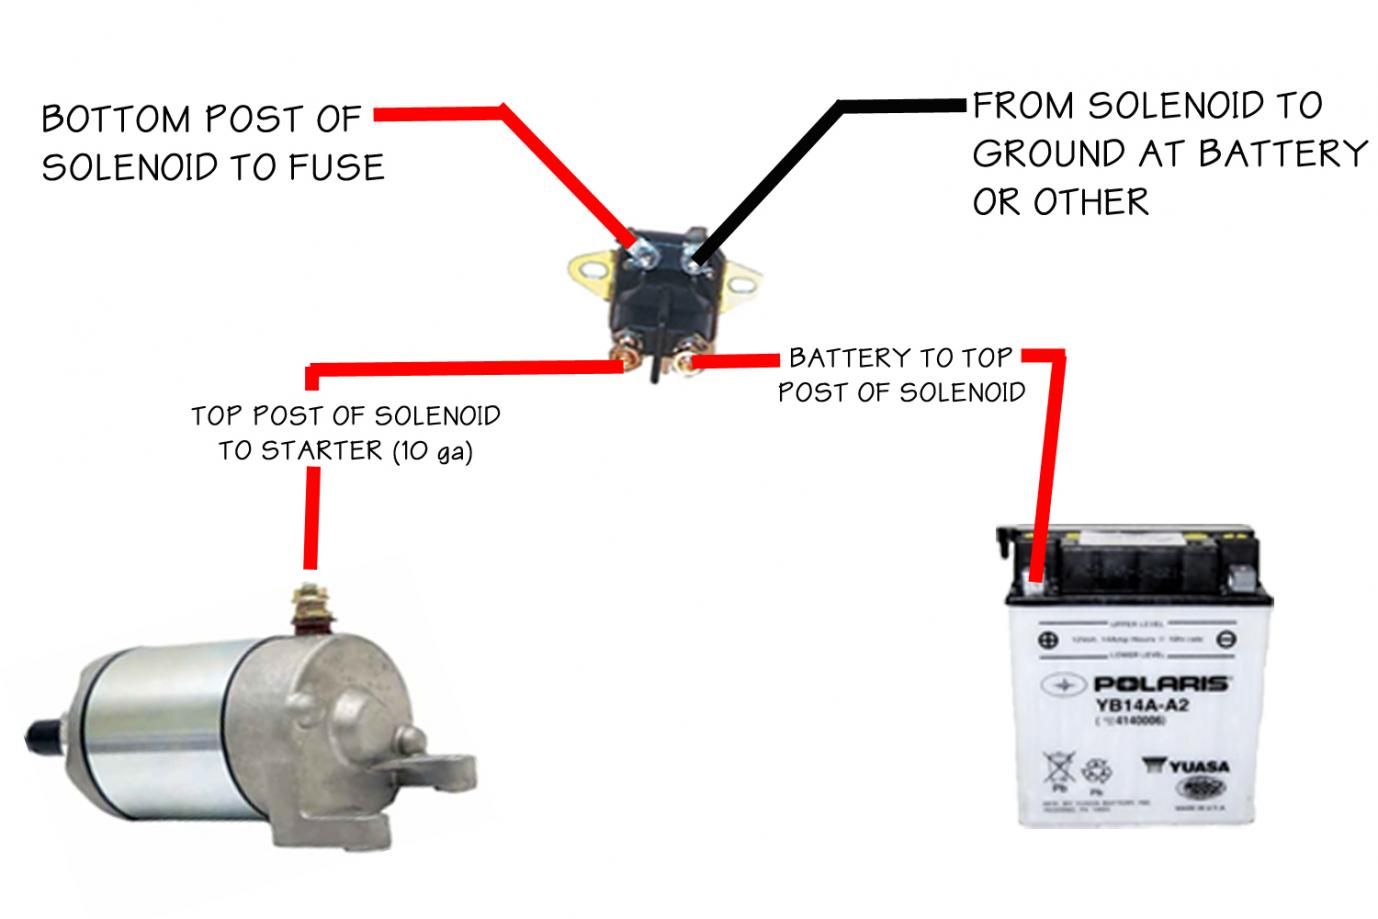
The Starter Solenoid
The starter solenoid is an electromechanical switch. It acts as a relay, using a small current from the ignition switch to activate a high-current circuit that powers the starter motor. Think of it as a gatekeeper controlling the flow of electricity to the starter. It has at least two large terminals for the battery and starter motor connections and one or two smaller terminals for the control circuit.
The Starter Motor
The starter motor is a high-torque electric motor that turns the engine's flywheel, initiating the combustion cycle. It requires a significant amount of current to operate, which is why the solenoid is necessary.
The Ignition Switch
The ignition switch is what you turn with the key (or activate via a button) to start the mower. It completes the low-current control circuit that activates the solenoid.
Safety Switches
Safety switches are crucial for preventing accidental starts. They are typically located on the seat, brake pedal, or blade engagement lever. They ensure that the mower can only be started when certain conditions are met (e.g., the operator is seated, the brake is engaged, or the blades are disengaged).
Wiring Harness
The wiring harness is a collection of wires that connect all the electrical components. The wires are typically color-coded to make it easier to identify them. Poor connections or damaged wiring are common sources of starting problems.
Symbols Explained
Understanding the symbols used in a wiring diagram is essential for accurate interpretation.
- Solid Lines: Represent wires. The thickness of the line sometimes indicates the wire gauge (thicker lines for higher current).
- Dashed Lines: Often indicate ground connections or connections to other circuits not directly related to the starter.
- Color Codes: Wires are color-coded (e.g., Red for positive, Black for ground, Yellow for accessories). The diagram will usually include a key explaining the color codes.
- Battery Symbol: Represents the battery. The positive (+) terminal is usually indicated with a longer line.
- Solenoid Symbol: Typically a rectangle with a coil symbol inside. The terminals are usually labeled (e.g., S for Start, B for Battery, M for Motor).
- Starter Motor Symbol: Usually a circle with an "M" inside.
- Switch Symbol: Represents a switch. The switch position (open or closed) indicates whether the circuit is complete.
- Ground Symbol: Represents the connection to the chassis ground.
How It Works
Here's a step-by-step explanation of how the starter solenoid circuit works:
- Key Turn: When you turn the ignition key to the start position, a small current flows from the battery, through the ignition switch, and to the control terminal of the starter solenoid (often labeled "S").
- Solenoid Activation: The small current energizes the solenoid's internal coil. This creates an electromagnetic field that pulls a metal core (plunger) inside the solenoid.
- High-Current Connection: The plunger movement closes a high-current contact inside the solenoid, connecting the battery terminal (labeled "B") to the starter motor terminal (labeled "M"). This is the critical step.
- Starter Motor Engagement: The high current flows from the battery, through the solenoid, and to the starter motor. The starter motor then engages the engine's flywheel, cranking the engine.
- Engine Start: Once the engine starts, you release the key. The ignition switch breaks the low-current circuit to the solenoid, de-energizing the coil. The plunger retracts, disconnecting the high-current circuit to the starter motor.
The safety switches are wired in series with the low-current control circuit. If any of the safety switches are open (i.e., the safety condition is not met), the circuit to the solenoid is broken, and the starter will not engage.
Real-World Use: Basic Troubleshooting
Using the wiring diagram, you can troubleshoot common starting problems:
- No Click, No Start:
Check the battery voltage. Is it below 12V? Charge or replace the battery. Use a multimeter to verify voltage is present at the solenoid's "B" terminal. Check the safety switches. Are they properly engaged? Use a multimeter to verify continuity through the switches. Check the ignition switch. Is it sending power to the solenoid's "S" terminal when the key is in the start position? Use a multimeter to check.
- Click, No Start:
The solenoid is engaging, but not enough current is reaching the starter. Check the battery terminals and the solenoid terminals for corrosion or loose connections. Clean and tighten them. The solenoid itself may be faulty. Use a jumper cable to bypass the solenoid (connect the "B" and "M" terminals directly). If the starter motor engages, the solenoid is bad and needs replacement. Be very careful when doing this! This bypasses all safety interlocks. The starter motor may be faulty. If bypassing the solenoid doesn't work, the starter motor may need to be rebuilt or replaced.
- Slow Cranking:
Check the battery voltage. A weak battery can cause slow cranking. Check the battery cables and starter motor cables for corrosion or damage. Replace them if necessary. The starter motor may be worn out.
Safety First
Working with electrical systems can be dangerous. Here are some crucial safety precautions:
- Disconnect the Battery: Always disconnect the negative (-) battery cable before working on the electrical system. This prevents accidental shorts and shocks.
- Use Insulated Tools: Use tools with insulated handles to protect yourself from electrical shock.
- Avoid Water: Never work on the electrical system in wet conditions.
- Be Careful with Jumper Cables: When using jumper cables to bypass the solenoid, be extremely careful not to create a short circuit. Wear safety glasses.
- Wear Safety Glasses: Protect your eyes from sparks and debris.
- Understand the Diagram: Don't guess! Refer to the wiring diagram and double-check your connections before applying power.
- High Current components: The battery, starter solenoid, and starter motor are high-current components. A short circuit can cause a fire or explosion. Be especially careful when working with these components.
With a solid understanding of the starter solenoid wiring diagram and these troubleshooting tips, you'll be well-equipped to tackle most starting issues on your lawn mower. Remember to prioritize safety and double-check your work.
We have a detailed, downloadable wiring diagram available. Please reach out, and we can provide you with the file.