Toyota 4runner Diagrama Correa Unica 4runner 2007
Alright, let's talk about the serpentine belt diagram for your 2007 Toyota 4Runner. Whether you're tackling routine maintenance, diagnosing a squealing noise, or just want to understand how this essential system works, having a clear understanding of the belt routing is crucial. This guide will walk you through everything you need to know, from the diagram itself to practical troubleshooting tips. We even have a file you can download, linked at the end, for easy reference.
Purpose of the 4Runner Serpentine Belt Diagram
Why bother with a diagram? Simple: it's the roadmap for your serpentine belt. Without it, replacing the belt correctly is a guessing game. A properly routed belt is vital for several reasons:
- Correct Component Operation: The serpentine belt drives crucial engine components like the alternator (charging system), power steering pump (steering assist), air conditioning compressor (cooling), and sometimes the water pump (engine cooling). Incorrect routing can lead to these systems failing.
- Belt Longevity: Improper tension or alignment caused by incorrect routing drastically shortens belt life. A misaligned belt can rub against pulleys, causing premature wear and even snapping.
- Preventing Damage: A snapped serpentine belt can leave you stranded and, in some cases, cause further damage to other components. The sudden loss of power steering, for example, can be dangerous.
- Ease of Maintenance: The diagram makes replacement and inspection much easier. Knowing the correct routing prevents mistakes and saves time.
Key Specs and Main Parts of the 2007 4Runner Serpentine Belt System
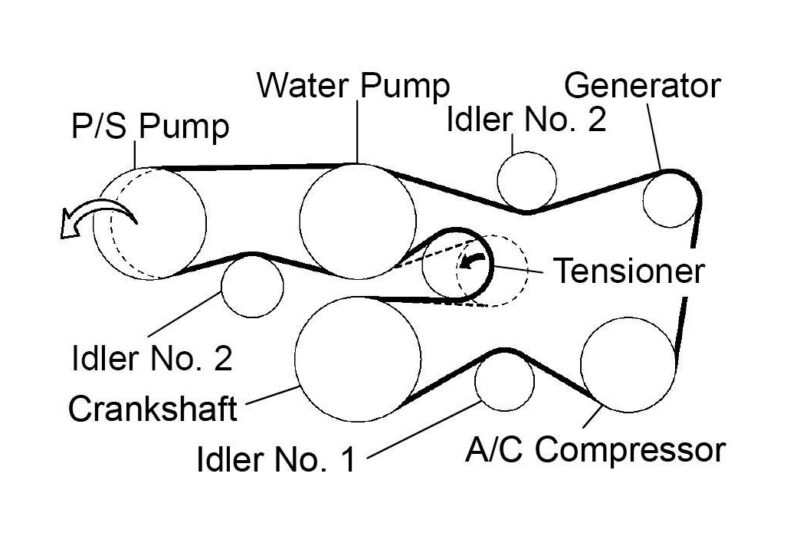
Before we dive into the diagram itself, let's identify the key components of the serpentine belt system in your 2007 4Runner, specifically those with the 4.0L V6 engine (1GR-FE). While belt routing for other engine options might vary slightly, this discussion focuses on the most common configuration.
- Serpentine Belt: The star of the show. A single, long belt made of durable rubber compound designed to transmit power from the crankshaft to various engine accessories. The "serpentine" part comes from the way it snakes (or winds) around multiple pulleys.
- Crankshaft Pulley (Damper): Located at the bottom of the engine, connected directly to the crankshaft. This pulley provides the driving force for the entire system. It also typically includes a harmonic balancer or damper to reduce engine vibrations.
- Alternator Pulley: Drives the alternator to generate electricity for the vehicle's electrical system.
- Power Steering Pump Pulley: Drives the power steering pump to provide hydraulic assistance for steering.
- Air Conditioning Compressor Pulley: Drives the AC compressor to circulate refrigerant for cooling the vehicle's cabin.
- Water Pump Pulley: Drives the water pump to circulate coolant through the engine, preventing overheating (In 2007 4Runners, the water pump is typically driven by the timing chain rather than the serpentine belt. This is a critical distinction because if your engine overheats, it's likely a timing chain or internal water pump issue, not the serpentine belt.)
- Tensioner Pulley: An automatic tensioner that maintains the correct amount of tension on the serpentine belt. It uses a spring-loaded arm and a pulley to compensate for belt stretch and wear. Maintaining correct tension is critical for proper operation.
- Idler Pulley(s): Smooth pulleys that guide the belt around the engine and prevent it from rubbing against other components. They don't drive any accessories; their sole purpose is to redirect the belt.
Understanding the Serpentine Belt Diagram Symbols
The diagram itself uses a few standard symbols. Understanding these symbols is key to interpreting the diagram correctly.
- Solid Lines: Represent the path of the serpentine belt. Follow these lines carefully to ensure correct routing.
- Pulleys: Typically represented as circles. The name of the component driven by the pulley (e.g., ALT for alternator, P/S for power steering) is usually indicated nearby or inside the circle.
- Arrows: Indicate the direction of belt travel around each pulley. This is important to ensure the belt is installed facing the correct way.
- Tensioner: Usually depicted with an arrow indicating the direction the tensioner arm moves when tension is released. This is critical information when loosening the tensioner to remove or install the belt.
- Rough Surface Pulleys: Some diagrams may indicate which side of the belt (smooth or ribbed) should contact the pulley. Typically, the ribbed side of the belt contacts the grooved pulleys (like the crankshaft, alternator, A/C compressor, and power steering pump), while the smooth side of the belt contacts the smooth idler pulley and the tensioner.
While color-coding isn't typically used on these diagrams, variations exist. Focus on the line paths and component labels for the most accurate interpretation.
How the Serpentine Belt System Works
The process is simple in principle. The engine's crankshaft turns the crankshaft pulley. This pulley then drives the serpentine belt. The belt, in turn, wraps around and drives the other pulleys connected to the alternator, power steering pump, and air conditioning compressor. The tensioner pulley keeps the belt taut, ensuring consistent power transfer. The idler pulley guides the belt along the correct path, preventing interference. Without proper tension, the belt will slip, resulting in reduced performance from these accessories and potential damage to the belt and pulleys.
Real-World Use: Troubleshooting and Maintenance
Knowing the serpentine belt routing is incredibly useful for troubleshooting:
- Squealing Noise: A common issue. A squealing noise often indicates a loose or worn serpentine belt. Check the belt for cracks, glazing (a shiny appearance), or missing ribs. Also, inspect the tensioner to ensure it's applying sufficient tension. Use a serpentine belt gauge to check the health. Also consider spraying water onto the belt while the engine is running to determine if it is the belt causing the squeal.
- Accessory Failure: If your alternator isn't charging, your power steering is weak, or your AC isn't cooling, a broken or slipping serpentine belt could be the culprit. Check the belt's condition and routing first.
- Visual Inspection: Regularly inspect the serpentine belt for wear and tear. Look for cracks, fraying, missing chunks, or glazing. Replace the belt if you notice any of these signs of damage.
- Belt Replacement: When replacing the serpentine belt, always refer to the diagram to ensure correct routing. Use the tensioner to relieve tension on the belt, remove the old belt, and install the new belt, following the diagram closely. Double-check your work before starting the engine. A useful trick is to take a photo of the belt routing before removing the old belt.
Important: When installing a new belt, make sure the ribs of the belt are properly seated in the grooves of each pulley.
Safety Considerations
Working around the serpentine belt system can be dangerous if you're not careful.
- Engine Off: Always work on the serpentine belt system with the engine off and the ignition key removed to prevent accidental starting.
- Hot Components: Be aware that the engine components can be extremely hot, especially after the engine has been running. Allow the engine to cool down before working on the serpentine belt system.
- Moving Parts: Never put your hands or tools near the serpentine belt or pulleys while the engine is running. A running engine can quickly and severely injure you.
- Tensioner Spring: The tensioner spring is under considerable pressure. Use the correct tool (usually a wrench or socket) to relieve tension on the belt. Be careful not to let the tensioner snap back suddenly, as this could cause injury.
- Eye Protection: Wear safety glasses to protect your eyes from debris while working.
Diagram Download
To make things even easier, we have the serpentine belt diagram for the 2007 Toyota 4Runner readily available for download. Use this diagram as your primary reference when working on your vehicle's serpentine belt system. This ensures accurate belt routing and helps prevent costly mistakes.
You can download the diagram here: [Insert Download Link Here - You will need to provide a valid URL to a PDF or image file containing the diagram].
By understanding the purpose, components, symbols, and operation of the serpentine belt system, you can confidently tackle maintenance and repair tasks on your 2007 Toyota 4Runner. Remember to always prioritize safety and double-check your work before starting the engine.