
Toyota Camry Serpentine Belt Diagram
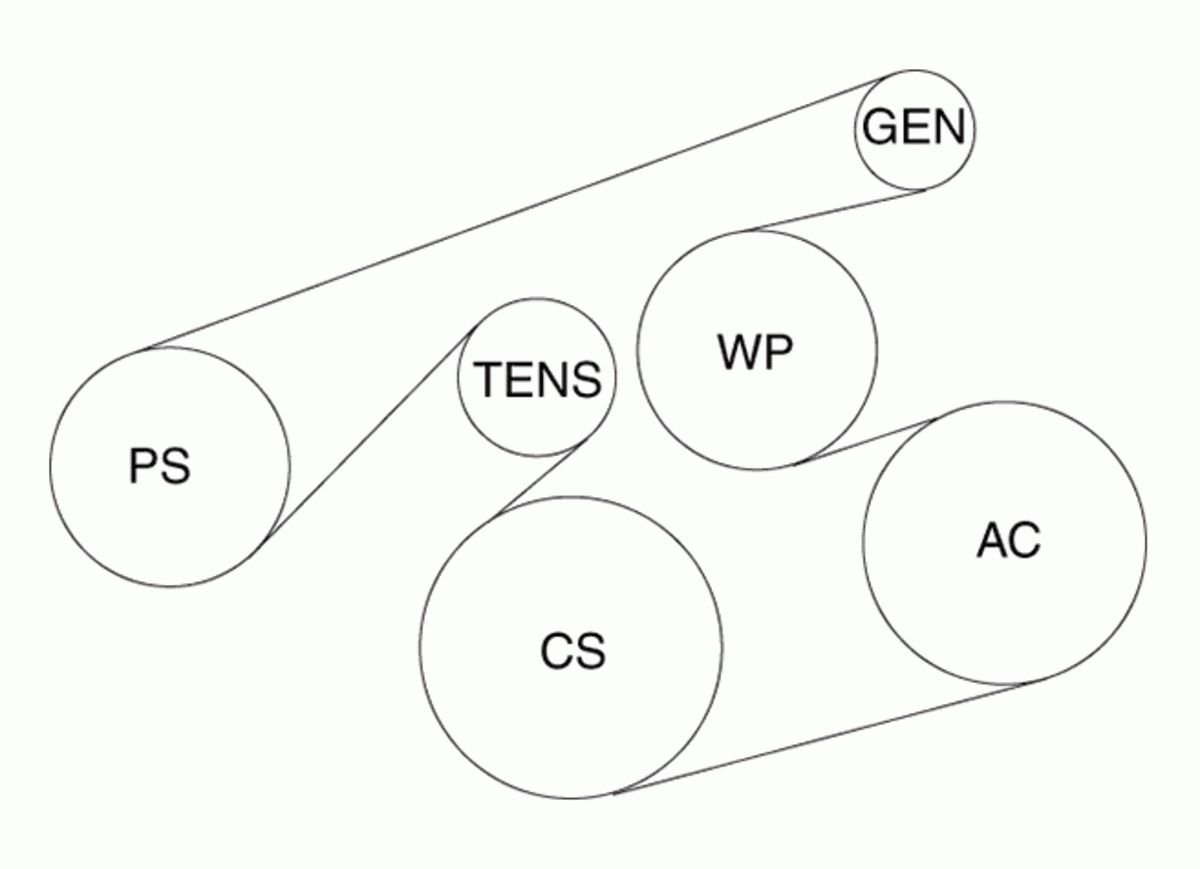
The serpentine belt in your Toyota Camry is a critical component responsible for powering several essential accessories. Understanding its layout and function is vital for preventative maintenance, troubleshooting, and even performing certain repairs yourself. This article provides a detailed breakdown of the Toyota Camry serpentine belt diagram, empowering you to confidently tackle belt-related issues.
Purpose of the Serpentine Belt Diagram
A serpentine belt diagram is more than just a pretty picture; it's your roadmap for understanding the belt's routing. It serves several crucial purposes:
- Repair and Replacement: The primary use is for replacing a worn or broken serpentine belt. The diagram ensures you route the new belt correctly around all the pulleys. Incorrect routing can lead to accessory malfunction and, in some cases, engine damage.
- Troubleshooting: By visually inspecting the belt's path, you can identify potential problems such as misalignment, pulley damage, or signs of wear and tear.
- Learning and Understanding: Familiarizing yourself with the diagram helps you understand how the various engine accessories are driven and their relationship to the crankshaft. This knowledge enhances your overall understanding of your Camry's engine.
- Pre-Purchase Inspection: Even when buying a used car, the diagram can help verify the belt is installed correctly and inspect for obvious issues.
Key Specs and Main Parts of the Serpentine Belt System
Before diving into the diagram, let's define the key components and specifications involved:
- Serpentine Belt: The single, long belt that snakes around multiple pulleys to transfer rotational power from the crankshaft to various engine accessories.
- Crankshaft Pulley (Crank Pulley): Driven directly by the engine's crankshaft, it's the source of power for the entire serpentine belt system.
- Alternator Pulley: The alternator is responsible for charging the battery and powering the electrical system. The serpentine belt turns its pulley.
- Power Steering Pump Pulley: Powers the power steering system, providing hydraulic assistance to the steering wheel.
- Air Conditioning Compressor Pulley: Drives the A/C compressor, which circulates refrigerant for the air conditioning system.
- Water Pump Pulley: The water pump circulates coolant through the engine to prevent overheating. Its pulley is driven by the serpentine belt.
- Idler Pulley(s): Smooth pulleys that guide the belt and maintain proper tension. They don't drive any accessories.
- Tensioner Pulley: This pulley is spring-loaded and automatically maintains the correct tension on the serpentine belt. It's crucial for optimal performance and belt life.
Belt Length and Rib Count: These are important specifications. The belt length is a precise measurement, and using the wrong length will result in improper tension or inability to install the belt. The rib count refers to the number of longitudinal grooves on the belt that mate with the grooves on the pulleys. The correct belt for your Camry will have the correct length and rib count as specified by Toyota. This information can typically be found in your owner's manual or a parts catalog.
Decoding the Serpentine Belt Diagram: Symbols and Conventions
The diagram uses standard symbols to represent the various components:
- Solid Lines: Indicate the path of the serpentine belt.
- Pulleys: Represented as circles. The size and labeling (e.g., ALT for alternator, P/S for power steering) identify each pulley.
- Arrows: Indicate the direction of rotation of each pulley.
- Tensioner Pulley Symbol: Usually indicated by a unique symbol, sometimes with an arrow showing the direction the tensioner arm moves to release tension.
- Routing Marks: Some diagrams may use specific markings or color-coding to further clarify the belt path, especially if the belt has to wrap around a pulley in a certain way to avoid interference.
The diagram is typically drawn from a top-down perspective, making it easier to visualize the belt's path around the engine. It is critical to find a diagram specific to your Camry's year and engine type, as different engines may have different accessory layouts and belt routing.
How It Works: Transferring Power
The principle is simple: the engine's crankshaft rotates the crankshaft pulley. This rotation is then transferred to the serpentine belt, which acts as a continuous loop, driving all the accessories connected to their respective pulleys. The tensioner pulley maintains the proper tension on the belt, ensuring adequate grip and preventing slippage. Without sufficient tension, the belt will slip, resulting in reduced accessory performance (e.g., dim headlights due to a poorly charged battery, weak power steering assist, or ineffective air conditioning) and potentially causing the belt to overheat and fail.
Real-World Use: Troubleshooting Tips
Here are some practical troubleshooting tips using the serpentine belt diagram:
- Squealing Noise: A squealing noise often indicates a loose or worn serpentine belt. Check the diagram to visually inspect the belt for cracks, fraying, or glazing. Also, verify that the tensioner pulley is functioning correctly. If the tensioner arm is bouncing excessively, it might need replacement.
- Accessory Malfunction: If one or more accessories aren't working correctly (e.g., the A/C isn't blowing cold air), refer to the diagram to check if the belt is properly routed around the affected accessory's pulley. Also, make sure that nothing is obstructing the accessory pulley, and that the accessory itself is functioning.
- Belt Slippage: Observe the belt while the engine is running. If you see it slipping, especially under load (e.g., turning on the A/C), the belt is likely worn, the tension is insufficient, or a pulley may be damaged.
- Visual Inspection: Regularly inspect the belt for signs of wear, such as cracks, fraying, missing ribs, or glazing (a shiny, hardened surface). Replace the belt if any of these conditions are present. A good rule of thumb is to replace the serpentine belt every 60,000 to 100,000 miles, or as recommended in your owner's manual.
If you are unsure of the condition of the belt or pulleys, it is always best to consult with a qualified mechanic.
Safety Considerations
Working on the serpentine belt system involves several safety considerations:
- Engine Off: Always ensure the engine is completely off and the key is removed from the ignition before working on the serpentine belt.
- Hot Engine: Avoid working on the engine immediately after it has been running, as components can be extremely hot.
- Moving Parts: Keep your hands and clothing away from the serpentine belt and pulleys while the engine is running. The belt can cause serious injury.
- Battery Disconnect: Disconnecting the negative battery terminal provides an extra layer of safety by preventing accidental starting of the engine.
- Tensioner Tool: Use the correct tensioner tool to relieve tension on the belt. Attempting to release tension without the proper tool can be dangerous and may damage the tensioner.
The most dangerous components in the serpentine system are the crankshaft pulley, alternator and other driving pulleys. Never attempt to work on them while the engine is running.
By understanding the serpentine belt diagram and following proper safety precautions, you can confidently maintain and troubleshoot your Toyota Camry's serpentine belt system.
We have the Toyota Camry Serpentine Belt Diagram, which includes critical information needed for replacement and maintenance. If you need it, just ask.