Toyota Corolla 2003 Serpentine Belt Diagram
Alright, let's dive into the serpentine belt diagram for the 2003 Toyota Corolla. This seemingly simple component plays a vital role in keeping your Corolla running smoothly. Understanding its routing, tensioning, and potential issues is essential for any DIY mechanic looking to tackle maintenance or repairs themselves. We've got the diagram itself ready for you to download, so you can follow along as we break it down.
Purpose: Why Bother with the Serpentine Belt Diagram?
Why is this diagram crucial? Several reasons. Firstly, it’s invaluable during repairs. Imagine replacing a water pump or alternator. You need to remove the serpentine belt, and without a clear diagram, remembering the exact routing can be a nightmare. Secondly, it's a powerful tool for diagnostics. Squealing noises, AC failures, or charging issues can often be traced back to a worn or misaligned serpentine belt. The diagram allows you to visually inspect the belt's path and identify potential problems. Finally, understanding the system helps with general maintenance and preventative care, allowing you to spot potential problems before they leave you stranded.
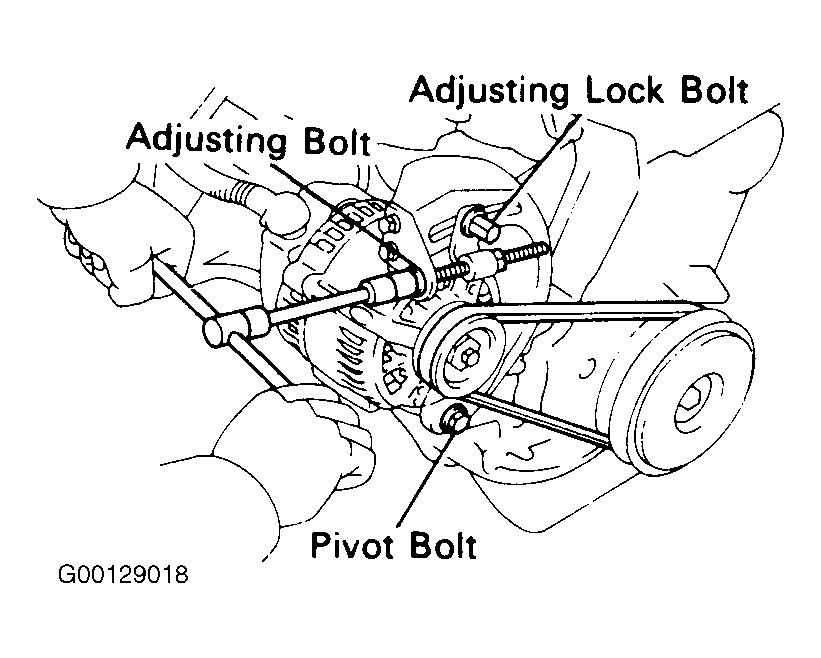
Key Specs and Main Parts of the 2003 Corolla Serpentine Belt System
The 2003 Toyota Corolla typically uses a single serpentine belt to drive multiple engine accessories. Here's a rundown of the key components involved:
- Serpentine Belt: This is the main drive belt – a long, multi-ribbed belt usually made of EPDM rubber (Ethylene Propylene Diene Monomer). It needs to be in good condition to properly transfer power.
- Crankshaft Pulley (or Damper): Located at the bottom of the engine, this pulley is directly connected to the crankshaft and provides the initial rotational force.
- Alternator Pulley: Powers the electrical system and charges the battery. A slipping belt here can cause a dead battery.
- Water Pump Pulley: Circulates coolant through the engine to prevent overheating. Failure here is critical!
- Power Steering Pump Pulley: Provides hydraulic assistance for steering. A failed belt can cause a loss of power steering, making the car difficult to maneuver.
- Air Conditioning (AC) Compressor Pulley: Drives the AC compressor, providing cold air.
- Tensioner Pulley: This is the unsung hero. The tensioner maintains the proper tension on the serpentine belt. It's usually spring-loaded and has a pulley that the belt runs over. A malfunctioning tensioner can lead to belt slippage or even belt failure.
- Idler Pulley(s): Some models might have one or more idler pulleys, which are smooth pulleys used to guide the belt around other components and maintain proper wrap angle on other pulleys.
Typical serpentine belt length for the 2003 Corolla ranges from approximately 74 to 76 inches. Always verify the correct belt length for your specific engine configuration – check your owner's manual or a reliable parts catalog.
Decoding the Serpentine Belt Diagram: Symbols and Conventions
Let's decipher the diagram itself. While specific diagrams may vary slightly, they generally follow these conventions:
- Solid Lines: These represent the belt itself. The thicker the line, sometimes, the more important that section might be to visualize.
- Arrows: Indicate the direction of belt travel. Pay close attention to these – incorrect routing will cause major problems.
- Pulleys: These are usually represented as circles. Some diagrams may label them with abbreviations (e.g., ALT for alternator, WP for water pump, AC for air conditioning).
- Tensioner: The tensioner pulley is often depicted with a small spring symbol to indicate its spring-loaded nature.
- Routing Path: The diagram clearly shows how the belt snakes its way around each pulley. Understanding this routing is absolutely critical.
- Component Labels: Each component (alternator, water pump, etc.) is usually labeled clearly on the diagram.
The diagram doesn't usually use color. It relies heavily on the clear depiction of the belt path and component placement.
How the Serpentine Belt System Works
The principle is straightforward. The crankshaft pulley, driven by the engine's rotation, provides the power. The serpentine belt transfers this rotational force to all the other pulleys: the alternator, water pump, power steering pump, and AC compressor. By driving these components, the belt ensures that your car's critical systems function properly.
The tensioner is crucial for maintaining optimal belt tension. Too little tension, and the belt will slip, leading to reduced performance and potential damage. Too much tension, and you can overload the bearings in the driven components, shortening their lifespan. The tensioner automatically adjusts to compensate for belt stretch and wear, keeping the system running efficiently.
Real-World Use: Serpentine Belt Troubleshooting Tips
Here's where the diagram becomes your best friend when diagnosing common serpentine belt issues:
- Squealing Noise: A high-pitched squeal, especially when starting the engine or using the AC, often indicates a slipping belt. Inspect the belt for cracks, glazing (a shiny, smooth surface), or signs of wear. Also, check the tensioner for proper operation. A weak tensioner spring can cause slippage.
- Accessory Failure: If your alternator isn't charging, your water pump isn't circulating coolant, or your power steering isn't working, the serpentine belt is a prime suspect. Use the diagram to visually check that the belt is properly routed around the affected component's pulley.
- Belt Damage: Regularly inspect the belt for cracks, fraying, or missing ribs. Any significant damage warrants immediate replacement.
- Misalignment: Sometimes, a pulley can become misaligned, causing the belt to rub against other components. The diagram helps you visualize the correct belt path and identify any potential misalignment issues.
When replacing the serpentine belt, always double-check the routing against the diagram before starting the engine. Incorrect routing can cause serious engine damage.
Safety First: Potential Hazards
Working around the serpentine belt system involves some inherent risks:
- Moving Parts: Never work on the serpentine belt system with the engine running. Severe injury can result from contact with the spinning belt and pulleys.
- Hot Components: The engine and its components can get extremely hot. Allow the engine to cool completely before working on the serpentine belt system.
- Tensioner Spring: The tensioner spring is under significant tension. Use the correct tool to relieve the tension before removing the belt. Improper handling can cause the spring to snap back forcefully, causing injury.
- Battery Disconnect: It’s generally a good idea to disconnect the negative battery terminal before starting any work on the engine. This will prevent accidental sparking.
Specifically, the crankshaft pulley and the spinning belt itself are the most dangerous. Keep your hands and tools clear of these areas when the engine is running (which, again, you should *never* be doing while working on the belt!). The water pump can contain scalding hot coolant. The AC compressor contains refrigerant, and should only be worked on by certified professionals.
We have the diagram available for download. Remember to always consult your vehicle’s service manual for the most accurate information and procedures.