Toyota Corolla 2009 Fuse Box Diagram
Alright, let's dive into the fuse box diagram for the 2009 Toyota Corolla. This is a crucial piece of documentation for anyone who wants to work on their car, whether you're tackling a simple electrical repair, adding aftermarket accessories, or just trying to understand your vehicle's electrical system better. Knowing how to read and use this diagram can save you time, money, and a lot of frustration. We'll break it down in a way that's both technical and easy to understand, so even if you're not a seasoned mechanic, you'll be able to follow along.
Purpose and Importance
Why bother with a fuse box diagram? Several reasons:
- Troubleshooting Electrical Problems: If a component like your headlights, radio, or power windows suddenly stops working, a blown fuse is often the culprit. The diagram pinpoints which fuse controls that specific circuit.
- Performing Repairs: Many electrical repairs require you to disconnect power to a specific circuit. The fuse box is the easiest way to do this safely.
- Installing Aftermarket Accessories: Adding things like a new stereo, alarm system, or auxiliary lights often involves tapping into the car's electrical system. The diagram helps you identify suitable power sources and protect the new circuit with an appropriate fuse.
- Understanding Your Car's Electrical System: The diagram gives you a birds-eye view of how different electrical components are connected and protected.
Key Specs and Main Parts of the 2009 Corolla Fuse Boxes
The 2009 Corolla typically has two fuse boxes:
- Engine Compartment Fuse Box: Located under the hood, this box houses fuses and relays for major systems like the engine management system, headlights, horn, and ABS (Anti-lock Braking System).
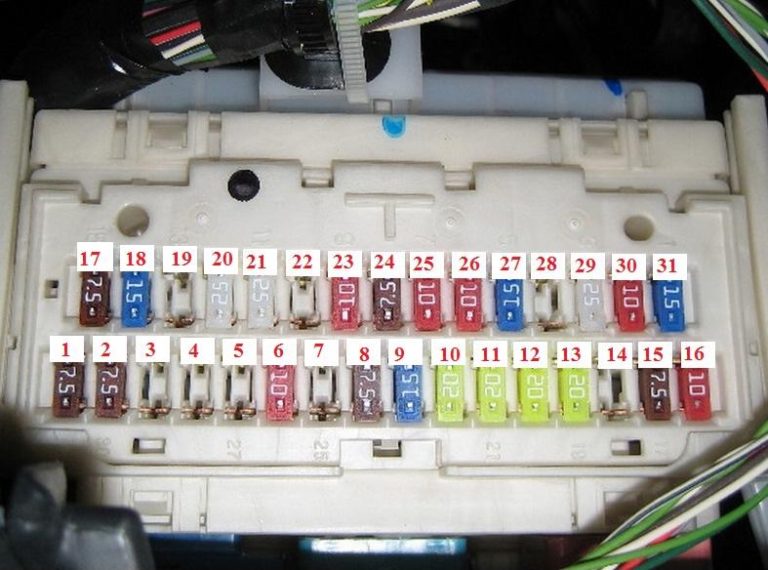
- Interior Fuse Box: Usually found under the dashboard on the driver's side, this box protects circuits for interior components like the radio, power windows, power locks, cigarette lighter (or power outlet), and interior lighting.
Key Specs to Pay Attention To:
- Fuse Ampere Rating (Amps - A): Each fuse is rated for a specific current (measured in Amps). This number is crucial. Replacing a fuse with one that has a higher rating can overload the circuit and cause damage or even a fire. Always use the correct amperage!
- Fuse Type: The 2009 Corolla uses various fuse types, most commonly blade-type fuses (also known as ATO or APR fuses) in different sizes (mini, standard). Make sure you know which type is required for each location.
- Relay Type: Relays are electromechanical switches that control higher-current circuits using a low-current signal. The diagram will show the location and function of each relay.
- Circuit Number/Name: Each fuse and relay location is usually labeled with a number or a short name that corresponds to a specific circuit (e.g., "H-LP LO" for Headlight Low Beam). This is how you identify the fuse you need to check or replace.
Understanding the Symbols in the Fuse Box Diagram
Fuse box diagrams use a variety of symbols to represent different components and connections. Here's a breakdown of the common ones:
- Fuses: Typically represented by a rectangular box with a number inside indicating the amperage rating (e.g., a rectangle with "15" inside means a 15-Amp fuse).
- Relays: Often shown as a square or rectangular box with connection points and a coil symbol. The coil symbol represents the relay's electromagnet.
- Lines: Solid lines represent the electrical wiring that connects components. Dashed lines might indicate a ground connection or a control signal.
- Ground Symbols: Represented by a series of horizontal lines decreasing in size, indicating the connection to the vehicle's chassis for grounding.
- Colors: While not always present in all diagrams, color-coded wiring is used in more detailed schematics. The diagram might include a key indicating which color corresponds to which wire (e.g., BLU = Blue, RED = Red, etc.).
- Icons: Some diagrams use icons to represent specific components, such as a light bulb for headlights, a speaker for the radio, or a window for power windows.
Important Note: The specific symbols and layout can vary slightly depending on the source of the diagram (e.g., the owner's manual, a repair manual, or an online source). Always refer to the diagram specifically for your 2009 Corolla.
How the Fuse Box Works (In Simple Terms)
Think of a fuse as a safety valve in your electrical system. It's a thin piece of metal designed to melt and break the circuit if the current exceeds a certain level. This prevents excessive current from damaging the wiring and components connected to that circuit.
When you turn on a component (like your headlights), electricity flows from the battery, through the fuse, and to the component. If there's a short circuit or an overload (e.g., due to a faulty component or too much load on the circuit), the current spikes. This excessive current heats up the fuse element, causing it to melt and break the circuit, stopping the flow of electricity and preventing damage.
Relays act as remote-controlled switches. A low-current circuit is used to energize the relay's coil, which then closes a high-current circuit to power the desired component. This allows the use of small switches and wiring to control high-power devices.
Real-World Use: Basic Troubleshooting Tips
Let's say your car's cigarette lighter/power outlet isn't working. Here's how you can use the fuse box diagram to troubleshoot the problem:
- Locate the Fuse Box Diagram: Consult your owner's manual or a reliable online source for the 2009 Corolla fuse box diagram.
- Identify the Fuse: Find the fuse labeled "CIG" or "Power Outlet" on the diagram. The diagram will show its location in the interior fuse box.
- Inspect the Fuse: Open the interior fuse box and locate the fuse you identified in the diagram. Visually inspect the fuse. If the thin wire inside the fuse is broken or blackened, the fuse is blown.
- Replace the Fuse: Replace the blown fuse with a new fuse of the same amperage rating.
- Test the Circuit: Turn on the ignition and test the cigarette lighter/power outlet. If it works, you've solved the problem. If the new fuse blows immediately, there's a short circuit in the wiring or the component itself. You'll need to investigate further.
Safety Precautions
Working with electrical systems can be dangerous. Here are some important safety tips:
- Disconnect the Battery: Before working on any electrical system, disconnect the negative terminal of the battery. This will prevent accidental shorts and electrical shocks.
- Use the Right Tools: Use insulated tools designed for automotive electrical work.
- Never Replace a Fuse with a Higher Amperage Rating: This can overload the circuit and cause damage or a fire. Always use the correct amperage rating.
- Avoid Working in Wet Conditions: Water conducts electricity, increasing the risk of electric shock.
- Be Careful Around High-Voltage Components: The ignition system and certain sensors operate at high voltages. Avoid touching these components while the engine is running or the ignition is on. The components connected to the SRS (Supplemental Restraint System), such as the airbags, also contain high voltage and must be handled with extreme care by qualified technicians.
By understanding and using the fuse box diagram for your 2009 Toyota Corolla, you'll be well-equipped to tackle a variety of electrical repairs and modifications. Remember to always prioritize safety and consult a qualified mechanic if you're unsure about any procedure.
We have the complete fuse box diagram file available for download. This diagram will provide you with the most accurate and detailed information for your specific vehicle. You can access the download link [Insert Download Link Here - Not Implemented].