Toyota Corolla 2012 Fuse Box Diagram
The 2012 Toyota Corolla, like all modern vehicles, relies heavily on electrical systems for everything from starting the engine to powering the infotainment. When something goes wrong electrically – a light stops working, the radio dies, or the car refuses to start – one of the first places a DIYer should check is the fuse box. This article provides a comprehensive guide to understanding the 2012 Toyota Corolla's fuse box diagram, empowering you to diagnose and potentially fix electrical issues yourself. We'll cover the purpose of the diagram, key components, the meaning of symbols, basic troubleshooting, and critical safety precautions. We even have the full fuse box diagram available for download at the end of this article.
Purpose of Understanding the Fuse Box Diagram
The fuse box diagram is essentially a roadmap of your Corolla's electrical system. It shows you:
- Fuse Locations: Where each fuse is located within the fuse box(es).
- Fuse Amperage: The current rating (in amps) of each fuse. This is critical for replacing a blown fuse with the correct one. Using the wrong amperage can lead to further damage or even a fire.
- Circuit Protection: Which circuits each fuse protects (e.g., headlights, taillights, power windows, fuel pump).
Understanding this information is crucial for several reasons:
- Troubleshooting Electrical Problems: When an electrical component fails, the diagram helps you quickly identify the corresponding fuse and check if it's blown.
- Performing Electrical Repairs: If you're adding aftermarket accessories (like a new stereo or fog lights), the diagram helps you find appropriate power sources and install fuses safely.
- Learning Your Vehicle's Systems: Studying the diagram provides a deeper understanding of how your car's electrical system is organized and interconnected.
- Preventative Maintenance: Periodically checking the fuse box and replacing any corroded or damaged fuses can prevent more serious electrical problems down the road.
Key Specs and Main Parts
The 2012 Toyota Corolla typically has two main fuse box locations:
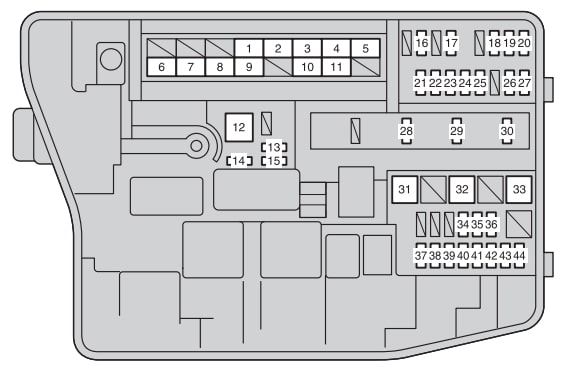
- Engine Compartment Fuse Box: Located under the hood, usually near the battery. This box houses fuses for critical engine components, headlights, and other high-current systems.
- Interior Fuse Box: Usually located under the dashboard, either on the driver's side or passenger's side. This box contains fuses for interior accessories, such as the radio, power windows, and cigarette lighter (power outlet).
Key Components:
- Fuses: The core protective element. A fuse contains a thin wire that melts and breaks the circuit when excessive current flows through it, preventing damage to other components. Fuses are rated in amperes (amps), which indicates the amount of current they can handle before blowing.
- Relays: Electrically operated switches that control high-current circuits using a low-current signal. They are often used to control things like the headlights, fuel pump, and starter motor.
- Fuse Box Housing: The plastic enclosure that holds the fuses and relays. It typically has a cover that provides a diagram of the fuse locations.
- Fuse Puller: A small plastic tool designed to safely remove fuses from the fuse box. Trying to remove fuses with your fingers or pliers can damage them or the fuse box.
Understanding the Symbols
Fuse box diagrams use a variety of symbols to represent different components and circuits. Here's a breakdown of the most common ones:
- Lines: Solid lines typically represent wires or electrical connections. Thicker lines may indicate higher-current circuits.
- Boxes: Represent fuses or relays. The number inside the box usually indicates the fuse's amperage.
- Colors: Different colors may be used to differentiate between circuits or systems. However, color coding can vary, so always refer to the specific diagram for your vehicle.
- Icons: Small icons are often used to indicate the specific component or system protected by a fuse (e.g., a headlight icon, a taillight icon, a radio icon).
The diagram will also have a legend or key that explains the meaning of each symbol used. Always refer to the legend to accurately interpret the diagram.
Example: A box labeled "HT LP 15A" likely represents a 15-amp fuse protecting the headlights (HT LP). Consult the diagram's legend for exact definition of the acronym.
How It Works: Electrical Circuit Protection
The fuse box is the central hub for electrical circuit protection in your Corolla. Each circuit in the vehicle is designed to handle a specific amount of current. When a component malfunctions or there's a short circuit (an unintended path for electricity to flow), the current flow increases dramatically.
This is where the fuse comes in. The fuse is a sacrificial component designed to fail before other more expensive and critical components are damaged. When the current exceeds the fuse's rating, the thin wire inside the fuse melts, breaking the circuit and stopping the flow of electricity. This prevents damage to the wiring, the component itself, and potentially even prevents a fire.
Relays, on the other hand, are used to control circuits that require a lot of current. A small amount of current is used to activate the relay, which then closes a separate, high-current circuit. This allows the car's computer to control things like the headlights and fuel pump without having to directly switch the high current required by those components.
Real-World Use: Basic Troubleshooting Tips
Here's a step-by-step guide to troubleshooting electrical problems using the fuse box diagram:
- Identify the Problem: Determine which component or system is not working.
- Consult the Diagram: Locate the fuse that corresponds to the affected component or system using the fuse box diagram.
- Inspect the Fuse: Visually inspect the fuse. A blown fuse will typically have a broken wire inside. You can also use a multimeter to test the fuse for continuity (a closed circuit).
- Replace the Fuse: If the fuse is blown, replace it with a new fuse of the same amperage. Never use a fuse with a higher amperage rating, as this can overload the circuit and cause damage or a fire.
- Test the System: After replacing the fuse, test the affected component or system to see if it's working properly.
- If the Fuse Blows Again: If the new fuse blows immediately or shortly after being replaced, there is likely a short circuit or other underlying problem in the system. Further diagnosis by a qualified mechanic may be necessary. This usually involves tracing the wiring, checking for damaged components, and testing the circuit with a multimeter.
Example: Your radio suddenly stops working. Consult the fuse box diagram to find the fuse labeled "Radio" or "Audio." Remove the fuse and inspect it. If the wire inside is broken, replace it with a new fuse of the same amperage rating. If the radio still doesn't work after replacing the fuse, the problem may be with the radio itself or the wiring connecting it to the car's electrical system.
Safety: Highlight Risky Components
Working with electrical systems can be dangerous if proper precautions are not taken. Here are some important safety tips:
- Disconnect the Battery: Before working on any electrical component, disconnect the negative terminal of the battery to prevent accidental short circuits.
- Use Insulated Tools: Use tools with insulated handles to protect yourself from electric shock.
- Never Use a Higher Amperage Fuse: As mentioned before, using a fuse with a higher amperage rating can overload the circuit and cause damage or a fire.
- Avoid Working in Wet Conditions: Water is a conductor of electricity, so avoid working on electrical systems in wet conditions.
- Identify High-Current Circuits: Be especially careful when working on high-current circuits, such as those for the starter motor, alternator, and headlights. These circuits can deliver a significant electric shock.
- If Unsure, Seek Professional Help: If you're not comfortable working on electrical systems, or if you're unsure about any aspect of the repair, seek the help of a qualified mechanic. It is better to pay for professional help than to risk injuring yourself or damaging your vehicle.
Important Note: Some circuits, such as those for the airbags and anti-lock brakes (ABS), are extremely sensitive and should only be worked on by qualified professionals. Tampering with these systems can be dangerous and could compromise their functionality.
We hope this guide has provided you with a solid understanding of the 2012 Toyota Corolla fuse box diagram. By understanding how your vehicle's electrical system is organized and protected, you can troubleshoot common problems, perform basic repairs, and gain a deeper appreciation for the inner workings of your car.
Ready to get your hands on the complete 2012 Toyota Corolla Fuse Box Diagram? We have a downloadable file ready for you. Click the link below to access the diagram:
[Link to Downloadable Fuse Box Diagram Here]