
Toyota Corolla Serpentine Belt Diagram
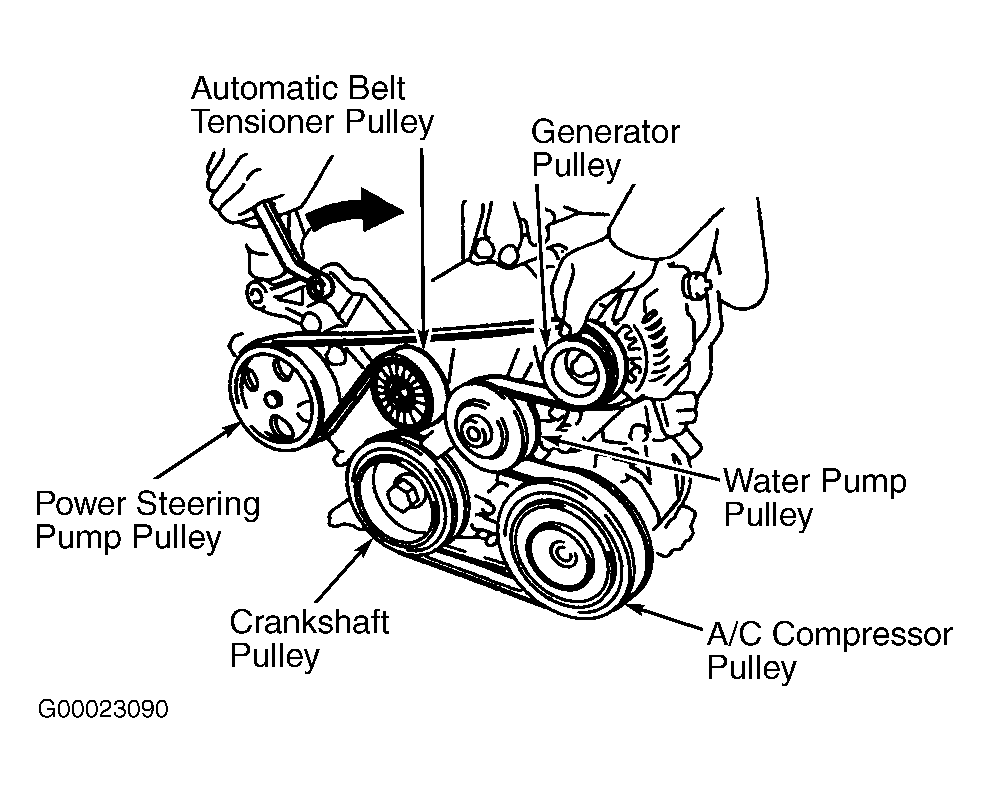
Welcome, fellow gearheads! Today, we're diving deep into the often-overlooked but critically important serpentine belt system in your Toyota Corolla. Whether you're planning a preemptive replacement, diagnosing a squealing noise, or simply want to understand your car's inner workings, this comprehensive guide to the serpentine belt diagram will be your trusty companion.
Purpose: Why the Serpentine Belt Diagram Matters
A serpentine belt diagram isn't just a pretty picture; it's a roadmap to keeping your Corolla running smoothly. This diagram is essential for several reasons:
- Correct Belt Routing: The serpentine belt follows a specific path around various engine components. An incorrect route can lead to component failure and even catastrophic engine damage. The diagram is your definitive guide.
- Troubleshooting: When you hear a squealing, chirping, or thumping noise coming from the engine bay, the serpentine belt is often the culprit. The diagram helps you visually inspect the belt, pulleys, and tensioner for signs of wear, misalignment, or damage.
- Replacement: Removing the old belt is relatively straightforward, but installing the new one correctly, following the exact route, is crucial. The diagram ensures you get it right the first time.
- Understanding the System: Even if you're not planning any immediate repairs, understanding how the serpentine belt system works provides valuable insight into your car's overall operation.
- Preventive Maintenance: By using the diagram to locate the belt and its related components, you can regularly inspect them, proactively addressing potential issues before they escalate into expensive repairs.
Key Specs and Main Parts of the Corolla Serpentine Belt System
Let's break down the key components involved in a typical Toyota Corolla serpentine belt system. Note that specific configurations may vary slightly depending on the model year and engine type.
Main Components:
- Serpentine Belt: The heart of the system. This long, winding belt transmits power from the crankshaft pulley to other engine accessories.
- Crankshaft Pulley (Harmonic Balancer): Attached to the crankshaft, this pulley drives the serpentine belt.
- Alternator Pulley: The alternator generates electricity to power your car's electrical system and charge the battery. The serpentine belt drives the alternator.
- Power Steering Pump Pulley: The power steering pump provides hydraulic assistance for steering. The serpentine belt turns this pump.
- Air Conditioning Compressor Pulley: The A/C compressor circulates refrigerant to cool the cabin air. It's also driven by the serpentine belt.
- Idler Pulley(s): Smooth pulleys that guide the belt and maintain proper tension.
- Tensioner Pulley: This spring-loaded pulley maintains the correct tension on the serpentine belt. A faulty tensioner can cause belt slippage, noise, and reduced performance.
Key Specs:
While specific measurements vary, understanding the following specs is essential:
- Belt Length: The overall length of the serpentine belt, typically measured in inches or millimeters. Using the correct length is critical.
- Belt Width: The width of the belt, which must match the pulley grooves.
- Number of Ribs: The number of V-shaped ribs on the belt that fit into the pulley grooves.
- Tension: The amount of force applied to the belt by the tensioner. Proper tension is vital for optimal performance and belt longevity.
Symbols: Decoding the Serpentine Belt Diagram
Understanding the symbols used in a serpentine belt diagram is key to interpreting it correctly. Here's a breakdown of common symbols:
- Solid Lines: Represent the path of the serpentine belt around the pulleys.
- Arrows: Indicate the direction of rotation of each pulley.
- Pulley Icons: Each pulley is represented by a circle with a specific symbol or abbreviation to identify its function (e.g., ALT for alternator, P/S for power steering).
- Tensioner Symbol: Usually a spring-like symbol indicating the location of the tensioner pulley.
- Dotted Lines (Sometimes): May indicate the back side of the belt (smooth side) contacting a pulley.
- Color Coding (Less Common): Some diagrams use color to differentiate sections of the belt path or highlight specific components. Refer to the diagram's legend for clarification.
How It Works: The Serpentine Belt in Action
The serpentine belt's primary function is to transmit rotational power from the engine's crankshaft to various accessories. Here's how it works:
- The engine's crankshaft rotates, turning the crankshaft pulley (harmonic balancer).
- The serpentine belt, wrapped tightly around the crankshaft pulley, is driven by its rotation.
- The rotating belt then turns the pulleys of the alternator, power steering pump, A/C compressor, and any idler pulleys.
- The tensioner pulley maintains the proper tension on the belt, preventing slippage and ensuring efficient power transfer.
Without a properly functioning serpentine belt system, your car's accessories won't operate correctly. This can lead to a dead battery, loss of power steering, no air conditioning, and potentially engine overheating if the water pump is driven by the same belt.
Real-World Use: Basic Troubleshooting Tips
Here are some practical troubleshooting tips for common serpentine belt issues:
- Squealing Noise: Often caused by a loose or worn belt. Check the belt tension and look for signs of cracking, glazing, or missing ribs. Also, inspect the pulleys for damage or misalignment.
- Chirping Noise: Can indicate a slightly loose belt or a worn idler pulley. Try applying a small amount of belt dressing (use sparingly!). If the noise persists, replace the belt or idler pulley.
- Thumping Noise: May indicate a damaged belt or a failing tensioner. Inspect the belt for damage and check the tensioner for smooth operation.
- Belt Slippage: Can be caused by a loose belt, a worn pulley, or oil/grease contamination. Clean the pulleys and replace the belt if necessary. Ensure the tensioner is functioning correctly.
- Visual Inspection: Regularly inspect the serpentine belt for cracks, fraying, glazing (a shiny, hard surface), and missing ribs. Replace the belt if you find any of these issues.
Safety: Proceed with Caution!
Working on the serpentine belt system involves moving parts and potential hazards. Always observe these safety precautions:
- Disconnect the Battery: Disconnect the negative battery terminal before working on the system to prevent accidental electrical shocks.
- Engine Cool Down: Allow the engine to cool down completely before touching any components. The engine and exhaust system can get extremely hot.
- Moving Parts: Never put your hands or tools near the serpentine belt while the engine is running. The belt and pulleys can cause serious injury.
- Eye Protection: Wear safety glasses to protect your eyes from debris.
- Proper Tools: Use the correct tools for the job, including a serpentine belt tool for releasing the tension on the tensioner pulley.
The tensioner pulley stores a significant amount of spring tension. When releasing it to remove or install the belt, ensure you have a secure grip on the tensioner tool to prevent it from snapping back suddenly, which could cause injury.
Remember, if you're uncomfortable working on the serpentine belt system, it's always best to consult a qualified mechanic.
Now that you're armed with this knowledge, you're well-equipped to tackle serpentine belt maintenance and repairs on your Toyota Corolla. This knowledge helps keep your car running smoothly and safely for years to come!
We have the serpentine belt diagram file ready for you. You can download the diagram for your specific Corolla model year and engine type by clicking the link below. Always double-check the diagram against your vehicle's configuration to ensure accuracy.
[Download Toyota Corolla Serpentine Belt Diagram Here] (Replace with actual download link)