
Toyota Highlander Trailer Wiring Harness
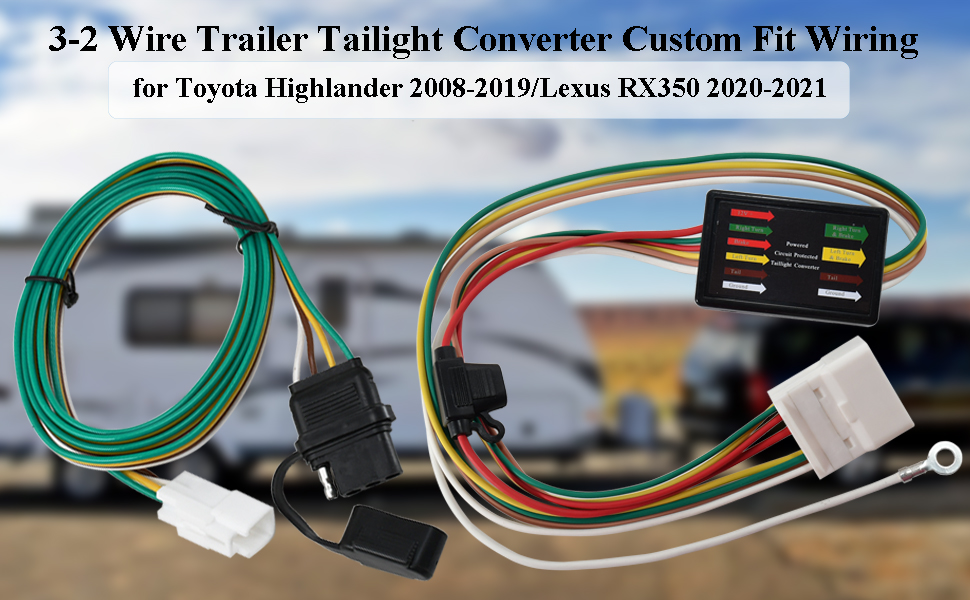
So, you're looking to understand the trailer wiring harness on your Toyota Highlander? Whether you're adding a trailer hitch for hauling, troubleshooting existing lights, or just want to understand the system better, this guide will break down the key elements. A good grasp of the wiring is crucial for safe towing and preventing electrical headaches. We're aiming for a clear, technical explanation suitable for the experienced DIYer, avoiding jargon where possible but explaining necessary technical terms.
Purpose and Importance
Why bother understanding your Highlander's trailer wiring harness? Simple: safety and functionality. Properly wired trailer lights are essential for safe towing, alerting other drivers to your intentions – braking, turning, and general presence. Beyond legal requirements, a properly functioning harness avoids costly fines, and more importantly, prevents accidents. This knowledge is also crucial for:
- Installation: Correctly connecting a new trailer hitch and wiring harness.
- Troubleshooting: Diagnosing and repairing issues like flickering lights, blown fuses, or non-functional signals.
- Customization: Understanding the system before attempting any modifications, like adding auxiliary lights or a brake controller.
- General Knowledge: Becoming a more informed and capable vehicle owner.
Key Specs and Main Parts
Before diving into the wiring diagram itself, let's establish the basic components and specifications you'll encounter on a typical Toyota Highlander trailer wiring harness. Note that specific years and trim levels may have minor variations, but the core principles remain the same.
Common Wiring Configurations:
- 4-Pin Flat Connector: This is the most basic type, providing connections for ground, tail lights, left turn/brake, and right turn/brake. Often referred to as a "4-way flat" or "4-pole flat."
- 7-Pin Round Connector: This heavier-duty connector adds connections for reverse lights, electric brakes (if your trailer has them), and an auxiliary 12V power supply. Commonly called a "7-way round" or "7-pole RV."
The Highlander typically comes pre-wired to some extent, often with a connector hidden behind a trim panel in the rear cargo area. This simplifies the installation of an aftermarket harness. The aftermarket harness will usually include the connector that plugs into the factory harness, and the connector to your trailer (4 pin, or 7 pin).
Main Harness Components:
- Vehicle-Side Connector: This is the connector that plugs into the Highlander's existing wiring. Its location varies depending on the year and model, but is often found in the rear cargo area near the driver's side taillight.
- Trailer Connector: The connector that plugs into the trailer. This is the 4-pin or 7-pin connector mounted near the hitch.
- Wiring Harness: The bundle of wires connecting the vehicle-side and trailer connectors. It's typically encased in a protective sleeve or conduit.
- Control Module (if applicable): Some more advanced harnesses include a control module that interfaces with the Highlander's electrical system. This module helps prevent overloading the vehicle's circuits and ensures proper signal transmission to the trailer lights.
- Fuses: In-line fuses protect the wiring from overloads and short circuits. These are crucial for safety and preventing damage to the vehicle's electrical system.
- Ground Wire: A dedicated ground wire is essential for a reliable electrical connection. It is typically connected to the vehicle's frame or chassis.
Understanding Wiring Diagram Symbols
A wiring diagram is a visual representation of the electrical circuit. To effectively interpret it, you need to understand the basic symbols used. Here's a breakdown:
- Solid Lines: Represent wires. The thickness of the line doesn't usually indicate wire gauge.
- Dashed Lines: May indicate shielded wires or connections within a component.
- Circles: Can represent various components, depending on what's inside (e.g., a light bulb symbol for a light).
- Rectangles: Typically represent larger components like modules, relays, or fuses.
- Squares: Often represent connectors.
- Ground Symbol: Looks like an inverted Christmas tree, indicating a connection to the vehicle's chassis.
- Fuse Symbol: Zigzag line enclosed in a rectangle.
- Relay Symbol: A coil symbol next to a switch symbol.
Wire Colors:
Wire colors are standardized to a degree, but variations exist. Refer to the specific wiring diagram for your Highlander's year and model. Common colors include:
- White: Ground.
- Brown: Tail lights.
- Yellow: Left turn/brake.
- Green: Right turn/brake.
- Blue: Electric brakes (on 7-pin connectors).
- Black: 12V power (on 7-pin connectors).
- Purple: Reverse lights (on 7-pin connectors).
Always verify the wire colors with your specific vehicle's wiring diagram. Do not rely on color alone. A multimeter is your best friend for verifying connections.
How It Works: Basic Circuit Flow
The Highlander's trailer wiring harness taps into the vehicle's existing lighting circuits. When you activate the turn signal, brake lights, or headlights, the corresponding signals are sent through the harness to the trailer lights. The control module (if present) acts as an intermediary, isolating the trailer's circuits from the vehicle's to prevent overloading. Here's a simplified overview:
- The Highlander's BCM (Body Control Module) sends signals to the taillights when you activate lights/turn signals/brake pedal.
- The Trailer Relay (if present) receives signals from the Highlander's existing lighting circuits.
- The Relay then sends the signal to the corresponding pin on the trailer connector.
- The trailer harness then powers the lights on the trailer.
The ground wire provides a return path for the electrical current, completing the circuit. A poor ground connection is a common cause of trailer lighting problems.
Real-World Use: Basic Troubleshooting Tips
Here are some common trailer wiring issues and how to diagnose them:
- No Lights At All: Check the fuses first! Both in the Highlander's fuse box and any in-line fuses on the trailer wiring harness. Next, check the ground connection. Ensure it's clean, secure, and properly connected to the vehicle's frame.
- Flickering Lights: Loose connections are the most likely culprit. Inspect all connectors and wiring splices for corrosion or damage. Tighten any loose connections.
- One Light Not Working: Use a multimeter to test for voltage at the corresponding pin on the trailer connector when the light should be on. If there's no voltage, trace the wire back to the vehicle-side connector, checking for breaks or shorts along the way.
- Brakes Not Working (7-Pin): Verify the brake controller settings in the vehicle. Inspect the blue wire on the 7-pin connector for proper voltage when the brake pedal is pressed. Check the trailer's brake wiring and magnets.
Remember to always disconnect the trailer from the vehicle before troubleshooting the wiring. Use a circuit tester or multimeter to check for voltage and continuity. A test light can also be useful for identifying blown fuses or open circuits.
Safety Considerations
Working with automotive electrical systems can be dangerous. Here are some key safety precautions:
- Disconnect the Battery: Always disconnect the negative battery terminal before working on any electrical wiring. This prevents accidental shorts and electrical shocks.
- Protect Against Shorts: Avoid accidentally grounding wires while working on them. Use electrical tape or wire caps to insulate exposed wires.
- Proper Tools: Use insulated tools designed for automotive electrical work.
- Fuses: Never replace a fuse with a higher amperage fuse. This can overload the circuit and cause a fire. Always use the correct fuse rating as specified in the owner's manual or wiring diagram.
- Airbags: Be aware of the location of airbags before working near the steering column or dashboard. Disconnect the battery and wait several minutes before working near airbags to avoid accidental deployment.
- Professional Help: If you're not comfortable working with electrical wiring, seek the assistance of a qualified mechanic.
Specifically regarding the Highlander's trailer wiring, the potential risks involve shorting the vehicle's computer system. Improper wiring can lead to damaged modules that are extremely costly to repair. A good way to avoid this is to use a wiring harness that plugs into the OEM tow package prewiring, this will help guarantee compatibility.
We hope this detailed explanation helps you understand your Toyota Highlander's trailer wiring harness. Remember, accurate diagrams specific to your vehicle year and trim are essential. Happy towing!
We have a standard wiring diagram file available for download. Contact us for access.