Toyota Land Cruiser Fuse Box Diagram
Okay, let's dive into the heart of your Toyota Land Cruiser's electrical system: the fuse box diagram. Understanding this diagram is absolutely crucial whether you're diagnosing a faulty headlight, installing aftermarket accessories, or just trying to understand how the electrical gremlins in your LC operate. I've seen countless headaches avoided by folks simply taking the time to learn how to interpret this essential piece of documentation. We're going to cover everything you need to know – from the purpose of the diagram to safety precautions, and even some real-world troubleshooting tips.
Purpose of the Fuse Box Diagram
Simply put, the fuse box diagram is your roadmap to the electrical system. Its primary purpose is to identify which fuse protects which circuit. This is invaluable for:
- Troubleshooting electrical issues: If a circuit isn't working (e.g., your power windows are dead), the diagram allows you to quickly locate the corresponding fuse and check its condition.
- Installing aftermarket accessories: When adding things like auxiliary lights, a winch, or a new stereo, you'll need to tap into the electrical system. The diagram helps you identify suitable circuits to tap into and choose appropriate fuse ratings to protect your new addition.
- General maintenance and understanding: Even if everything's working fine, knowing the function of each fuse empowers you to understand how your Land Cruiser is wired and troubleshoot potential issues before they escalate.
Imagine trying to find the fuse for your cigarette lighter (or power outlet, as it's more accurately called these days) without a diagram. You'd be pulling fuses at random, which is time-consuming, frustrating, and potentially damaging. The diagram eliminates this guesswork.
Key Specs and Main Parts
Land Cruisers, like all vehicles, have multiple fuse boxes. You'll typically find these in the following locations:
- Main Fuse Box (Engine Compartment): This box houses fuses and relays for critical systems like the engine control unit (ECU), headlights, fuel pump, and starter motor. It's typically located near the battery, making it easily accessible for engine-related issues.
- Instrument Panel Fuse Box (Interior): Usually located under the dashboard, often on the driver's side, this box contains fuses for interior components like the radio, power windows, climate control, and interior lights.
- Possibly a Rear Fuse Box (Cargo Area): Some Land Cruiser models, particularly those with more advanced features, may have a fuse box in the rear cargo area to serve accessories and systems specific to that area, such as the power tailgate or rear climate control.
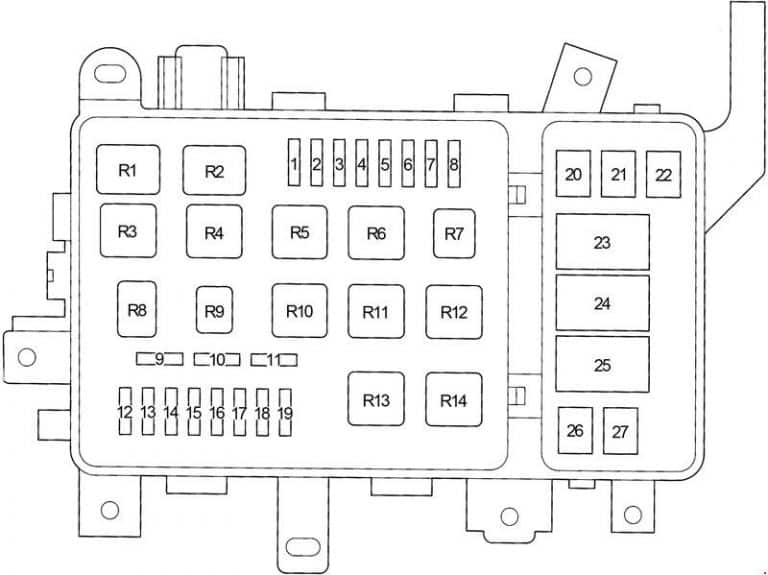
Each fuse box will have its own diagram, usually printed on the inside of the fuse box cover or in the owner's manual. The diagram will show the location of each fuse and relay, along with a label indicating the circuit it protects and its amperage rating (e.g., "15A TAIL"). The amperage rating is critical; replacing a fuse with one of a higher amperage can overload the circuit and potentially cause a fire.
Symbols, Lines, Colors, and Icons
Fuse box diagrams use a variety of symbols and conventions to convey information efficiently. Here’s a breakdown of common elements:
- Fuses: Fuses are typically represented by a simple rectangular shape with a number inside indicating the amperage rating.
- Relays: Relays are usually shown as squares or rectangles with a coil symbol inside. They're often accompanied by a label indicating their function (e.g., "HEAD LO" for headlight low beam relay). A relay is an electrically operated switch that allows a low-current circuit to control a high-current circuit.
- Lines: Lines connect the fuses and relays to the circuits they protect. Thicker lines may indicate higher-current circuits.
- Colors: While not always present, some diagrams use colors to differentiate between different types of circuits or to indicate voltage levels. However, color-coding is not standardized across all Land Cruiser models or years.
- Icons: Icons are often used to represent the function of a fuse or relay. For example, a headlight icon will indicate the headlight fuse, a fan icon might represent the cooling fan fuse, and so on. These icons are generally intuitive, but always refer to the diagram's legend for clarification.
Understanding these symbols and conventions is essential for accurately interpreting the fuse box diagram and locating the correct fuse or relay.
How It Works: From Battery to Bulb
To fully grasp the importance of the fuse box, let's trace the path of electricity from the battery to, say, your headlights. Power flows from the battery, through the main wiring harness, and into the fuse box. The headlight circuit is protected by a fuse. If there's a short circuit (an unintended path for electricity with low resistance) in the headlight wiring, the current will surge. This surge will melt the thin wire inside the fuse, breaking the circuit and preventing damage to the headlight wiring or other components. The fuse sacrifices itself to protect the circuit.
The amperage rating of the fuse is chosen based on the maximum current the circuit is designed to handle. A fuse with a lower amperage rating than necessary will blow prematurely, while a fuse with a higher amperage rating may not blow quickly enough to prevent damage in the event of a short circuit.
Real-World Use: Basic Troubleshooting Tips
Here's how to put your newfound knowledge into practice:
- Identify the Problem: Determine which electrical component isn't working.
- Locate the Correct Fuse Box Diagram: Refer to your owner's manual or the sticker on the fuse box cover. Make sure you're using the correct diagram for your Land Cruiser model and year.
- Find the Corresponding Fuse: Use the diagram to identify the fuse associated with the malfunctioning component.
- Inspect the Fuse: Remove the fuse and visually inspect it. A blown fuse will typically have a broken filament or a blackened appearance.
- Replace the Fuse: Replace the blown fuse with a new fuse of the same amperage rating. Do not use a fuse with a higher amperage rating.
- Test the Circuit: Turn on the component to see if it now works. If the new fuse blows immediately, there's likely a short circuit in the wiring. This requires further investigation and may necessitate the help of a professional.
A multimeter can be invaluable for diagnosing electrical problems. You can use it to check for voltage at the fuse socket, continuity in the wiring, and resistance to identify shorts.
Safety: Handle with Care!
Working with electrical systems can be dangerous. Keep these safety precautions in mind:
- Disconnect the Battery: Before working on any electrical components, disconnect the negative (-) battery terminal. This will prevent accidental short circuits and potential shocks.
- Use Insulated Tools: Use tools with insulated handles to minimize the risk of electrical shock.
- Never Replace a Fuse with a Higher Amperage Rating: This can overload the circuit and potentially cause a fire.
- Be Careful Around Relays: Relays can sometimes get hot during operation. Allow them to cool down before handling them.
- Airbags: Some fuse boxes are located near airbag components. Never tamper with airbag wiring or fuses unless you're a qualified technician. Airbag deployment can cause serious injury.
Specifically, the wires going to the ECU and ABS system are very sensitive. Be careful when working on these circuits.
Understanding the fuse box diagram is a valuable skill for any Land Cruiser owner. By learning how to interpret the diagram and follow basic troubleshooting steps, you can save time, money, and frustration while keeping your rig running smoothly.
We have a comprehensive collection of Land Cruiser fuse box diagrams covering various models and years. You can download the diagram specific to your vehicle by [link to download page - placeholder]. Good luck!