Toyota Oil Filter Housing Assembly Diagram
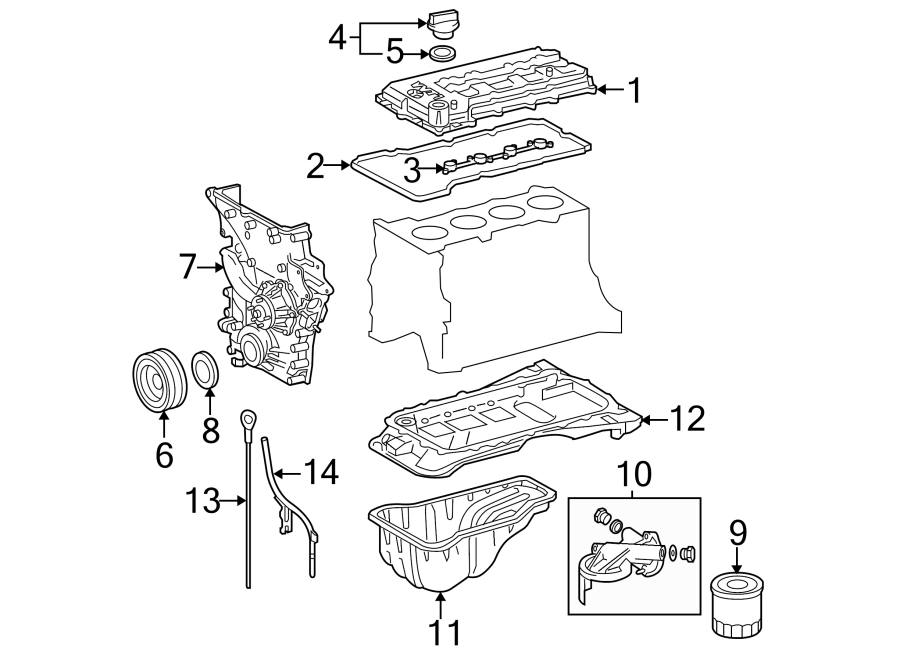
The Toyota oil filter housing assembly diagram is an invaluable resource for anyone working on their Toyota's engine. Whether you're performing routine maintenance, diagnosing a leak, or upgrading to a different type of oil filter housing, understanding this diagram is crucial. It provides a visual representation of the system, detailing the components, their relationships, and the pathways for oil flow. This article will delve into the specifics of the diagram, equipping you with the knowledge to confidently tackle your Toyota's oil filter housing.
Purpose of the Toyota Oil Filter Housing Assembly Diagram
The primary purpose of this diagram is to provide a comprehensive visual guide for:
- Repairs and Maintenance: Identifying individual components for replacement or repair. Locating seals, O-rings, and other small parts that often fail.
- Troubleshooting: Tracing oil leaks to their source by understanding the flow path and potential failure points.
- Installation: Ensuring proper installation of the oil filter housing and related components during maintenance or upgrades.
- Understanding System Functionality: Comprehending how the oil filtration system operates within the engine's lubrication system.
- Modifications and Upgrades: Facilitating informed decisions when considering aftermarket oil filter housings or related performance modifications.
Having access to this diagram dramatically reduces the chances of errors during repairs, saves time on diagnostics, and allows you to learn more about your engine's inner workings. It's a key piece of information that every Toyota owner performing DIY maintenance should have.
Key Specs and Main Parts
While specific components and their arrangement might vary slightly depending on your Toyota model and engine type (e.g., 2AR-FE, 2GR-FE), the core elements of the oil filter housing assembly remain largely consistent. Here's a breakdown of the common parts and their key specs:
- Oil Filter Housing: The main body that contains the oil filter element. Typically made of cast aluminum or reinforced plastic.
- Oil Filter Element: The disposable filter media that removes contaminants from the engine oil. Various types are available (paper, synthetic) with different filtration efficiencies (measured in microns).
- Filter Housing Cap/Lid: Secures the oil filter element inside the housing. Usually made of plastic and features a tightening mechanism.
- Drain Plug: Located on the housing for draining oil during filter changes. Typically requires a specific torque specification when tightening.
- O-Rings and Seals: Located at various points within the housing to prevent oil leaks. Critical for maintaining oil pressure. Common locations include the cap seal and the housing to engine block interface.
- Oil Cooler Lines (if equipped): Hoses that connect the oil filter housing to the engine's oil cooler. These lines are under pressure and need to be handled with care.
- Oil Pressure Sensor/Switch (if equipped): Monitors oil pressure and sends a signal to the engine control unit (ECU).
- Check Valve (if equipped): Prevents oil from draining back into the engine when the engine is off, ensuring quicker oil pressure buildup on startup.
- Bypass Valve (if equipped): Allows oil to bypass the filter element if it becomes clogged, preventing oil starvation to the engine.
The diagram will typically show the part numbers associated with each component, making it easier to order replacements.
Symbols and Conventions
Understanding the symbols used in the diagram is essential for accurate interpretation. Here are some common conventions:
- Lines: Indicate oil flow paths. Solid lines typically represent pressurized oil lines, while dashed lines might represent drain lines or vacuum lines. The thickness of the line might indicate the size of the oil passage.
- Arrows: Show the direction of oil flow.
- Colors: Some diagrams use colors to distinguish different types of lines or components. For example, red might indicate high-pressure oil lines, and blue might indicate coolant lines (if the oil filter housing is water-cooled).
- Icons: Specific symbols are used to represent components like the oil filter element, pressure sensors, check valves, and bypass valves. These icons are usually defined in a legend within the diagram.
- Numerical Callouts: Numbers pointing to specific parts of the assembly, corresponding to a parts list with descriptions and part numbers.
Pay close attention to the legend or key provided with the diagram to understand the specific symbols and colors used in your particular diagram.
How It Works
The Toyota oil filter housing assembly is an integral part of the engine's lubrication system. Here's a simplified explanation of how it works:
- The oil pump draws oil from the oil pan and pushes it under pressure to the oil filter housing.
- The oil enters the housing and passes through the oil filter element.
- The filter element traps contaminants, such as dirt, metal particles, and sludge, preventing them from circulating through the engine.
- Cleaned oil exits the oil filter housing and flows to various engine components, such as the crankshaft, connecting rods, camshaft, and valve train, providing lubrication and cooling.
- If the oil filter becomes clogged, the bypass valve (if equipped) opens, allowing unfiltered oil to flow to the engine to prevent oil starvation. This is a safety mechanism, but it's important to change the oil and filter as soon as possible when this occurs.
Understanding this basic flow path is essential for diagnosing problems and ensuring proper lubrication.
Real-World Use: Basic Troubleshooting Tips
The oil filter housing assembly is a common source of oil leaks. Here are some troubleshooting tips based on the diagram:
- Oil leak around the cap: Inspect the cap O-ring for damage or cracks. Replace the O-ring if necessary. Ensure the cap is tightened to the correct torque specification.
- Oil leak around the housing: Inspect the housing gasket (if equipped) for damage or leaks. Ensure the housing is properly tightened to the engine block. Consider replacing the gasket during an oil change for preventative maintenance.
- Oil leak from the drain plug: Inspect the drain plug washer for damage. Replace the washer if necessary. Ensure the drain plug is tightened to the correct torque specification.
- Low oil pressure: A clogged oil filter can restrict oil flow and cause low oil pressure. Change the oil and filter. If the problem persists, investigate other potential causes, such as a faulty oil pump or worn engine bearings.
When troubleshooting, always refer to the diagram to identify the specific components and their relationships. This will help you narrow down the source of the problem.
Safety Considerations
Working on the oil filter housing assembly involves handling hot engine oil and working in close proximity to hot engine components. Here are some safety precautions to keep in mind:
- Hot Oil: Always allow the engine to cool down completely before working on the oil filter housing. Hot oil can cause severe burns.
- Oil Pressure: Be aware that the oil system is pressurized when the engine is running. Relieve the pressure by allowing the engine to cool down.
- Flammability: Engine oil is flammable. Keep open flames and sparks away from the work area.
- Secure Vehicle: Ensure the vehicle is properly supported on jack stands before working underneath it. Never rely solely on a jack.
- Environmental Concerns: Dispose of used oil and filters properly at a designated recycling center. Do not pour oil down the drain or onto the ground.
- Torque Specifications: Always use a torque wrench and tighten bolts to the manufacturer's specified torque to avoid damaging components. Overtightening can crack plastic housings.
Special attention should be paid to the oil cooler lines (if equipped). These lines carry pressurized oil and can be damaged if not handled carefully. Always use the correct tools and techniques when disconnecting and reconnecting these lines.
We have the Toyota Oil Filter Housing Assembly Diagram available for download. This diagram will provide you with a detailed visual representation of the oil filter housing assembly for your specific Toyota model. It includes part numbers, torque specifications, and other critical information needed for performing maintenance and repairs.