
Toyota Sienna Serpentine Belt Diagram
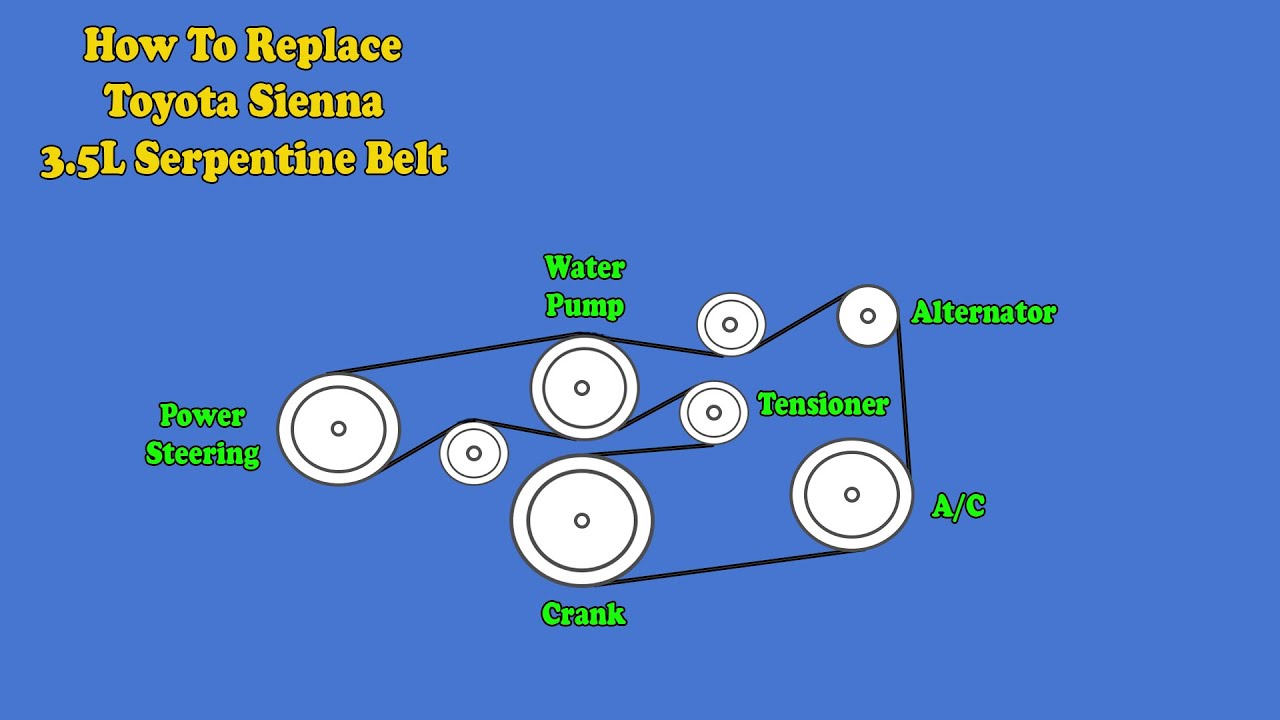
Okay, let's dive into the serpentine belt diagram for your Toyota Sienna. This is a crucial piece of information whether you're planning some routine maintenance, tackling a repair, or just expanding your automotive knowledge. Having a clear understanding of the serpentine belt and its routing is essential for keeping your Sienna running smoothly and avoiding potential headaches down the road.
Why This Diagram Matters
The serpentine belt diagram isn't just a pretty picture; it's your roadmap to maintaining a vital part of your engine. Its main purpose is to show you exactly how the serpentine belt is routed around all the different components it powers. Without this diagram, replacing the belt correctly after removal can be a real puzzle, potentially leading to misrouting, incorrect tension, and ultimately, component failure. The diagram is specifically useful for:
- Belt Replacement: Absolutely critical for correctly routing the new belt. A misrouted belt can quickly shred or damage components.
- Troubleshooting: Helps identify which component is not spinning if the belt breaks or slips. For example, if your power steering goes out, the diagram helps you quickly determine if the belt is even turning the power steering pump.
- General Maintenance: Allows you to visually inspect the belt's condition and the alignment of the pulleys.
- Component Replacement: If you're replacing the alternator, water pump, or AC compressor, you'll need to remove the serpentine belt, making the diagram essential for proper reinstallation.
Key Specs and Main Parts
Before we get to the diagram itself, let's quickly review the key components involved and some general specifications for a Toyota Sienna (Note: specific years and engine types may have slight variations):
- Crankshaft Pulley (or Damper): This is the driving pulley, connected directly to the engine's crankshaft. It's the source of power for the entire serpentine belt system.
- Alternator Pulley: The alternator generates electricity to charge the battery and power the electrical systems.
- Water Pump Pulley: The water pump circulates coolant to keep the engine from overheating.
- Power Steering Pump Pulley: The power steering pump provides hydraulic assistance for easier steering.
- Air Conditioning (A/C) Compressor Pulley: The A/C compressor circulates refrigerant to cool the cabin.
- Idler Pulley(s): These pulleys are smooth and used to guide the belt and maintain proper wrap angle around other pulleys.
- Tensioner Pulley: This spring-loaded pulley maintains the correct tension on the belt. It's crucial for preventing slippage and premature wear.
Belt Specs: The serpentine belt is usually a multi-ribbed, single belt made of reinforced rubber. The length and rib count vary depending on the Sienna's engine and model year. Always check your owner's manual or a reliable parts catalog for the correct belt specification for your specific vehicle. Using the wrong belt can lead to serious problems.
Understanding Diagram Symbols
Serpentine belt diagrams are fairly standardized, but let's break down the common symbols you'll encounter:
- Solid Lines: These represent the main path of the serpentine belt. Follow them carefully!
- Dotted Lines: Sometimes used to indicate the back side of the belt, where it's hidden from view in the diagram.
- Arrows: Show the direction of belt rotation around each pulley.
- Pulleys: Usually depicted as circles with labels or abbreviations (e.g., ALT for alternator, WP for water pump, AC for A/C compressor, PS for power steering). Some diagrams may show the ribbing on the pulley to indicate which side of the belt makes contact (ribbed side or smooth side).
- Tensioner: Typically shown as a pulley with an attached spring or arm, indicating its tensioning function.
- Idler Pulleys: Usually simple circles, often labeled "IDLER."
- Engine Block: Some diagrams show a simplified representation of the engine block to provide context.
Pay close attention to the direction of rotation indicated by the arrows. This is vital for ensuring the belt is routed correctly.
How It Works: The Serpentine Belt System
The serpentine belt system is relatively straightforward. The crankshaft pulley, driven by the engine, provides the rotational force. This force is then transferred to all the other pulleys via the serpentine belt. The belt wraps around each pulley, transferring the rotational energy needed to power the accessories. The tensioner pulley maintains the correct amount of tension on the belt, preventing slippage and ensuring efficient power transfer. Without proper tension, the belt can slip, causing reduced performance or even complete failure of the accessories (e.g., no power steering, no A/C, alternator not charging the battery).
The term "serpentine" comes from the belt's winding, snake-like path through all the components. The design allows a single belt to drive multiple accessories, simplifying the engine design and reducing maintenance compared to older systems that used multiple belts.
Real-World Use: Basic Troubleshooting
Here are some basic troubleshooting tips using the serpentine belt diagram:
- Squealing Noise: A squealing noise often indicates a slipping belt. Use the diagram to check if the belt is routed correctly and that the tensioner is applying sufficient pressure. Look for signs of glazing or wear on the belt.
- Accessory Failure: If your power steering, A/C, or alternator stops working, check the serpentine belt first. Is it broken? Is it properly routed? Is it turning the pulley of the non-functional accessory? The diagram will help you quickly pinpoint the problem area.
- Visual Inspection: Regularly inspect the belt for cracks, fraying, missing ribs, or signs of wear. The diagram allows you to easily trace the belt's path and thoroughly inspect its entire length.
- Misrouting: If you or someone else has recently worked on the engine, double-check the belt routing against the diagram. Misrouting is a common cause of accessory failure and belt damage.
If you notice a problem, consult the diagram to identify the potential causes and take appropriate action. Sometimes it's as simple as tightening the tensioner, while other times, you may need to replace the belt or even a pulley.
Safety Considerations
Working on the serpentine belt system can be dangerous if proper precautions aren't taken. Here are some key safety points to keep in mind:
- Disconnect the Battery: Always disconnect the negative battery terminal before working on any electrical components, including the alternator. This prevents accidental shocks.
- Engine Off and Cool: Never work on the serpentine belt system with the engine running or hot. Serious injury can occur.
- Moving Parts: Be extremely careful around moving parts, especially the crankshaft pulley. Keep your hands, clothing, and tools clear of the belt and pulleys while the engine is running (if you absolutely must run it for diagnostic purposes).
- Tensioner Tool: Use the correct tool to release the tension on the belt. Attempting to release the tension with makeshift tools can be dangerous.
- Eye Protection: Wear safety glasses to protect your eyes from debris.
The crankshaft pulley is particularly dangerous because it rotates at high speeds. Be extremely cautious around this component. The tensioner also stores a significant amount of spring force; use the correct tool and follow the manufacturer's instructions carefully when releasing the tension.
Understanding your Toyota Sienna's serpentine belt diagram is a valuable asset for any DIY mechanic or car enthusiast. By following the diagram and taking the necessary safety precautions, you can keep your Sienna running smoothly and reliably.
We have a downloadable file containing high-resolution serpentine belt diagrams for various Toyota Sienna model years and engine types. Contact us to request the specific diagram for your vehicle.