
Toyota Tacoma Serpentine Belt Diagram
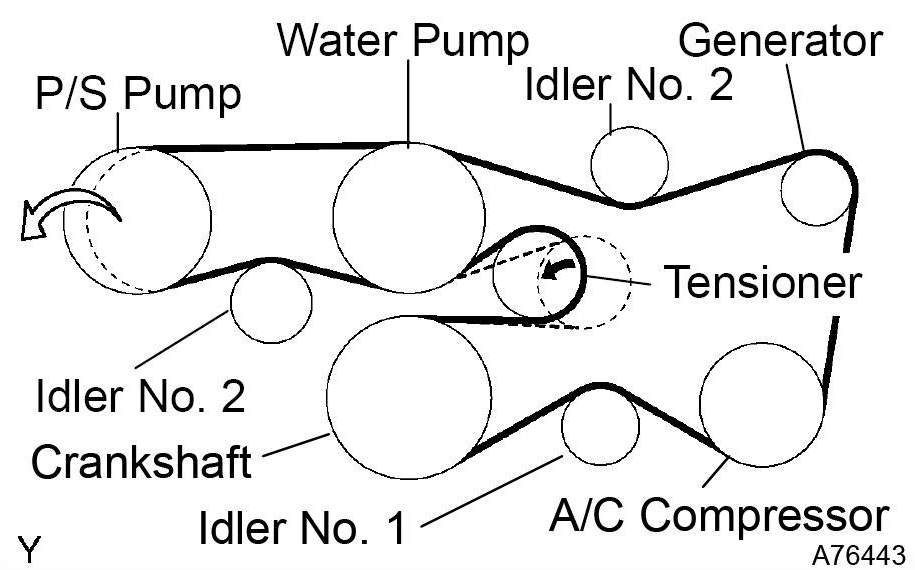
The serpentine belt, also known as the accessory drive belt, is a critical component in your Toyota Tacoma's engine. It's a single, continuous belt that snakes around several pulleys, powering essential accessories. Understanding its routing and condition is vital for preventative maintenance and troubleshooting. This article provides a comprehensive guide to understanding the Toyota Tacoma serpentine belt diagram, covering its purpose, key components, how it works, and practical troubleshooting tips. We aim to equip you with the knowledge to confidently diagnose and address serpentine belt issues on your own.
Purpose of the Serpentine Belt Diagram
The serpentine belt diagram is your roadmap to understanding the belt's routing. It serves several crucial purposes:
- Correct Installation: Perhaps the most important function. When replacing the serpentine belt, the diagram ensures you route the new belt correctly. Incorrect routing can damage accessories, cause the belt to slip, or even lead to engine damage.
- Troubleshooting: If you experience accessory failures (e.g., power steering loss, A/C not working, alternator not charging), the diagram helps you identify which accessories are driven by the belt and potentially pinpoint the cause.
- Preventative Maintenance: Regular inspection of the belt and its routing, guided by the diagram, allows you to identify potential problems early, such as misalignment or excessive wear.
- Learning and Understanding: For the DIY mechanic, understanding the serpentine belt system provides valuable insight into the workings of the engine's accessory drive system.
Key Specs and Main Parts
While specific specs may vary slightly depending on the Tacoma's year and engine (2.7L 4-cylinder or 3.5L V6), the core components and principles remain the same. Here's a breakdown of the main parts involved:
- Serpentine Belt: The continuous rubber belt itself, typically made of EPDM (ethylene propylene diene monomer) rubber for its durability and resistance to heat.
- Crankshaft Pulley: Driven directly by the engine's crankshaft. This pulley is the primary driver of the serpentine belt.
- Alternator Pulley: Powers the alternator, which charges the battery and provides electrical power to the vehicle.
- Power Steering Pump Pulley: Drives the power steering pump, providing hydraulic assistance for steering.
- Air Conditioning Compressor Pulley: Powers the A/C compressor, responsible for cooling the cabin air.
- Water Pump Pulley: Drives the water pump, which circulates coolant through the engine to prevent overheating. (Sometimes driven by the timing belt, especially on older models, check your specific engine configuration)
- Idler Pulley(s): Smooth, non-powered pulleys used to guide the belt around the accessories and maintain proper tension.
- Tensioner Pulley: Spring-loaded pulley that automatically maintains the correct tension on the serpentine belt. This is *crucial* for proper operation and preventing slippage. A failing tensioner can lead to belt squeal and eventual accessory failure.
Symbols and Conventions in Serpentine Belt Diagrams
Understanding the symbols used in a serpentine belt diagram is key to interpreting it correctly.
- Solid Lines: Represent the path of the serpentine belt. Follow the line to see how the belt wraps around each pulley.
- Pulleys: Usually depicted as circles with labels indicating which accessory they belong to (e.g., ALT for Alternator, P/S for Power Steering, A/C for Air Conditioning).
- Arrows: Indicate the direction of rotation of each pulley. This is helpful for understanding the belt's movement.
- Dashed Lines: May indicate the *rear* of the belt's path, showing that it passes behind another component or pulley.
- "Smooth" or "Grooved" Indication: Some diagrams will indicate whether the belt contacts a pulley's smooth surface or a grooved surface. This is essential for correct belt orientation. The ribbed side of the belt always engages with grooved pulleys, while the smooth side engages with smooth idler pulleys.
How It Works: The Serpentine Belt System
The serpentine belt system is a simple yet effective mechanism. The crankshaft pulley, driven directly by the engine, transmits rotational force to the serpentine belt. The belt, in turn, drives all the accessory pulleys. The tensioner pulley keeps the belt at the correct tension, preventing slippage and ensuring efficient power transfer. Without the serpentine belt system, you would have no power steering, no air conditioning, a non-charging battery, and potentially an overheating engine. It's truly the unsung hero of many modern vehicles.
Real-World Use: Basic Troubleshooting Tips
Knowing how to use the serpentine belt diagram can help you diagnose common issues:
- Squealing Noise: Often indicates a loose or worn serpentine belt. Check the tensioner pulley for proper operation. Also, inspect the belt for cracks, glazing (shiny surface), or missing ribs. Compare the belt path to the diagram to ensure it's correctly routed.
- Accessory Failure: If your power steering, A/C, or alternator stops working, first check the serpentine belt. Is it intact? Is it slipping on the affected pulley? The diagram will help you identify which accessory is linked to the belt.
- Belt Damage: Inspect the belt regularly for signs of wear. Cracks, fraying, or missing ribs are all signs that the belt needs replacement. Use the diagram to ensure the new belt is correctly routed.
- Misalignment: If a pulley is misaligned, it can cause premature belt wear and noise. Use a straight edge to check the alignment of the pulleys. The diagram can help you visualize the proper alignment.
Safety Considerations
Working on the serpentine belt system involves potential hazards:
- Moving Parts: Never work on the serpentine belt system while the engine is running. Serious injury can result from contact with the moving belt or pulleys.
- Hot Engine: Allow the engine to cool completely before working on the serpentine belt system.
- Spring Tension: The tensioner pulley is spring-loaded and can snap back forcefully if released improperly. Use the correct tools and procedures to relieve the tension safely. Some tensioners require a specific wrench or tool to compress the spring.
- Battery Disconnect: It is always a good practice to disconnect the negative terminal of the battery before working on any part of the electrical system.
Remember, if you're uncomfortable performing any of these tasks, consult a qualified mechanic. Replacing a serpentine belt is a relatively straightforward job, but it requires careful attention to detail and adherence to safety precautions.
We have a high-resolution, printable Toyota Tacoma serpentine belt diagram available for download. You can use this diagram as a reference guide when inspecting, troubleshooting, or replacing your serpentine belt.