
Trailer Wiring 7 Pin To 4 Pin Adapter
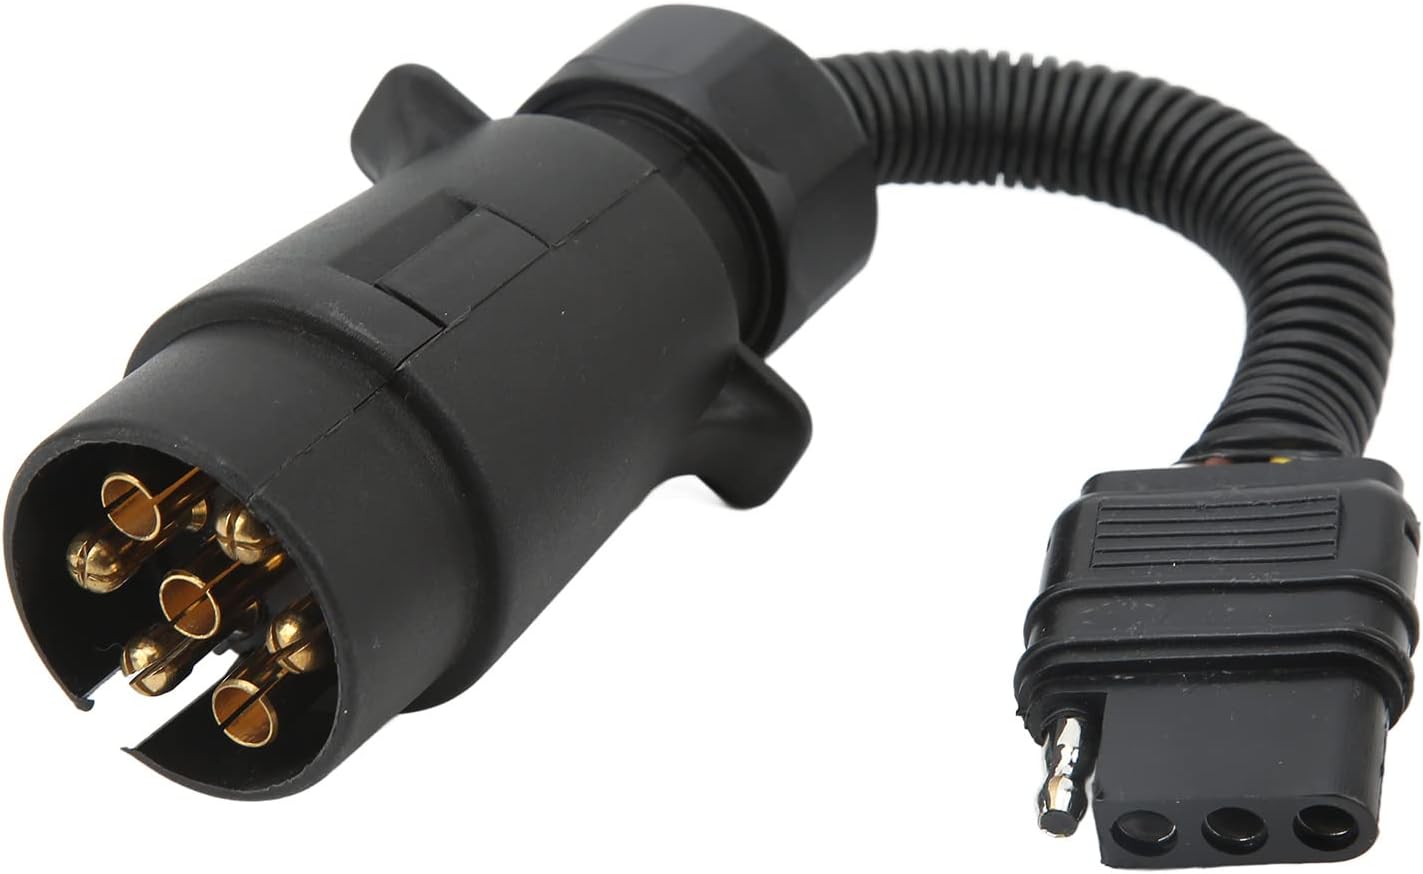
Let's dive into something many of you have likely encountered: adapting a 7-pin trailer wiring connector to a 4-pin one. This conversion is crucial for towing various trailers with different wiring configurations, and understanding how it works can save you time, money, and potential headaches on the road. This knowledge is invaluable for anyone doing trailer wiring repairs, upgrades, or even just wanting a solid understanding of their vehicle's electrical system.
Purpose of the 7-Pin to 4-Pin Adapter
The core reason for using a 7-pin to 4-pin adapter is compatibility. Modern vehicles, especially those equipped with factory tow packages, often feature a 7-pin connector. This connector provides a more comprehensive set of functions than the older, simpler 4-pin connector. However, many smaller trailers, such as utility trailers, boat trailers, and some light-duty campers, still utilize the 4-pin standard. The adapter acts as a bridge, taking the signals from the 7-pin connector and routing them to the appropriate pins on the 4-pin connector.
Without an adapter, you'd be unable to connect the trailer's lights to your vehicle, rendering it unsafe and illegal to tow. The adapter ensures that the trailer's essential lighting functions – tail lights, brake lights, and turn signals – are properly synchronized with your vehicle's lights. This is paramount for road safety and compliance with traffic laws.
Key Specs and Main Parts of the Adapter
The 7-pin to 4-pin adapter is a relatively simple device, but understanding its components is key. Here's a breakdown:
- 7-Pin Connector (Vehicle Side): This connector is designed to plug into the 7-pin receptacle on your tow vehicle. It conforms to the SAE J560 standard, which dictates the pin assignments and dimensions.
- 4-Pin Connector (Trailer Side): This connector plugs into the 4-pin connector on your trailer. This follows the industry standard for light-duty trailers.
- Wiring Harness: The internal wiring connects the pins from the 7-pin connector to the corresponding pins on the 4-pin connector. The quality of this wiring, its gauge (thickness), and its insulation are crucial for reliable performance and longevity.
- Housing: The plastic or rubber housing protects the internal wiring from the elements and physical damage. Look for a housing made of durable, weather-resistant materials.
When selecting an adapter, pay attention to the materials used. Cheaper adapters may use lower-gauge wiring or less durable plastics, leading to premature failure. Investing in a quality adapter from a reputable brand is generally a good idea.
Understanding the Wiring Diagram and Pin Assignments
A wiring diagram is essentially a roadmap for the adapter's internal connections. It shows which pin on the 7-pin connector is connected to which pin on the 4-pin connector. Understanding this diagram is crucial for troubleshooting and repairs. While color codes can vary slightly between manufacturers, the functional assignments are generally standardized.
7-Pin Connector Pin Assignments (SAE J560):
- Pin 1 (White): Ground
- Pin 2 (Blue): Electric Brakes (for trailers with electric brakes)
- Pin 3 (Brown): Tail Lights
- Pin 4 (Green): Right Turn/Brake Light
- Pin 5 (Red): Auxiliary (often used for charging a trailer battery or powering interior lights)
- Pin 6 (Black): 12V Power (hot lead from the vehicle's battery)
- Pin 7 (Yellow): Left Turn/Brake Light
4-Pin Connector Pin Assignments:
- Pin 1 (White): Ground
- Pin 2 (Brown): Tail Lights
- Pin 3 (Yellow): Left Turn/Brake Light
- Pin 4 (Green): Right Turn/Brake Light
Key Wiring Connections: The adapter maps the 7-pin functions to the appropriate 4-pin functions. Most importantly, the Right Turn/Brake and Left Turn/Brake signals are combined onto single pins on the 4-pin connector.
How the Adapter Works
The adapter's operation is fairly straightforward. It's essentially a pass-through device that re-routes the electrical signals from the 7-pin connector to the 4-pin connector. When you plug the 7-pin connector into your vehicle, each pin makes contact with a corresponding wire inside the adapter. These wires then run to the 4-pin connector, where they make contact with the trailer's wiring. When you activate your vehicle's lights (tail lights, brake lights, turn signals), the electrical signals travel through your vehicle's wiring harness, through the adapter, and finally to the trailer's lights, causing them to illuminate in sync with your vehicle's lights.
The 7-pin connector offers additional functionality not present on the 4-pin connector, such as a dedicated 12V power line and an electric brake controller signal. These extra circuits are simply not used in the adaptation to the 4-pin connector. Therefore, if your trailer requires electric brakes, this adapter will not provide the functionality. You would need to either install a 7-pin connector on the trailer, or use a more sophisticated adapter (not a simple pass-through) that supports electric brakes, if available.
Real-World Use and Basic Troubleshooting
Here are some common issues and troubleshooting tips when using a 7-pin to 4-pin adapter:
- No Lights: This is the most common problem. Start by checking the fuses in your tow vehicle. A blown fuse is often the culprit. Next, inspect the adapter for corrosion or damage. Use a multimeter to check for continuity between the pins on the 7-pin and 4-pin connectors. If you find a break in the circuit, the adapter may need to be replaced. Also, examine the trailer's wiring and light bulbs.
- Dim Lights: Dim lights can indicate a poor ground connection. Ensure that the ground wire (white) is securely connected to both the vehicle and the trailer frame. Clean any corroded connections.
- Erratic Lights: Erratic lighting behavior can be caused by loose connections or corroded contacts. Carefully inspect all connections and clean them with electrical contact cleaner.
- Turn Signals Not Working: This could be due to a faulty turn signal switch in your vehicle, a blown fuse, or a problem with the adapter's wiring. Check the turn signal bulbs on both your vehicle and the trailer.
Remember to always disconnect the trailer from the vehicle before troubleshooting any electrical problems. Using a test light or multimeter can help you pinpoint the source of the problem.
Safety Considerations
Working with electrical systems always carries some risk. Here are some important safety precautions:
- Disconnect the Battery: Before working on any electrical wiring, disconnect the negative terminal of your vehicle's battery. This will prevent accidental short circuits and electrical shocks.
- Wear Safety Glasses: Protect your eyes from debris and sparks when working with wiring.
- Use Proper Tools: Use insulated tools designed for electrical work. Avoid using tools with damaged or frayed insulation.
- Be Aware of High-Current Circuits: The 12V power circuit (black wire on the 7-pin connector) can carry a significant amount of current. Be extremely careful when working with this circuit to avoid short circuits and potential damage to your vehicle's electrical system.
- Never Exceed the Rated Capacity: The adapter is designed for specific current loads. Do not exceed these limits, as this can damage the adapter and potentially cause a fire.
Working on your vehicle's electrical system can be complex. If you're not comfortable with any of these procedures, it's best to consult a qualified mechanic or auto electrician.
By understanding the purpose, components, and wiring of a 7-pin to 4-pin adapter, you're well-equipped to diagnose and resolve common trailer lighting issues. Remember to always prioritize safety and consult a professional if you're unsure about any aspect of the repair.
For your convenience, we have a detailed wiring diagram available for download to assist you further in your trailer wiring endeavors.