Troy Bilt Bronco Transmission Belt Diagram
The Troy-Bilt Bronco is a popular lawn tractor known for its reliability and ease of use. However, like any machine with moving parts, it requires occasional maintenance and repairs. One of the most crucial systems is the transmission, responsible for transferring power from the engine to the wheels. Understanding the transmission belt diagram is fundamental for diagnosing issues, performing repairs, and ensuring the long-term health of your mower. This article will serve as a comprehensive guide to deciphering the Troy-Bilt Bronco transmission belt diagram, empowering you to confidently tackle transmission-related tasks.
Purpose of the Transmission Belt Diagram
The transmission belt diagram serves multiple critical purposes:
- Repair and Maintenance: The diagram is your roadmap for replacing a worn or broken belt. It shows the precise routing of the belt around pulleys, idlers, and the transmission itself. Without this diagram, properly installing a new belt can be a frustrating and potentially damaging process.
- Troubleshooting: A slipping belt, jerky movement, or complete loss of drive can often be traced to a problem with the belt or its related components. The diagram helps you visually inspect the belt's condition, identify correct tension, and check for proper alignment.
- Understanding the System: Even if you don't need to repair anything, studying the diagram provides valuable insight into how the transmission system functions. This knowledge can help you anticipate potential problems and perform preventative maintenance.
- Parts Identification: Many diagrams also label the various components of the transmission system, making it easier to identify and order replacement parts like pulleys, idler arms, and tension springs.
Key Specs and Main Parts
Before diving into the diagram, let's define some key specs and components typically found in a Troy-Bilt Bronco transmission system:
- Belt Size and Type: The correct belt size and type are crucial. Using the wrong belt will lead to slippage, premature wear, and potentially damage to the transmission. Typically, the belt is a V-belt, and the diagram or your owner's manual will specify the length, width, and angle.
- Engine Pulley: This pulley is directly connected to the engine's crankshaft and provides the initial power source for the transmission system.
- Transmission Pulley: This pulley is connected to the transmission input shaft and receives power from the engine pulley via the belt.
- Idler Pulleys: These pulleys are strategically placed to guide the belt around obstacles, maintain proper tension, and ensure optimal contact with the engine and transmission pulleys.
- Tension Spring: This spring applies pressure to the idler pulley, keeping the belt taut and preventing slippage. The correct tension is essential for proper operation.
- Idler Arm: The idler arm is a lever that holds one or more idler pulleys. The arm pivots to adjust belt tension, usually controlled by the mower's speed control lever.
- Transmission: The heart of the system, the transmission converts the engine's rotational power into the appropriate speed and torque to drive the wheels. Bronco's typically use hydrostatic transmissions, which are smoother and more versatile than gear-drive systems.
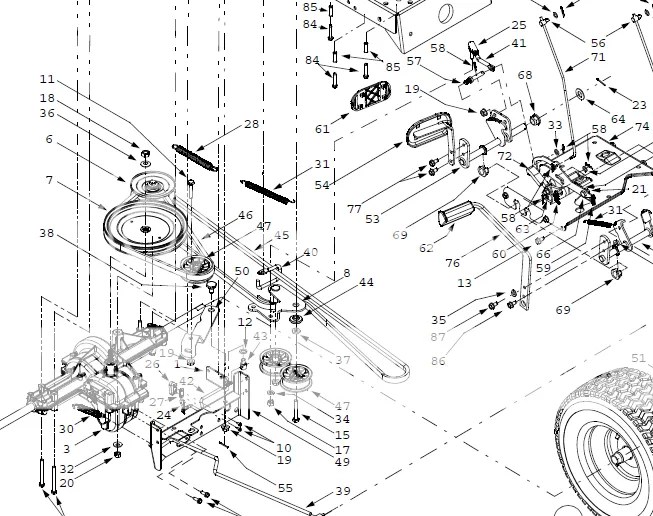
Diagram Symbols Explained
Transmission belt diagrams use standardized symbols to represent different components and features. Here's a breakdown of common symbols:
- Solid Lines: These usually represent the belt itself. The thickness of the line might indicate the belt width.
- Dashed Lines: Dashed lines may indicate the path of the belt underneath other components or within enclosed areas.
- Circles: Circles typically represent pulleys. The size of the circle might indicate the pulley diameter.
- Arrows: Arrows show the direction of belt rotation. This is important for ensuring proper belt routing.
- Numbers/Labels: Numbers or labels are used to identify specific components, such as "Engine Pulley," "Idler Pulley #1," or "Transmission Pulley." These labels often correspond to a parts list.
- Colors: While not always present, color-coded diagrams might use different colors to distinguish between different belt sections or components. For example, the belt might be shown in blue, while pulleys are shown in gray. Consult the diagram's legend if colors are used.
- Icons: Icons could represent features like the location of adjustment points, the direction of spring tension, or warnings about specific hazards.
It's crucial to consult the specific legend or key that accompanies your diagram. This will provide the most accurate interpretation of the symbols used.
How the Transmission System Works
The Troy-Bilt Bronco's transmission system is designed to efficiently transfer power from the engine to the wheels, allowing you to control the mower's speed and direction. Here's a simplified explanation of the process:
- The engine's crankshaft rotates the engine pulley.
- The transmission belt, wrapped around the engine pulley and the transmission pulley, transfers the rotational force.
- The idler pulleys guide and tension the belt, ensuring optimal contact between the engine and transmission pulleys.
- The transmission pulley rotates the transmission's input shaft.
- The transmission converts the input shaft's rotation into the appropriate speed and torque to drive the wheels. In a hydrostatic transmission, this is achieved using hydraulic fluid and a variable displacement pump.
- The mower's speed control lever adjusts the position of the idler arm, which changes the belt tension and, consequently, the speed of the transmission.
Real-World Use: Basic Troubleshooting Tips
Here are some common problems and how the transmission belt diagram can help you diagnose them:
- Slipping Belt: This results in a loss of power and can be caused by a worn belt, insufficient tension, or a misaligned pulley. Use the diagram to inspect the belt for wear and tear, check the tension spring for proper function, and ensure that all pulleys are aligned.
- Jerky Movement: This can be caused by a damaged belt or a problem with the idler pulleys. The diagram will help you locate the idler pulleys and check for damage or excessive wear.
- No Drive: This could be a broken belt, a disengaged idler pulley, or a problem with the transmission itself. The diagram allows you to quickly verify the belt's condition and the position of the idler pulley.
- Unusual Noises: Squealing or grinding noises can indicate a misaligned pulley, a worn belt, or a dry bearing in an idler pulley. The diagram helps you pinpoint the source of the noise.
When troubleshooting, always start by visually inspecting the belt, pulleys, and idler arm. Compare the actual configuration to the diagram to identify any discrepancies. Remember to disconnect the spark plug wire before working on the transmission system to prevent accidental starting.
Safety Precautions
Working on the transmission system involves potential hazards. Always observe the following safety precautions:
- Disconnect the Spark Plug: This is the most important step to prevent accidental starting. Remove the spark plug wire and secure it away from the spark plug.
- Wear Safety Glasses: Protect your eyes from debris and flying objects.
- Wear Gloves: Protect your hands from sharp edges and grease.
- Work in a Well-Ventilated Area: Avoid inhaling fumes from gasoline or other chemicals.
- Support the Mower Securely: If you need to lift the mower, use jack stands to support it safely. Never work under a mower supported only by a jack.
- Beware of Hot Components: The engine and transmission can get very hot. Allow them to cool down before working on them.
- Spring Tension: Be extremely cautious when working with tension springs. These springs store a significant amount of energy and can cause serious injury if they are released suddenly. Use appropriate tools to safely remove and install tension springs.
The area around the transmission and the pulleys is especially risky because of moving parts. Always ensure the engine is OFF and spark plug disconnected before any adjustments or inspections.
With the transmission belt diagram in hand and a clear understanding of its symbols and function, you're well-equipped to diagnose, repair, and maintain your Troy-Bilt Bronco's transmission system. Remember to always prioritize safety and consult your owner's manual for specific instructions and recommendations.
We have the file. If you require a downloadable PDF version of the Troy-Bilt Bronco Transmission Belt Diagram, please reach out and we'll happily provide it!