
Two Switches One Light Wiring Diagram
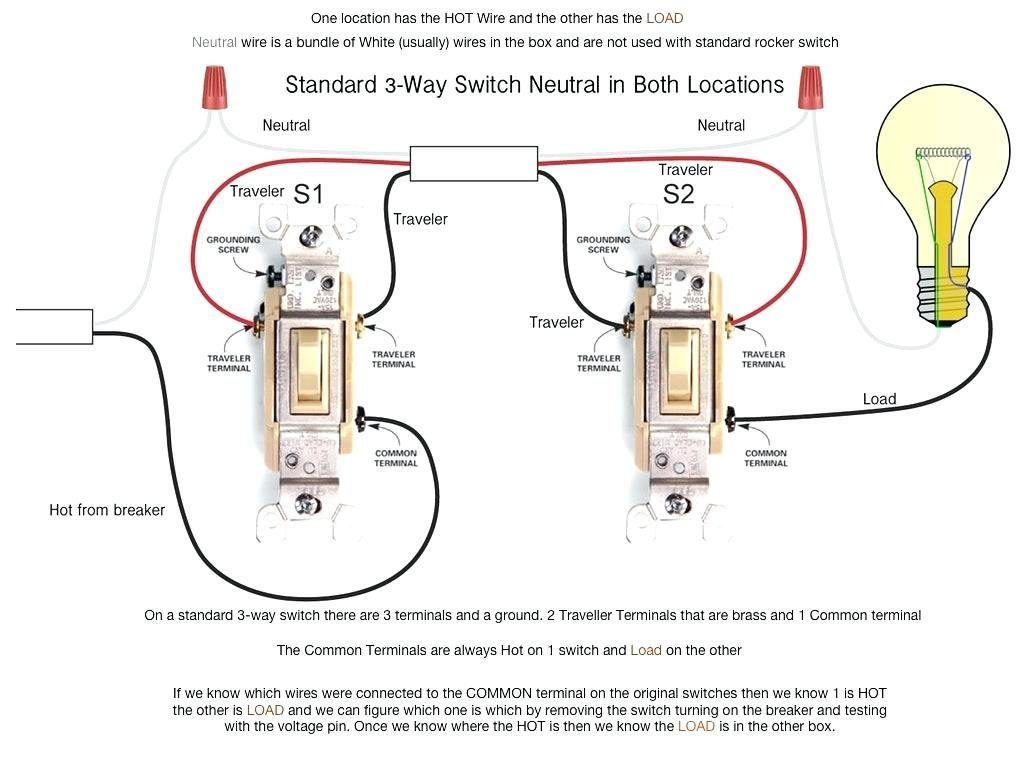
Let's talk about wiring a seemingly simple yet surprisingly versatile circuit: two switches controlling a single light. This "two-way" or "three-way" (depending on where you're from) setup is ubiquitous, found everywhere from your garage to your home's hallways. Understanding the wiring diagram isn't just about replacing a faulty switch; it's a fundamental skill for any DIY mechanic or car modder looking to add interior lighting, auxiliary lights, or even modify existing circuits. This article will break down the diagram, the components, and the operational principles, giving you the confidence to tackle this common wiring task.
Purpose: Why Master the Two-Switch, One-Light Circuit?
Why bother understanding this circuit? Several reasons come to mind:
- Repairing Existing Circuits: Diagnosing why your lights aren't behaving as expected is significantly easier when you understand the underlying wiring. Is one switch unresponsive? Does the light flicker? Understanding the diagram helps you pinpoint the fault.
- Adding Interior Lighting: Imagine adding footwell lighting in your car, controlled by switches at the driver and passenger doors. This circuit provides the foundation.
- Custom Lighting Modifications: Perhaps you want to control an auxiliary light bar with switches in different locations within your vehicle.
- Understanding Electrical Fundamentals: Mastering this circuit provides a solid grounding in electrical principles, enabling you to tackle more complex projects with confidence.
- Safety: Perhaps the most important reason - knowledge and competence in electronics is safety and keeps you and your vehicle from harm.
Key Specs and Main Parts
Before diving into the diagram, let's identify the key components and their specifications:
- Power Source (Battery): Typically, this will be your vehicle's 12V battery. Ensure the circuit is appropriately fused to protect against overcurrent.
- Two 3-Way Switches: This is crucial. These are not your standard single-pole, single-throw (SPST) switches. 3-way switches have three terminals: a common terminal and two traveler terminals. The model type/rating depends on the type of bulb used for your application.
- Light Fixture (Bulb): The bulb's wattage will determine the current draw. Ensure your wiring and switches are rated to handle the load. LED bulbs are energy-efficient and often preferred.
- Wiring (Gauge): The wire gauge (thickness) must be appropriate for the current draw. Consult a wiring chart to determine the correct gauge for your specific application and wire length. Generally, 14 or 16 AWG is sufficient for most interior lighting applications, but always verify.
- Fuses: Essential for circuit protection. A fuse with a rating slightly higher than the expected current draw is recommended.
Decoding the Wiring Diagram: Symbols and Conventions
Wiring diagrams use standardized symbols to represent components and connections. Understanding these symbols is key to interpreting the diagram. Here’s a breakdown:
- Straight Lines: These represent wires. Thicker lines may indicate higher current-carrying capacity.
- Dots at Intersections: A dot where two lines cross indicates a connection. No dot indicates the wires are simply crossing without being connected.
- Switch Symbol (3-Way): Typically represented with a toggle arm that can switch between two different positions. The common terminal is usually indicated with a small dot or a "COM" label.
- Light Bulb Symbol: Represented by a circle with a cross inside or a stylized representation of a bulb filament.
- Battery Symbol: A series of short and long parallel lines, representing the battery's cells. The longer line indicates the positive (+) terminal.
- Fuse Symbol: A wavy line inside a rectangle or a small, filled rectangle.
- Color Coding: While not always explicitly stated on the diagram, standard color coding practices are often followed:
- Red: Typically indicates positive (+) voltage or power wire.
- Black: Typically indicates ground (-) or negative return.
- Other Colors (e.g., Blue, Yellow, White): Often used for the traveler wires between the two 3-way switches.
How the Two-Switch, One-Light Circuit Works
The magic lies in the 3-way switches and their traveler terminals. Here’s a step-by-step explanation:
- Power to the First Switch: The power source (battery, via a fuse) is connected to the common terminal of the first 3-way switch.
- Traveler Wires: Two wires, called "traveler wires," connect the two traveler terminals of the first switch to the two traveler terminals of the second switch. These wires act as alternative paths for the current.
- Second Switch to the Light: The common terminal of the second 3-way switch is connected to one terminal of the light fixture.
- Ground Connection: The other terminal of the light fixture is connected to ground (the vehicle's chassis).
When both switches are in the same position (e.g., both switched to their "top" traveler terminal), the circuit is complete, and the light turns on. When either switch is toggled to the opposite position (e.g., from "top" to "bottom"), the circuit is broken, and the light turns off. Because there are two traveler wires, either switch can interrupt the current flow, providing control from two locations.
Real-World Use and Basic Troubleshooting
Let’s look at common problems and how to diagnose them:
- Light Doesn't Turn On:
- Check the Bulb: Start with the simplest solution. Is the bulb burned out?
- Check the Fuse: A blown fuse is a common culprit. Replace it with a fuse of the correct amperage rating.
- Check Connections: Ensure all wire connections are secure and making good contact. Loose connections can cause intermittent problems or complete failure.
- Test the Switches: Use a multimeter to test the continuity of the switches. A faulty switch may not be switching properly.
- Test the Wiring: Check for breaks or shorts in the wiring using a multimeter.
- Light Stays On: This is less common, but potential causes include:
- Short Circuit: A wire is shorting to ground. Inspect the wiring carefully for damaged insulation.
- Faulty Switch: One of the switches may be stuck in the "on" position.
- One Switch Doesn't Work: This often indicates a problem with the wiring or the switch itself. Test the continuity of the switch and the wiring between the switches.
Safety First: Handling Electrical Components
Working with electrical systems can be dangerous. Here are some critical safety precautions:
- Disconnect the Battery: Always disconnect the negative terminal of the battery before working on any electrical circuit. This prevents accidental shorts and electric shock.
- Use Insulated Tools: Use tools with insulated handles to minimize the risk of electric shock.
- Never Work in Wet Conditions: Water conducts electricity, increasing the risk of shock.
- Double-Check Your Wiring: Before reconnecting the battery, carefully double-check all wiring connections to ensure they are correct and secure.
- Fuses are Mandatory: Never bypass a fuse. Fuses are your last line of defense against overcurrent and potential fires. Use the correct fuse amperage rating.
- Know Your Limits: If you are not comfortable working with electrical systems, seek the help of a qualified electrician or technician. Don't attempt repairs beyond your skill level.
Disclaimer: Working with electrical systems involves inherent risks. The information provided here is for educational purposes only and should not be considered a substitute for professional advice. Always follow proper safety precautions and consult with a qualified technician if you have any doubts or concerns.
Final Notes
The two-switch one-light system is simple and easy to understand and implement for your automobile.
This document contains essential knowledge, a comprehensive guide to understanding and implementing a crucial aspect of your vehicle's functionality