Under Hood Fuse Panel 1995 Ford F150 Fuse Box Diagram
Alright, let's dive into the under-hood fuse panel of a 1995 Ford F150. This is a crucial component for maintaining and troubleshooting your truck's electrical system. Whether you're dealing with a blown fuse, planning an electrical modification, or simply trying to understand how things work, understanding this fuse box and its diagram is essential. We're going to approach this from a practical standpoint, like a seasoned mechanic explaining things to someone who knows their way around an engine bay.
Purpose: Why This Diagram Matters
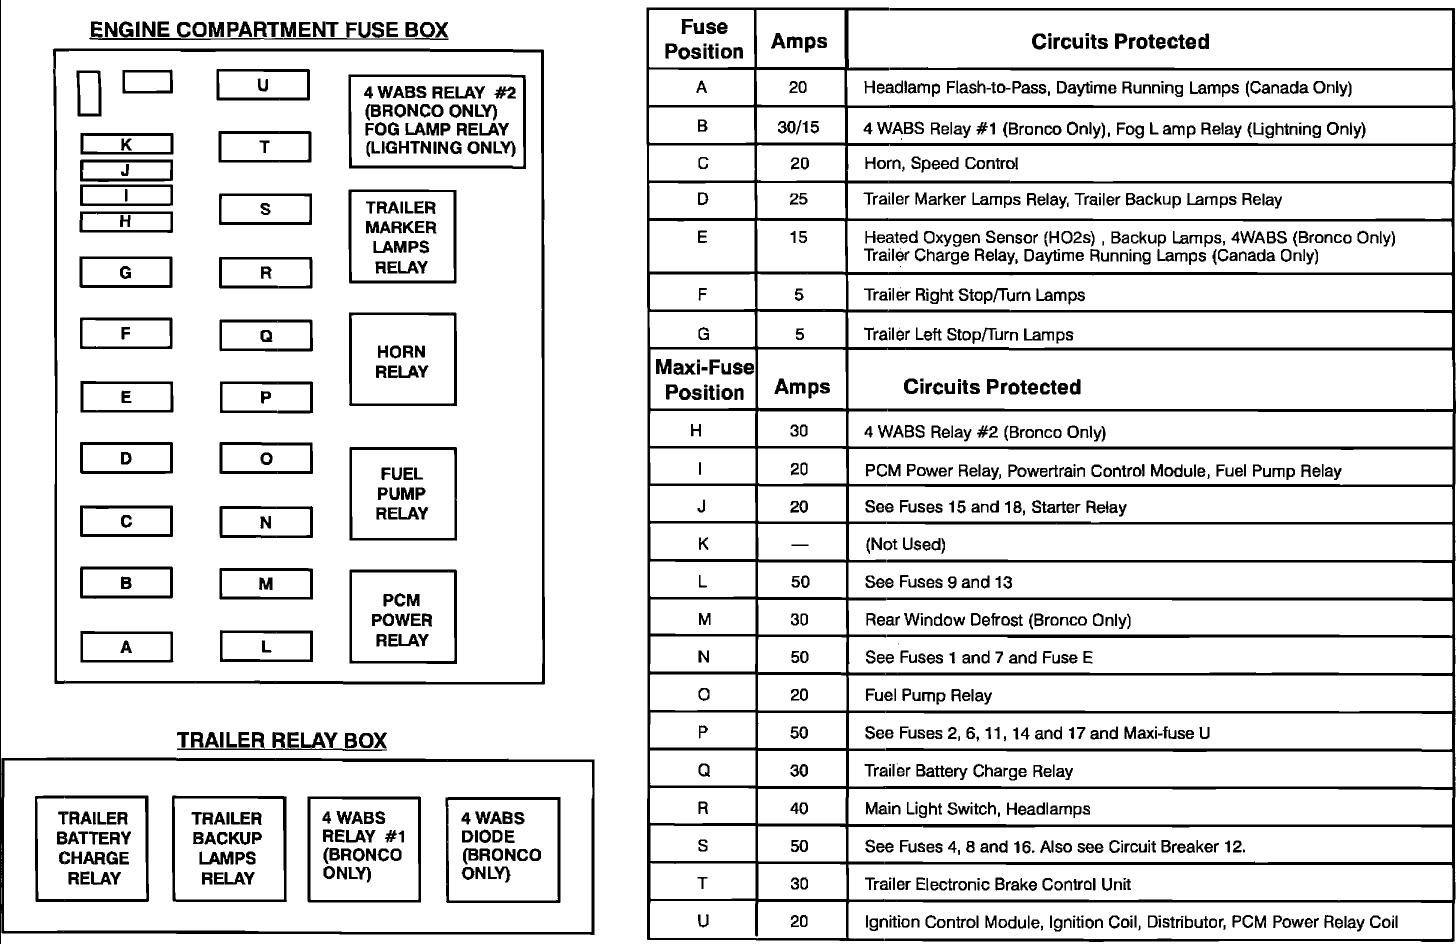
Think of the fuse box as the central distribution point for electrical power in your F150. Its primary purpose is circuit protection. Each circuit – headlights, fuel pump, radio, etc. – is protected by a fuse. If a circuit experiences an overload (too much current draw, typically from a short circuit), the fuse blows, interrupting the flow of electricity and preventing damage to the wiring and components. A fuse box diagram, like the one for your '95 F150, is invaluable because:
- It Identifies Circuits: You can quickly locate the fuse associated with a specific component. No guessing!
- It Simplifies Troubleshooting: Knowing which fuse protects which circuit makes diagnosing electrical problems much easier.
- It Aids in Modifications: When adding aftermarket accessories (lights, audio systems, etc.), you need to identify suitable circuits for tapping into, and the diagram shows you which fuse to tap into.
- It Ensures Correct Fuse Replacement: Using the wrong amperage fuse can lead to serious problems – fire is the biggest risk. The diagram tells you the correct amperage for each fuse.
Key Specs and Main Parts
Let's break down the physical components and their function:
- Fuse Box Housing: This is the plastic enclosure that holds all the fuses and relays. It's typically located under the hood, often near the battery or on the inner fender.
- Fuses: These are the sacrificial components that protect the circuits. They come in various amperage ratings (measured in amps, often denoted by "A"). Common types in your F150 include blade-type fuses (also called ATO or APR fuses) and possibly some older glass-tube fuses.
- Relays: These are electromechanical switches that allow a low-current circuit to control a high-current circuit. For example, the headlight relay allows a small switch in the cab to control the high-current headlights.
- Fuse Puller: A small plastic tool included in the fuse box, used to remove fuses safely without damaging them or the terminals.
- Grounding Points: While not directly part of the fuse box itself, it's critical to remember that all electrical circuits require a proper ground. The fuse box is connected to the chassis ground, and any issues with grounding can mimic fuse problems.
Symbols: Interpreting the Diagram
The fuse box diagram is essentially a map. Understanding the symbols is key to navigating it. Here's a breakdown:
- Lines: Solid lines represent electrical conductors (wires). Dotted lines may represent grounding connections or optional circuits.
- Numbers: Each fuse and relay is typically numbered on the diagram. This number corresponds to a physical location within the fuse box. You'll find corresponding numbers molded into the plastic fuse box itself.
- Amperage Rating: Next to each fuse on the diagram, you'll see a number followed by "A" (e.g., "20A"). This is the amperage rating of the fuse. Never use a fuse with a higher amperage rating than specified.
- Component Icons: The diagram will use icons to represent the circuits protected by each fuse. Common icons include headlights, taillights, fuel pump, windshield wipers, and radio. The specific icons may vary slightly, but they're usually intuitive.
- Relay Symbols: Relays are represented by a square with a diagonal line through it, or with a coil and switch diagram. The diagram will also show which terminals of the relay are the coil, the common, the normally open (NO), and the normally closed (NC) contacts.
- Color Coding: Sometimes, diagrams will use color coding to differentiate between circuits. For example, a red line might indicate a constant power supply, while a blue line might indicate a switched power supply. Refer to the legend on the diagram for clarification.
How It Works: From Battery to Component
Electricity flows from the battery, through the ignition switch (or a constant-on source), to the fuse box. Inside the fuse box, the current is distributed to various circuits via the fuses. If a short circuit occurs in a particular circuit, the fuse for that circuit blows, interrupting the current flow and protecting the wiring and the component at the end of the circuit.
Consider the example of the fuel pump. Power flows from the battery, through the ignition switch (in the "run" position), to the fuel pump relay. The computer then grounds the fuel pump relay, allowing power to flow from a dedicated fuse in the fuse box, through the relay contacts, to the fuel pump. If the fuel pump develops a short circuit, the fuse will blow, cutting power to the pump and preventing further damage.
Real-World Use: Basic Troubleshooting Tips
Here's how you can use the fuse box diagram to troubleshoot common electrical problems:
- Symptom Identification: First, identify the component that's not working (e.g., the radio).
- Diagram Lookup: Consult the fuse box diagram to find the fuse associated with that component.
- Fuse Inspection: Physically inspect the fuse. Look for a broken filament inside the fuse body. Even if it looks good, it's always a good idea to test it with a multimeter set to continuity.
- Fuse Replacement: If the fuse is blown, replace it with a fuse of the exact same amperage rating.
- Test the Component: After replacing the fuse, test the component to see if it's working again.
- Recurrent Blown Fuses: If the fuse blows repeatedly, it indicates a short circuit or overload in the circuit. You'll need to investigate further to find the source of the problem. Check the wiring for damage, the component itself for internal shorts, and consider having a professional diagnose the issue.
Important Note: Before replacing a fuse, always turn off the ignition switch and any other electrical loads on the circuit. This will help prevent sparks and further damage.
Safety: Risky Components and Precautions
While most fuse box components are relatively low-voltage, there are still some safety precautions to keep in mind:
- Battery Disconnect: When working on any electrical system, especially if you're tracing wires or making modifications, it's always a good idea to disconnect the negative terminal of the battery. This will prevent accidental short circuits.
- Avoid Water: Never work on the fuse box in wet or damp conditions. Water can conduct electricity and create a shock hazard.
- High-Current Circuits: Be extra cautious when working on circuits that handle high current, such as the starter motor or the alternator. These circuits can deliver a powerful shock.
- Airbag Circuits: Never tamper with the airbag circuits. These are highly sensitive and can deploy unexpectedly, causing serious injury. If you suspect a problem with the airbag system, consult a qualified technician.
Working with electrical systems can be dangerous if you're not careful. If you're unsure about any aspect of the repair, it's always best to consult a qualified mechanic.
Now that you have a solid understanding of the 1995 Ford F150 under-hood fuse panel, you're better equipped to diagnose and repair electrical problems. Remember to always consult the diagram and follow safety precautions.
We have the complete fuse box diagram file available for download to help you with your electrical project on your '95 F150. This detailed diagram can be a lifesaver when troubleshooting or modifying your truck's electrical system.