What Are The 2 Wires On A Carburetor Diagram
Carburetors, though increasingly rare in modern vehicles, remain a staple in classic cars, motorcycles, and small engines. Understanding the electrical components in a carburetor system, particularly the two wires often depicted in diagrams, is crucial for troubleshooting, repair, and even performance modifications. This article dives into the details of these wires, providing you with the knowledge to confidently work on your carbureted engine.
Why Bother with Carburetor Diagrams?
Carburetor diagrams aren't just pretty pictures; they're essential tools. They are vital for:
- Troubleshooting: Diagnosing issues like poor idling, stalling, or fuel delivery problems requires understanding the carburetor's components and their interactions.
- Repairing: When rebuilding or replacing parts, a diagram ensures correct assembly and prevents costly mistakes.
- Modifying: For those seeking performance gains, a diagram helps identify components for tuning and optimization.
- Learning: Even if you're not actively wrenching, understanding carburetor function deepens your automotive knowledge.
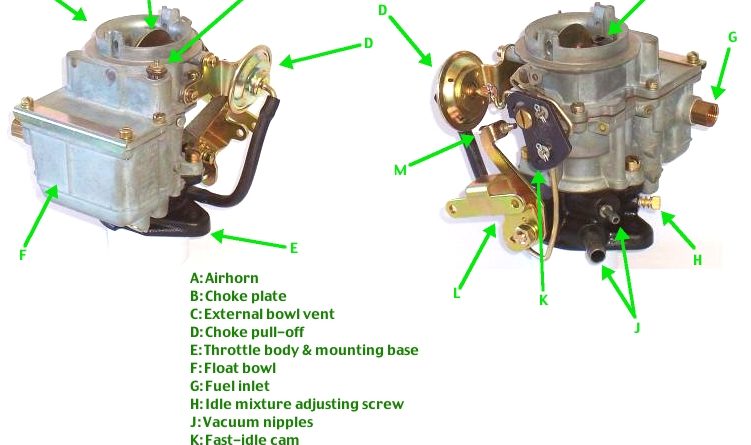
Key Specs and Main Parts: An Overview
Before we focus on the wiring, let's recap the critical carburetor components:
- Float Bowl: A reservoir that maintains a consistent fuel level.
- Float: A buoyant object that controls fuel inlet valve.
- Main Jet: Meters fuel flow at higher engine speeds.
- Idle Circuit: Provides fuel and air mixture at idle.
- Accelerator Pump: Delivers extra fuel during sudden acceleration.
- Choke: Restricts airflow during cold starts, enriching the fuel mixture.
- Throttle Valve: Controls airflow into the engine, regulated by the accelerator pedal.
These components are often depicted using simplified symbols in the diagrams, making it important to familiarize yourself with them.
Deciphering Carburetor Diagram Symbols
Carburetor diagrams use a visual language to represent complex systems concisely. Here's a breakdown of common symbols:
- Lines:
- Solid lines typically represent fuel lines.
- Dashed lines might indicate vacuum lines or air passages.
- Thick lines often represent mechanical linkages (e.g., throttle cable).
- Colors: While not standardized, color coding can provide additional information. For example, red might signify fuel, blue might indicate vacuum, and black could represent grounding.
- Icons:
- Simple circles or squares often depict jets or valves.
- Coils or wavy lines usually represent electrical components like solenoids.
- Arrows indicate the direction of flow (fuel, air, or vacuum).
Understanding these conventions allows you to quickly interpret the diagram and identify specific components.
The Two Wires: Functionality Unveiled
Now, let's pinpoint those two wires. In many carburetors, these wires commonly connect to these two functions:
1. Electric Choke
The electric choke is arguably the most frequent application for one of the wires. It is a thermostatically controlled device that enriches the fuel mixture when the engine is cold, aiding in starting and preventing stalling. The wire provides power to a heating element within the choke housing. As the element heats up, a bimetallic spring gradually opens the choke plate, leaning out the mixture as the engine warms. Without this electrical connection, the choke may not function correctly, leading to difficult starting or poor cold-weather performance.
2. Idle Stop Solenoid (or Fuel Cut-off Solenoid)
The second wire often goes to an idle stop solenoid, also sometimes referred to as a fuel cut-off solenoid. This is an electrically operated valve that controls fuel flow to the idle circuit. When the ignition is turned off, the solenoid de-energizes, cutting off fuel and preventing engine run-on (dieseling). Some carburetors use this solenoid to momentarily increase the idle speed during periods of high electrical load (e.g., when the air conditioning compressor engages). This prevents the engine from stalling. The other variation – the fuel cut-off solenoid – serves as a safety mechanism to stop fuel flow immediately upon engine shutdown. This helps prevent fuel from continuing to enter the engine cylinders which can cause various issues with performance and even potentially hydrolock the engine.
On some older models, it might be a wire that provides power to a carburetor-mounted heater designed to prevent icing in certain conditions.
How It Works: A Systems Perspective
The two wires we've discussed operate as part of a larger system. The electric choke relies on the engine's electrical system for power, often connected to a switched ignition source. The idle stop solenoid is also powered by the ignition circuit and is sometimes integrated with the vehicle's electrical control unit (ECU) in more advanced systems. Understanding how these wires integrate into the vehicle's electrical network is vital for troubleshooting.
Real-World Use: Basic Troubleshooting
Here are a few troubleshooting tips related to these wires:
- Electric Choke Issues: If your engine is hard to start when cold, or runs rough until warm, check the electric choke wiring. Use a multimeter to verify that power is reaching the choke when the ignition is on. Also, inspect the choke housing for corrosion or damage.
- Idle Stop Solenoid Problems: If your engine diesels after turning off the ignition, or stalls when the air conditioning kicks on, inspect the idle stop solenoid wiring. Ensure that the solenoid is receiving power when the ignition is on and that it's functioning correctly.
- Wiring Condition: Always check the wiring for fraying, cracking, or loose connections. Corroded terminals can impede electrical flow and cause malfunctions.
- Grounding: Ensure the carburetor body has a good ground connection to the chassis. A poor ground can cause erratic electrical behavior.
Safety First: Risky Components
Working with carburetors involves inherent risks. Fuel is highly flammable, and improper handling can lead to fires or explosions. Always disconnect the battery before working on the fuel system to prevent accidental sparks. Work in a well-ventilated area, and keep a fire extinguisher nearby.
Furthermore, exercise caution when dealing with electrical components. Always double-check wiring diagrams before making connections to avoid damaging the vehicle's electrical system. If you are uncomfortable working with electricity or fuel, seek professional assistance.
Downloadable Carburetor Diagram
Understanding your specific carburetor model is key. We have a generic carburetor diagram file available for download that you may find helpful. Please remember that specific wiring configurations vary depending on the make, model, and year of your vehicle. Consult your vehicle's service manual for precise information.