Wiper Linkage Windshield Wiper Parts Diagram
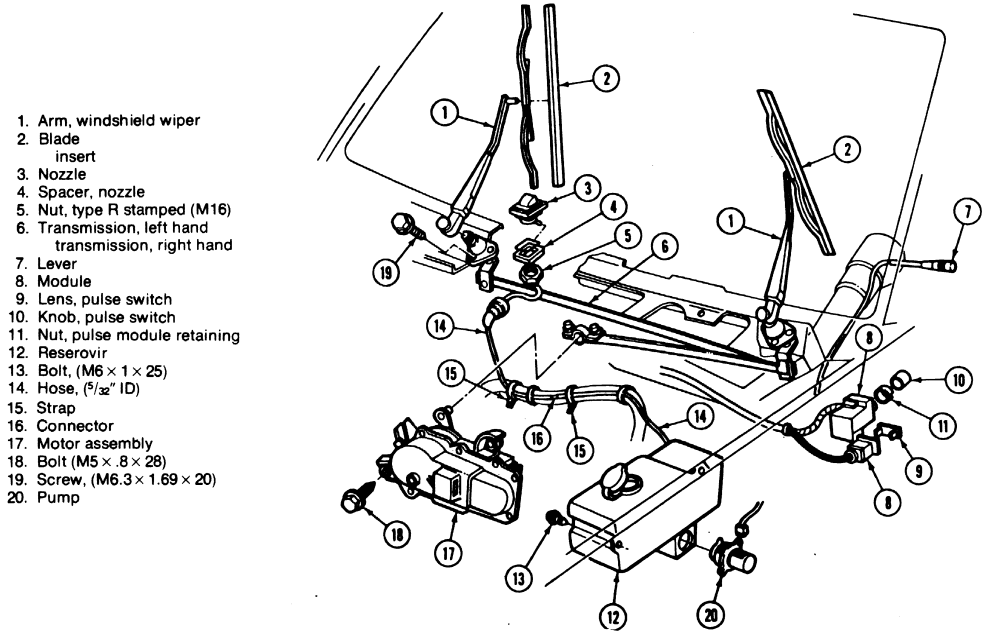
So, you're tackling a windshield wiper issue? Smart move. Before you start ripping things apart, let's get acquainted with the wiper linkage system. This isn't just about flailing blades; it's a carefully orchestrated mechanical ballet. This article, along with the accompanying wiper linkage windshield wiper parts diagram (which you can download - more on that later!), will give you the understanding you need to diagnose problems, make repairs, or even upgrade your system.
Why This Diagram Matters
Think of the wiper linkage diagram as your roadmap through a potentially frustrating repair job. It provides a visual representation of all the components and their relationships, which is invaluable for:
- Troubleshooting: Identifying which part is failing when your wipers aren't behaving as expected.
- Repairing: Ensuring you reassemble everything correctly after a repair or replacement.
- Modifying: Understanding the system's limitations and potential for upgrades, if that's your thing.
- Learning: Gaining a deeper understanding of your car's systems and how they work.
Without a diagram, you're essentially working blind. You risk damaging other components, installing parts incorrectly, and ultimately wasting time and money.
Key Specs and Main Parts
Every wiper system is slightly different depending on the vehicle make and model, but the core components remain the same. Here’s a breakdown of the key players and their basic specs:
Main Components:
- Wiper Motor: This is the powerhouse of the system, typically a 12V DC motor. Specs to consider: torque rating (how much force it can apply), speed (wipes per minute), and mounting configuration.
- Linkage Arms (or Wiper Arms): These connect the motor to the wiper pivots. They are usually made of metal (steel or aluminum) and are designed to transmit the motor's rotational motion into a reciprocating motion that drives the wiper blades across the windshield. Key specs here are length, material strength, and connection type (e.g., ball-and-socket, splined).
- Pivots (or Wiper Transmissions): These are the joints that allow the wiper arms to rotate. They convert the linear motion of the linkage arms to the rotational movement required for the wipers. Pay attention to bearing type (bushing, needle bearing) and sealing for weather resistance.
- Wiper Blades: The rubber part that actually makes contact with the windshield. While not directly part of the linkage, their condition *drastically* affects the system's performance. Consider blade length, material composition (rubber, silicone), and attachment type.
- Connecting Rods: Some systems use connecting rods between the motor crank and the linkage. These are often adjustable to fine-tune the wiper sweep. Specs include length, material, and adjustability range.
Key Specifications:
- Sweep Angle: The total angle that the wiper blades cover on the windshield. This is a critical parameter for visibility and safety. The diagram may indicate the designed sweep angle.
- Wipe Speed: Measured in wipes per minute (WPM), this indicates how quickly the blades move across the windshield. Usually, there are multiple speed settings.
- Motor Torque: The amount of rotational force the motor can generate. Insufficient torque can lead to slow or stalled wipers, especially in heavy rain or snow.
Symbols in the Diagram
Understanding the symbols in the diagram is essential for interpreting it correctly. Here are some common symbols you might encounter:
- Solid Lines: Typically represent physical connections between components (e.g., linkage arms, connecting rods).
- Dashed Lines: May indicate hidden components or optional connections.
- Arrows: Show the direction of motion. For example, arrows on the linkage arms indicate the direction of their movement.
- Circles/Dots: Often represent pivot points or connection points.
- Color Coding: Some diagrams use color coding to differentiate between different types of components or to highlight specific areas of interest. For instance, the motor might be colored blue, while the linkage arms are red.
- Icons: Small icons may be used to represent specific types of fasteners (e.g., bolts, nuts, clips) or other hardware.
- Abbreviations: Pay attention to abbreviations. Common ones include "MTR" (motor), "LNK" (linkage), "PIV" (pivot).
The legend on the diagram (if present) will define these symbols explicitly, so be sure to check it.
How It Works
The wiper system's operation is quite simple in principle. The wiper motor provides the initial rotational force. A crank arm (or similar mechanism) on the motor converts this rotational motion into a reciprocating (back-and-forth) motion. This motion is then transmitted through the linkage arms to the wiper pivots. The pivots convert the linear motion of the linkage arms into the rotational motion needed to sweep the wiper blades across the windshield. The clever part is the geometry of the linkage. It's designed to ensure that both wiper blades move in a coordinated manner and cover the maximum possible area of the windshield.
Different wiper systems use different linkage designs. Some use a single linkage arm connecting the motor to both pivots, while others use multiple linkage arms and connecting rods for more complex wipe patterns. The diagram helps you understand the specific configuration of *your* system.
Real-World Use: Basic Troubleshooting Tips
Armed with the diagram, you can now start diagnosing common wiper problems. Here are a few examples:
- Wipers Not Moving at All: Check the fuse first! Then, use a multimeter to test if the wiper motor is receiving power. If power is present, the motor may be faulty. If no power, trace the wiring back to the switch and identify the break.
- One Wiper Moving, the Other Not: This usually indicates a broken linkage arm or a detached pivot. Visually inspect the linkage system for any broken or disconnected parts. Use the diagram to identify the specific linkage arm that is causing the problem.
- Wipers Moving Slowly or Erratic: This could be due to a weak motor, worn pivots, or excessive friction in the linkage. Lubricate the pivot points with a silicone-based lubricant. If the problem persists, the motor or pivots may need to be replaced.
- Wipers Not Parking Correctly: Most wiper motors have a "park" switch that ensures the wipers return to their resting position when turned off. If the wipers are not parking correctly, the park switch may be faulty. Replace the motor.
Remember, always disconnect the battery before working on any electrical components.
Safety Considerations
While the wiper system may seem relatively harmless, there are a few safety precautions to keep in mind:
- Pinch Points: The linkage arms can pinch fingers if they are unexpectedly activated. Always disconnect the battery before working on the linkage system.
- Sharp Edges: Some linkage components may have sharp edges. Wear gloves to protect your hands.
- Electrical Shock: The wiper motor is powered by 12V DC, which can deliver a shock. Avoid touching bare wires or terminals.
- Eye Protection: Wear safety glasses to protect your eyes from debris.
Important note: the wiper motor and linkage are often located in a confined space, sometimes near other critical systems. Be careful not to damage any other components while working on the wiper system.
The wiper motor itself can be surprisingly powerful, even after the ignition is switched off. Some vehicles retain power in certain circuits for a short time after the engine is shut down. Disconnecting the battery is always the safest option.
Now that you're equipped with the knowledge, the diagram is the missing piece. Access the wiper linkage windshield wiper parts diagram for a detailed visual guide by downloading it here. Good luck with your repair!