
Wiring Diagram For 7 Wire Trailer Plug
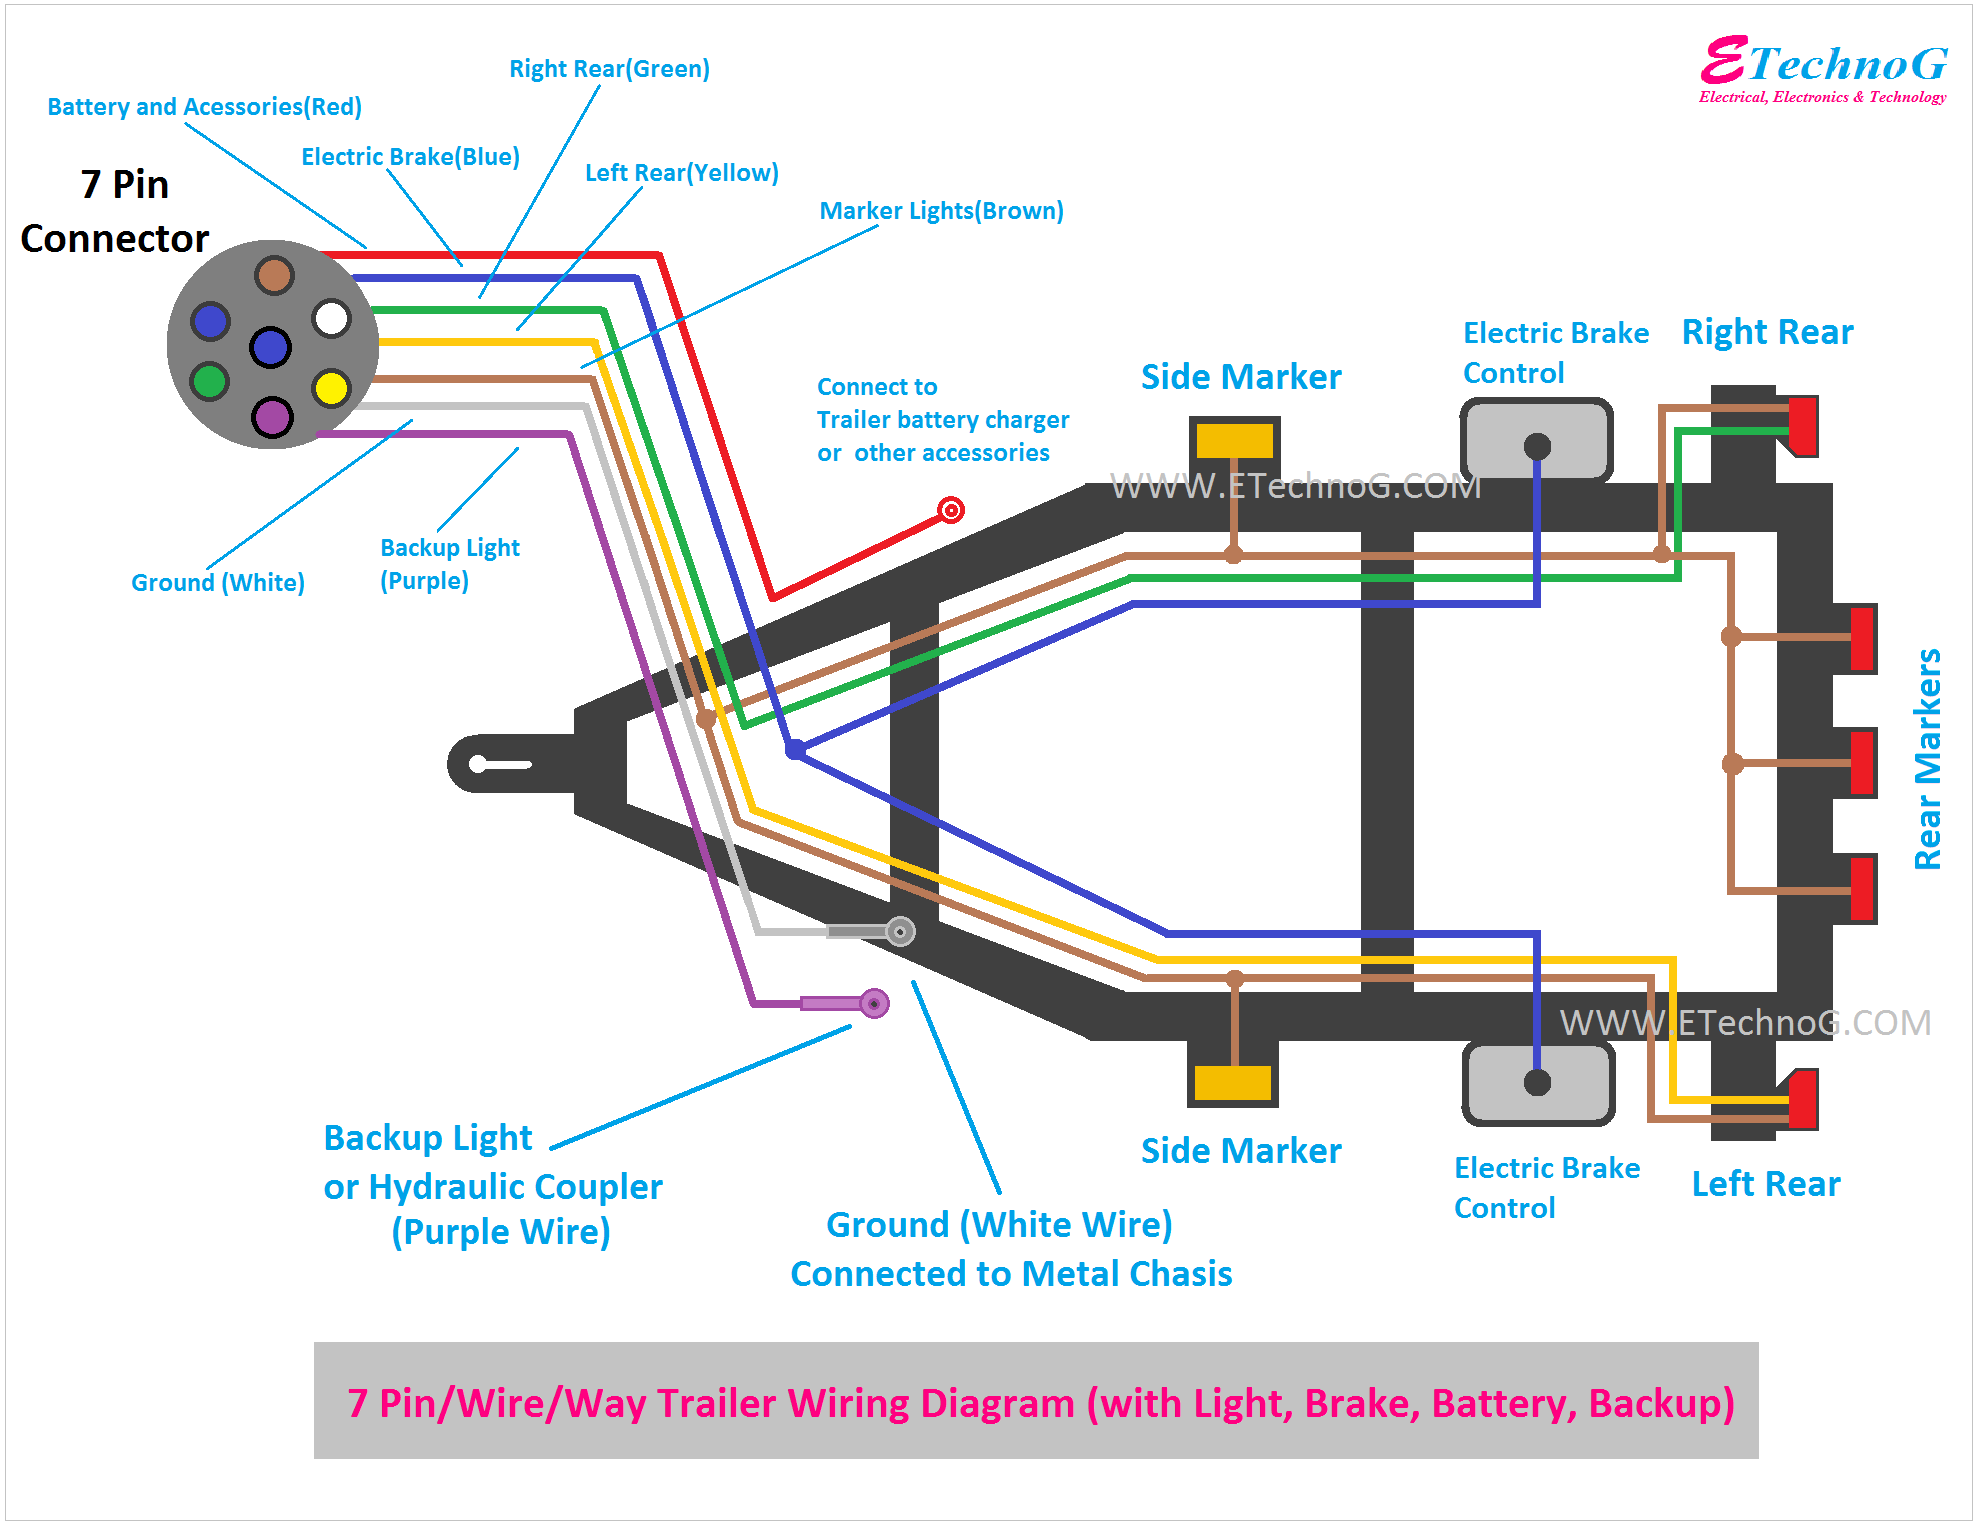
Alright, let's dive into the wiring of a 7-wire trailer plug. If you're tackling trailer wiring repairs, upgrades, or even just trying to understand how your trailer lights are functioning, knowing the 7-wire system is crucial. This isn't just about making the lights blink; it's about safety on the road, ensuring your trailer is visible and your brakes are functioning correctly. We're going to break down the wiring diagram, what each wire does, and how to troubleshoot common issues.
Purpose of a 7-Wire Trailer Plug Diagram
Why bother with a wiring diagram? Several reasons. First, repairs. If a light isn't working, or your electric brakes are acting up, the diagram is your roadmap to find the faulty connection. Second, customization and upgrades. Maybe you're adding a backup camera to your trailer, or integrating auxiliary lighting. The diagram ensures everything is wired correctly. And finally, understanding. Knowing how your trailer wiring works empowers you to diagnose and fix problems yourself, saving time and money. Having a reliable diagram also makes future modifications and enhancements significantly easier.
Key Specs and Main Parts of a 7-Wire System
The 7-wire system is the industry standard for medium to heavy-duty trailers, including those with electric brakes. Here’s a breakdown of the essential components:
- 7-Way RV Blade Connector (Trailer Side): This is the plug mounted on your trailer that connects to the vehicle's receptacle.
- 7-Way RV Blade Connector (Vehicle Side): This is the receptacle mounted on your vehicle that accepts the trailer plug.
- Wiring Harness: The bundle of wires connecting the vehicle's electrical system to the trailer receptacle. It's usually color-coded for easy identification.
- Electric Brake Controller (if applicable): This unit, usually mounted inside the vehicle, allows you to control the electric brakes on your trailer.
- Fuses and Circuit Breakers: These protect the vehicle's electrical system from overloads caused by faults in the trailer wiring. Always check these first when troubleshooting!
Now, let's talk about the specs. The gauge (thickness) of the wires is important. Typically, heavier gauge wires (e.g., 10 or 12 AWG) are used for the brake circuit and the 12V power wire due to the higher current draw. Lighter gauge wires (e.g., 14 or 16 AWG) are usually sufficient for the lighting circuits.
Symbols in a 7-Wire Trailer Plug Diagram
Understanding the diagram requires knowing the symbols. Here's a common breakdown:
- Solid Lines: Represent wires. The thicker the line, the thicker the wire typically. However, always refer to the color code for definitive gauge information.
- Dashed Lines: Often represent optional connections or grounds.
- Circles: Can indicate connection points or splices.
- Rectangles: Often represent components like lights, brake controllers, or fuses.
- Color Codes: This is the most crucial part! The standard color codes are:
- White: Ground
- Blue: Electric Brakes
- Brown: Right Turn/Stop Light
- Yellow: Left Turn/Stop Light
- Green: Tail Lights/Running Lights
- Red: Auxiliary (often used for backup lights or other accessories)
- Black: 12V+ Auxiliary Power (Battery Charge)
Pay close attention to the grounding symbol, often represented by three horizontal lines decreasing in length. A good, solid ground is essential for proper trailer wiring function. A poor ground is the source of many trailer lighting problems.
How a 7-Wire Trailer Plug Works
The 7-wire system is designed to provide all the necessary electrical connections between the tow vehicle and the trailer. Let's break down how each wire functions:
- White (Ground): This provides the return path for all electrical circuits. It's crucial for proper operation. Think of it as the negative terminal of a battery in a simple circuit.
- Blue (Electric Brakes): This wire carries the signal from the brake controller to the trailer's electric brakes. The voltage on this wire is proportional to the braking force applied in the tow vehicle.
- Brown (Right Turn/Stop Light): This wire activates the right turn signal and stop light on the trailer.
- Yellow (Left Turn/Stop Light): This wire activates the left turn signal and stop light on the trailer.
- Green (Tail Lights/Running Lights): This wire activates the tail lights, side marker lights, and license plate light on the trailer. These lights should be on whenever the tow vehicle's headlights are on.
- Red (Auxiliary): This wire can be used for a variety of purposes, such as backup lights, interior lights, or other accessories. Its function depends on how it's wired in the trailer.
- Black (12V+ Auxiliary Power): This wire provides a constant 12V power supply from the tow vehicle's battery. It can be used to charge a trailer battery, power interior lights, or run other accessories. It's usually fused at the vehicle end.
The brake controller is a critical component. It receives signals from the tow vehicle's brake pedal and adjusts the voltage sent to the trailer's electric brakes. This allows for proportional braking, where the trailer brakes apply with increasing force as the tow vehicle brakes harder. Without a properly functioning brake controller and wiring, trailer braking can be erratic or non-existent, which is incredibly dangerous.
Real-World Use: Basic Troubleshooting Tips
Okay, so a light isn't working. Where do you start? Here's a basic troubleshooting checklist:
- Check the Fuses: This is the first and easiest step. Look for blown fuses in the tow vehicle's fuse box that are associated with trailer lighting.
- Inspect the Connectors: Check both the trailer and vehicle connectors for corrosion, bent pins, or loose connections. Clean corroded terminals with a wire brush or electrical contact cleaner.
- Test the Ground: A bad ground is the most common cause of trailer lighting problems. Use a multimeter to check for continuity between the trailer frame and the ground pin on the trailer connector. If there's no continuity, you have a ground issue.
- Check the Bulbs: Make sure the bulbs are not burnt out. While it sounds obvious, it's an easy thing to overlook.
- Use a Test Light or Multimeter: Use a test light or multimeter to check for voltage at the trailer light sockets when the corresponding lights should be on. If there's no voltage, trace the wire back to the connector, checking for breaks or loose connections along the way.
- Isolate the Problem: If you suspect a problem with the tow vehicle wiring, disconnect the trailer and use a trailer wiring tester to check the signals at the vehicle connector. This will help you determine if the problem is with the tow vehicle or the trailer.
Important Note: If you suspect a problem with the electric brake circuit, never attempt to test it by directly applying 12V to the brake magnets. This can damage the magnets and the brake controller. Always use a brake controller tester to check the brake circuit.
Safety Considerations
Working with electrical systems carries risks. Here are some key safety precautions:
- Disconnect the Battery: Before working on any electrical wiring, disconnect the negative terminal of the tow vehicle's battery. This will prevent accidental short circuits.
- Use Proper Tools: Use insulated tools designed for electrical work.
- Wear Safety Glasses: Protect your eyes from flying debris and sparks.
- Avoid Working in Wet Conditions: Water and electricity don't mix. Wait for dry weather before working on trailer wiring.
- Electric Brakes: As mentioned earlier, the electric brake circuit can be dangerous. Always use proper testing equipment and never apply direct voltage to the brake magnets.
The 12V+ Auxiliary Power (Black wire) is a particularly risky component if not handled correctly. Shorting this wire to ground can cause a significant spark and potentially damage the vehicle's electrical system. Make sure it's properly fused and avoid touching it to the vehicle's frame or other grounded metal parts. Also, it is recommended to disconnect the trailer from the tow vehicle when the trailer is not in use.
By understanding the 7-wire trailer plug wiring diagram and following these troubleshooting and safety tips, you'll be well-equipped to maintain and repair your trailer wiring system. Remember to always double-check your work and consult a qualified mechanic if you're unsure about any aspect of the process.
We have the 7-wire trailer plug wiring diagram file that you can download for free. Please download and use it for your trailer wiring repair.