Wiring Diagram For Chevy 350 Starter
Let's dive into the wiring of a Chevy 350 starter. This engine has powered countless vehicles, from trucks to muscle cars, making understanding its starter wiring crucial for any DIY mechanic or automotive enthusiast. This isn't just about replacing a faulty starter; it's about grasping the fundamentals of automotive electrical systems, which can aid in troubleshooting, modification, and even simple maintenance. A solid understanding of the wiring diagram will allow you to confidently diagnose issues, perform upgrades (like adding a high-torque starter), and avoid potentially damaging electrical gremlins.
Why This Diagram Matters
A wiring diagram is essentially a roadmap for the electrical system. For the Chevy 350 starter, it’s particularly useful for:
- Troubleshooting starting problems: Is your engine cranking slowly, not cranking at all, or just clicking? The wiring diagram helps you trace the electrical path to pinpoint the faulty component.
- Replacing a faulty starter: Ensuring you connect the wires correctly is paramount to prevent damage.
- Modifying your electrical system: Upgrading to a high-torque starter or adding an anti-theft system requires knowledge of the starter circuit.
- Understanding automotive electrical fundamentals: This is a great learning opportunity to delve into how 12V electrical systems operate.
Key Specs and Main Parts
The Chevy 350 starter circuit is relatively simple but relies on a few key components:
- Battery: The source of electrical power (typically 12V DC). A fully charged battery is essential.
- Ignition Switch: When you turn the key to the "start" position, this switch completes the circuit, sending power to the starter solenoid.
- Starter Solenoid: This is an electromagnetically operated switch. It's usually mounted directly on the starter motor. When energized, it does two things:
- Engages the starter drive (Bendix) into the flywheel or flexplate, causing the engine to rotate.
- Closes a high-current circuit between the battery and the starter motor.
- Starter Motor: A powerful electric motor that spins the engine's flywheel or flexplate to initiate combustion.
- Wiring: Heavy-gauge wires are used to carry the high current required by the starter motor. These include:
- Battery Cable: Runs directly from the battery positive (+) terminal to the starter solenoid.
- Solenoid Activation Wire: A smaller gauge wire that runs from the ignition switch to the solenoid to trigger it.
- Ground Cable: Connects the engine block (and thus the starter) to the vehicle's chassis, providing a return path for the current to the battery negative (-) terminal.
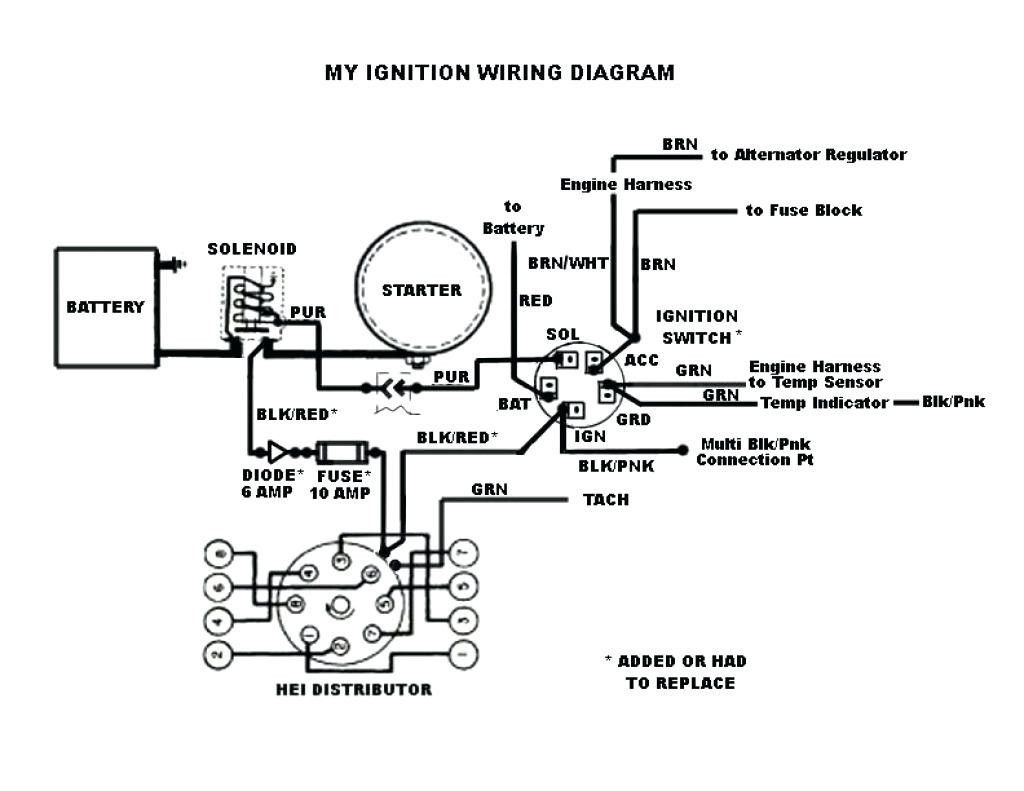
Symbols: Decoding the Wiring Diagram
Wiring diagrams use standardized symbols. Here are the key symbols you'll find in a Chevy 350 starter wiring diagram:
- Solid Lines: Represent wires. Thicker lines usually indicate heavier gauge wires capable of carrying more current.
- Dashed Lines: May represent wires or, more commonly, indicate a connection to ground (chassis ground).
- Circles: Represent electrical terminals or connection points.
- Rectangles: Can represent various components, often with a symbol or label inside. For example, the ignition switch.
- Solenoid Symbol: A coil symbol (like a spring) often represents the solenoid. Look for terminals labeled "S" (for start), "I" (for ignition - sometimes used for ballast resistor bypass), and a large terminal connected to the battery cable.
- Motor Symbol: A circle with an "M" inside, representing the starter motor itself.
- Color Codes: Wires are often identified by color (e.g., Red for battery positive, Black for ground, Purple or Yellow for the solenoid activation wire). The diagram should have a color key.
- Numbers/Labels: Wires and components are often labeled with numbers or codes to further identify them. Consult the diagram's legend or accompanying documentation for specific meanings.
How It Works
Here's a step-by-step explanation of the starter circuit's operation:
- When you turn the ignition key to the "start" position, the ignition switch closes, sending 12V to the starter solenoid through the solenoid activation wire (usually a smaller gauge wire).
- The solenoid acts as an electromagnet. Energizing the solenoid coil pulls in a plunger, which:
- Engages the starter drive (Bendix) with the engine's flywheel/flexplate, preparing it to turn the engine.
- Closes a heavy-duty switch (internal to the solenoid) connecting the battery directly to the starter motor. This is where the large battery cable comes in.
- The starter motor, now receiving high current, spins rapidly, turning the engine over.
- Once the engine starts, you release the key, the ignition switch opens, de-energizing the solenoid.
- The solenoid disengages the starter drive from the flywheel and disconnects the battery from the starter motor. The starter stops spinning.
Real-World Use: Basic Troubleshooting
Here's how to use the wiring diagram to troubleshoot common starting problems:
- No Cranking, No Clicking: Check the battery voltage. Use a voltmeter to ensure you have at least 12.4V. Then check the battery cable connections at both the battery and the starter solenoid. Make sure they are clean and tight. Also, check the ignition switch. Use a multimeter to verify it's sending power to the solenoid activation wire when the key is in the "start" position.
- No Cranking, Clicking Sound: This usually indicates a weak battery, poor connections, or a faulty solenoid. Clean battery terminals and cable connections. Try jump-starting the vehicle to rule out a weak battery. If the clicking persists, the solenoid may be bad. Try tapping the solenoid with a hammer while someone turns the key (be careful!). If it suddenly cranks, the solenoid is definitely faulty.
- Slow Cranking: This can be caused by a weak battery, poor connections, or a worn starter motor. Check the battery voltage under load (while cranking). If it drops below 10V, the battery is weak. Inspect battery cables and ground connections for corrosion. A failing starter motor will draw excessive current, causing slow cranking.
- Starter Stays Engaged (Grinding Noise): This is usually a faulty solenoid that's not releasing properly. Replace the solenoid immediately to avoid damage to the flywheel or flexplate.
Safety First!
Working with automotive electrical systems can be dangerous. Here are some crucial safety precautions:
- Disconnect the Battery: Always disconnect the negative (-) battery cable before working on any electrical component. This prevents accidental shorts and potential electrical shocks.
- Work in a Well-Ventilated Area: Batteries can produce hydrogen gas, which is flammable.
- Use Insulated Tools: Protect yourself from accidental shorts by using tools with insulated handles.
- Be Careful with the Battery Positive (+) Terminal: This terminal is always hot (energized). Avoid shorting it to ground.
- Wear Eye Protection: Protect your eyes from battery acid or flying debris.
- High Current Warning: The starter motor draws a huge amount of current. Shorting the starter circuit can cause wires to overheat rapidly and potentially start a fire. Be extremely careful when working with the battery cable and solenoid.
We have a detailed Chevy 350 starter wiring diagram available for download. This diagram includes color-coded wires, component labels, and troubleshooting tips to help you confidently tackle your next automotive project. Contact us, and we'll gladly provide the file.