
Wiring Diagram For Electric Water Heater
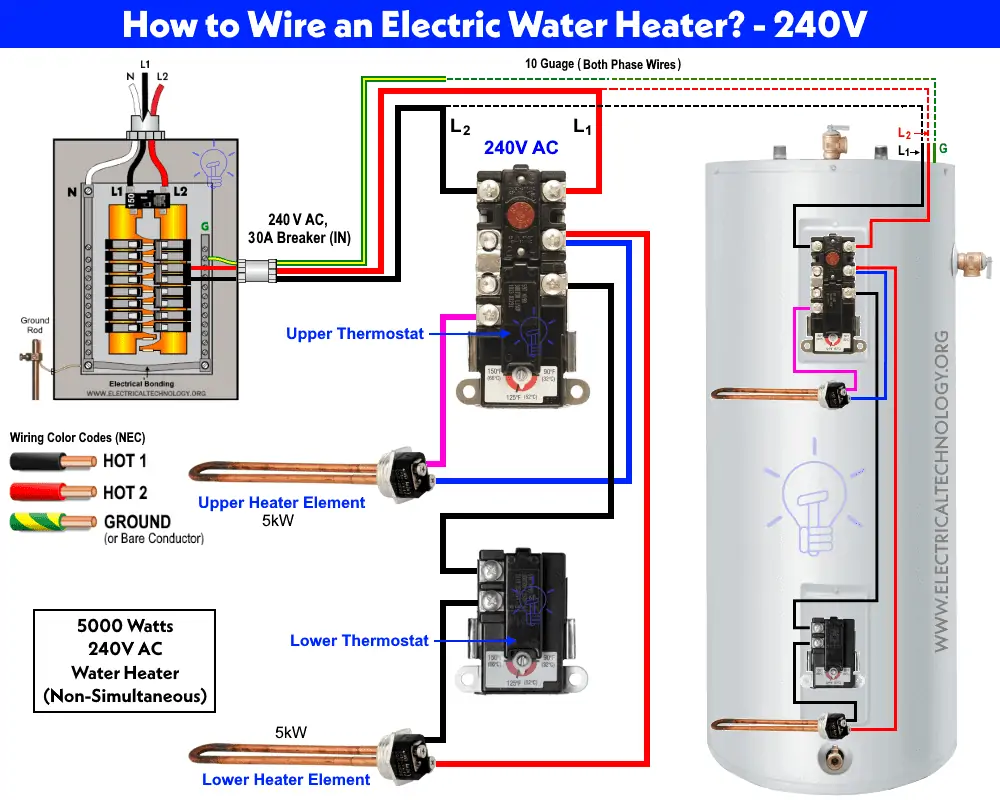
Let's dive into the often-overlooked world of electric water heater wiring. Understanding this system isn't just about fixing a cold shower; it's about grasping a fundamental aspect of home electrical systems. This guide is for the experienced DIYer, the car modifier who's comfortable with circuits, and the DIY mechanic looking to expand their skillset. We'll break down the wiring diagram, its components, and how it all works together. Whether you're tackling a repair, upgrading your system, or simply trying to understand how your hot water gets delivered, this guide is your starting point. And just so you know, we have a comprehensive wiring diagram file available for download at the end of this article for your reference.
Purpose of Understanding the Wiring Diagram
Why bother understanding the wiring diagram of your electric water heater? Here are a few compelling reasons:
- Troubleshooting and Repair: When your hot water goes cold, the wiring diagram is your roadmap. It helps you pinpoint the faulty component, be it a heating element, thermostat, or wiring connection.
- Safe DIY Repairs: Electrical work is inherently dangerous. Knowing the wiring layout minimizes the risk of shocks and short circuits. A diagram lets you disconnect the correct wires before you start working.
- Upgrading and Modifications: Planning to install a new, more efficient water heater? The diagram is essential for ensuring proper connections and avoiding electrical hazards.
- Understanding Home Electrical Systems: The water heater circuit is a microcosm of your home's electrical grid. Learning its components and how they interact provides a valuable foundation for understanding more complex systems.
Key Specs and Main Parts
Before we dive into the diagram, let's familiarize ourselves with the main components and their specifications. We're primarily talking about 240V electric water heaters here, which are the most common type.
- Voltage: Typically 240VAC (Volts Alternating Current) in North America. Some smaller units might be 120VAC.
- Wattage: Ranging from 1500W to 5500W, depending on the tank size and heating requirements. Higher wattage means faster heating.
- Tank Capacity: Measured in gallons (e.g., 40-gallon, 50-gallon, 80-gallon).
Now, the main physical parts you'll see reflected in the wiring diagram:
- Heating Elements: These are resistive heating coils immersed in the water. Most 240V heaters have two, an upper and a lower element. The resistance of the element converts electrical energy into heat.
- Thermostats: These control the temperature of the water. Each heating element usually has its own thermostat. They are bimetallic strips which flex with temperature changes, opening or closing the electrical circuit.
- High-Limit Switch (ECO - Energy Cut-Off): A safety device that automatically cuts off power to the heating elements if the water temperature gets dangerously high. This prevents overheating and potential damage.
- Junction Box: This is where the power supply wires (from your circuit breaker) connect to the water heater's internal wiring.
- Dip Tube: While not part of the electrical system, it's important to understand. It brings cold water to the bottom of the tank for more efficient heating.
- Anode Rod: A sacrificial metal rod that corrodes instead of the tank itself, extending the lifespan of the water heater. Again, not electrical but vital for longevity.
- Wiring: High-temperature rated wires connect all the components. These wires are typically rated for 300V or 600V and can withstand the heat generated by the heating elements.
Symbols in the Wiring Diagram
A wiring diagram is a symbolic representation of the electrical circuit. Here's a breakdown of the common symbols you'll encounter:
- Lines: Represent wires connecting different components. Dashed lines often indicate that wires are crossing but not connected.
- Colors: Wires are color-coded for easy identification. Common colors include:
- Black: Hot (live) wire.
- Red: Another hot (live) wire (in a 240V system).
- White: Neutral wire (although in 240V systems, this is often used as a second hot wire depending on the age of the heater and local codes - *always verify with a multimeter before touching*).
- Green (or Bare Copper): Ground wire.
- Heating Element Symbol: Often represented as a squiggly line or a coil symbol.
- Thermostat Symbol: Usually depicted as a circle with a line through it, indicating a switch.
- Ground Symbol: Represented by three horizontal lines decreasing in length, connected by a vertical line.
- Junction Box Symbol: Often a rectangle or a square.
- Overload protection (Thermal Cutoff): Often a square with a "T" shape.
How It Works
Here's the general sequence of operation for a typical 240V electric water heater:
- Power Supply: 240V power enters the water heater through the junction box. This is typically a two-pole breaker in your main electrical panel.
- Upper Thermostat: The upper thermostat senses the water temperature in the upper part of the tank. If the water is below the setpoint, it closes the circuit, allowing current to flow to the upper heating element.
- Upper Heating Element: The upper element heats the water in the upper part of the tank. Once the water reaches the setpoint, the upper thermostat opens the circuit, stopping the flow of current.
- Lower Thermostat Activation: In many designs, once the upper thermostat is satisfied, it switches power to the lower thermostat.
- Lower Thermostat: The lower thermostat senses the water temperature in the lower part of the tank. If the water is below the setpoint, it closes the circuit, allowing current to flow to the lower heating element.
- Lower Heating Element: The lower element heats the water in the lower part of the tank. Once the water reaches the setpoint, the lower thermostat opens the circuit, stopping the flow of current.
- Temperature Maintenance: The thermostats cycle on and off as needed to maintain the set temperature.
- High-Limit Switch: If the water temperature exceeds a safe limit, the high-limit switch trips, cutting off power to both heating elements. This switch usually needs to be manually reset.
Real-World Use: Basic Troubleshooting
Here are some basic troubleshooting tips using the wiring diagram as a guide:
- No Hot Water:
- Check the Circuit Breaker: Is it tripped? Reset it. If it trips immediately again, there's a short circuit. Consult a qualified electrician immediately if that occurs.
- Check the High-Limit Switch: Is it tripped? Reset it. If it trips frequently, there may be an underlying issue with the thermostat.
- Test the Heating Elements: Use a multimeter to check for continuity. A broken element will show no continuity (open circuit).
- Test the Thermostats: Use a multimeter to check for continuity when the thermostat is calling for heat. A faulty thermostat may not close the circuit.
- Check Wiring Connections: Look for loose or corroded connections. Tighten or clean them as needed.
- Water Too Hot:
- Check the Thermostat Settings: Are they set too high?
- Test the Thermostats: A faulty thermostat may not be shutting off the heating element at the correct temperature.
- Leaking Water Heater:
- This is rarely an electrical issue, but water can certainly damage the electrical components. Shut off the power immediately if you see water near electrical components. Consult a plumber.
Safety Considerations
Electricity and water are a dangerous combination. Here are crucial safety precautions:
- Turn Off the Power: Always turn off the circuit breaker supplying power to the water heater before working on it. Double-check with a multimeter to ensure there is no voltage present.
- Use Proper Tools: Use insulated tools designed for electrical work.
- Wear Safety Gear: Wear safety glasses and rubber gloves.
- Never Work on Live Wires: Even if you think the power is off, double-check with a multimeter.
- If Unsure, Hire a Professional: If you're not comfortable working with electricity, consult a qualified electrician. Water heaters are high-voltage and high-amperage appliances.
- Be aware of the high-limit switch (ECO) and the potential for scalding water if it fails.
- Always consult local electrical codes and regulations.
The heating elements themselves are a risky component, they can maintain high temperatures for some time after being de-energized. Allow time to cool.
Remember, this article provides general guidance. Specific wiring configurations may vary depending on the manufacturer and model of your water heater. Always refer to the manufacturer's documentation for your specific unit.
Now that you're armed with this knowledge, you're well-equipped to understand and troubleshoot your electric water heater. As promised, you can download the detailed wiring diagram file here. Good luck, and stay safe!