
Wiring Diagram For Fog Lights With Relay
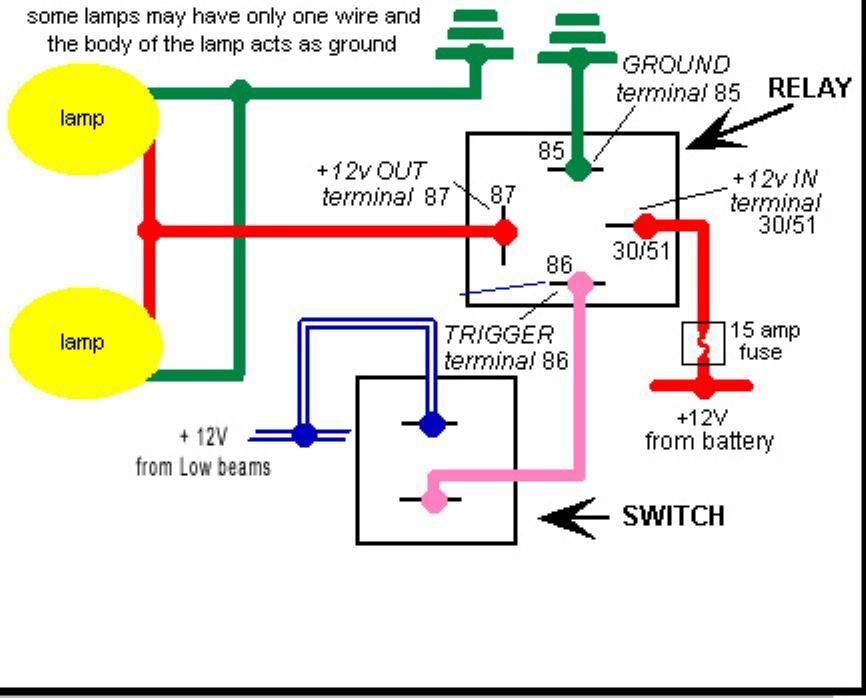
So, you're looking to wire up some fog lights with a relay? Excellent choice. Whether you're upgrading your ride's visibility, replacing a faulty setup, or simply expanding your automotive electrical knowledge, understanding the wiring diagram is absolutely crucial. This article will break down the process, walking you through the components, the connections, and the essential safety considerations. We're going to treat this like a conversation between experienced DIYers. Let's get started.
Purpose
Why bother with a wiring diagram at all? Well, slapping wires together and hoping for the best rarely works out well in automotive electrical systems. Using a diagram ensures:
- Correct Functionality: The lights work as intended – turning on and off when they should.
- Safety: Prevents short circuits, blown fuses, and potential fire hazards. Improper wiring can seriously damage your car's electrical system.
- Troubleshooting: Makes diagnosing problems much easier. When something goes wrong (and it eventually will), you'll have a clear roadmap to follow.
- Future Modifications: Allows you to confidently modify or expand your fog light system later on, knowing how everything is connected.
- Professional Finish: A properly wired system looks cleaner and more professional.
Think of it as the blueprint for your fog light installation. It's an essential tool for any serious automotive enthusiast.
Key Specs and Main Parts
Let's identify the core components we'll be working with in our fog light wiring diagram:
- Fog Lights: The actual lights themselves. Pay attention to their voltage (typically 12V in automotive applications) and wattage (which determines current draw).
- Relay: This is the heart of the system. A relay is an electrically operated switch. It allows a low-current circuit (like your dashboard switch) to control a high-current circuit (the fog lights). This prevents overloading the switch and damaging your car's wiring. A standard automotive relay is a Single Pole Double Throw (SPDT) relay with 5 pins.
- Switch: This is the switch inside your car that you'll use to turn the fog lights on and off. It needs to be rated for at least the control circuit current of the relay.
- Fuse: A crucial safety device! The fuse protects the entire circuit from overcurrent. Choose a fuse amperage rating slightly higher than the expected current draw of the fog lights, but lower than the wiring's amperage capacity. (See the section on safety below).
- Wiring: The conductors that connect all the components. Use appropriately sized wiring (gauge) to handle the current draw. Thicker wire is needed for higher current. Consult a wiring gauge chart based on amperage and wire length.
- Ground: A secure connection to the vehicle's chassis. This provides a return path for the current. A good ground is essential for proper operation.
- Battery: The source of power (typically 12V DC).
Symbols – Deciphering the Diagram
Wiring diagrams use specific symbols to represent different components. Here's a breakdown of common symbols you'll encounter:
- Straight Line: Represents a wire or conductor.
- Dotted Line: Often indicates a shielded cable or a connection that might not always be present.
- Circle with an 'X': Represents a light bulb (in this case, a fog light).
- Rectangle with diagonal lines: Represents a resistor. Not typically used in a basic fog light circuit, but good to know.
- Coil Symbol: Represents the relay coil. This is the electromagnetic part of the relay.
- Switch Symbol: A break in a line with a pivoting arm, representing a switch.
- Ground Symbol: Usually a series of horizontal lines getting progressively shorter, representing a connection to the vehicle's chassis.
- Fuse Symbol: A zigzag line inside a rectangle, representing a fuse.
- Battery Symbol: A series of short and long parallel lines, representing a DC power source.
Wire colors are also important. Common conventions include:
- Red: Typically used for positive (+) power connections.
- Black: Typically used for ground (-) connections.
- Other Colors (e.g., Blue, Yellow, Green): Used for signal wires or to differentiate between different circuits. Always refer to the specific diagram's color code legend if provided.
How It Works
Here's a step-by-step explanation of how the fog light circuit functions:
- Power to the Relay Coil: When you flip the fog light switch inside your car, it completes a low-current circuit that energizes the relay coil. This coil acts like an electromagnet.
- Relay Activation: The energized coil pulls a metal contact inside the relay, closing the high-current circuit.
- Power to the Fog Lights: With the relay closed, power flows directly from the battery, through the fuse (for protection), and to the fog lights.
- Lights On: The fog lights receive power and illuminate.
- Switch Off: When you turn off the fog light switch, the relay coil is de-energized, the contact opens, and the power to the fog lights is cut off, turning them off.
The relay acts as an intermediary, allowing a small switch to control a much larger power load. This prevents the switch from burning out and protects the vehicle's electrical system.
Real-World Use – Basic Troubleshooting Tips
Even with a perfect wiring diagram, things can still go wrong. Here are some common issues and troubleshooting tips:
- Fog Lights Don't Turn On:
- Check the Fuse: This is the first and easiest step. Use a multimeter to test for continuity across the fuse. Replace it if blown.
- Check the Ground: Ensure the ground connection is clean and secure. A loose or corroded ground can cause all sorts of problems.
- Test the Relay: You can test the relay by applying 12V to the coil terminals and listening for a "click." You can also use a multimeter to check for continuity across the switched terminals when the relay is activated.
- Check the Switch: Use a multimeter to check for continuity through the switch when it's in the "on" position.
- Check the Wiring: Look for any broken, frayed, or disconnected wires. Use a multimeter to check for voltage at different points in the circuit.
- Fuse Blows Repeatedly:
- Short Circuit: This is the most likely cause. Carefully inspect the wiring for any places where the insulation is damaged and the wire is touching the chassis or another wire.
- Overloaded Circuit: If you've added too many lights or accessories to the same circuit, it may be drawing more current than the fuse is rated for.
- Fog Lights Are Dim:
- Voltage Drop: This can be caused by undersized wiring or poor connections. Check the voltage at the fog lights themselves. If it's significantly lower than the battery voltage, there's likely a voltage drop somewhere in the circuit.
- Poor Ground: As mentioned before, a bad ground can cause all sorts of issues, including dim lights.
Safety – Handle with Care
Working with automotive electrical systems can be dangerous. Keep these safety precautions in mind:
- Disconnect the Battery: Always disconnect the negative (-) terminal of the battery before working on any electrical components. This prevents accidental short circuits and potential shocks.
- Use Appropriate Tools: Use insulated tools designed for automotive electrical work.
- Don't Exceed Wire Capacity: Ensure that the wiring you use is rated for the current draw of the fog lights. Undersized wiring can overheat and cause a fire.
- Proper Fuse Selection: Always use a fuse with the correct amperage rating. A fuse that's too large won't protect the circuit, and a fuse that's too small will blow repeatedly.
- Work in a Well-Ventilated Area: When soldering, work in a well-ventilated area to avoid inhaling fumes.
- Handle Relays with Care: Relays can get hot when they are operating. Handle them with caution to avoid burns.
- Never bypass a fuse. Fuses are a critical safety component.
Especially be careful with the battery. It can deliver a large amount of current in a very short time, leading to serious burns or even explosions if shorted accidentally.
By understanding the wiring diagram and following these safety guidelines, you can confidently install or repair your fog light system. Remember to double-check your connections and take your time. A well-executed wiring job will provide years of reliable service and enhance your driving experience.