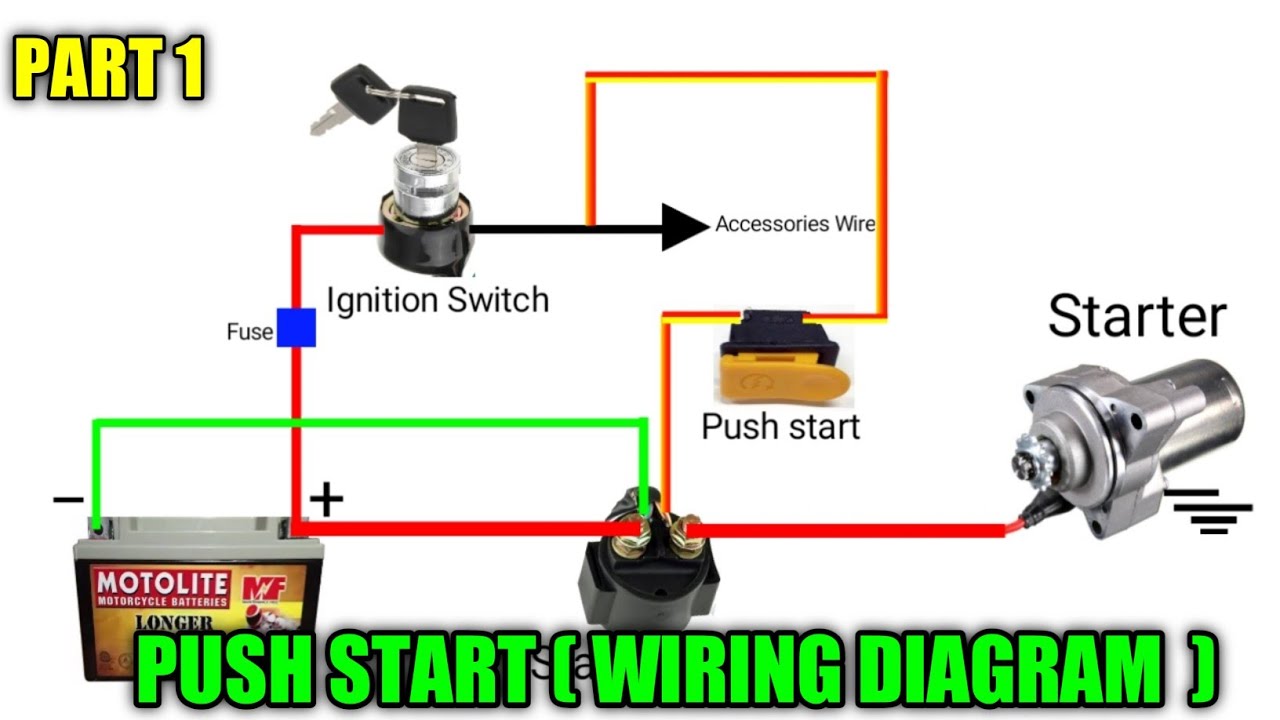
Wiring Diagram For Push Button Start
So, you're thinking about adding a push-button start to your ride, or maybe you're troubleshooting an existing system? Awesome! Understanding the wiring is absolutely crucial, whether you're dealing with a factory-installed system or a custom modification. This article is your comprehensive guide to dissecting a push-button start wiring diagram. We'll break down the components, decipher the symbols, and provide practical troubleshooting tips to get you confidently working on your vehicle.
Purpose of Understanding the Wiring Diagram
Why bother learning all this stuff? A wiring diagram isn't just a pretty picture; it's the roadmap to your car's electrical system. Specifically, understanding the push-button start wiring allows you to:
- Diagnose Problems: Track down faults and malfunctioning components quickly.
- Perform Repairs: Correctly rewire damaged circuits or replace faulty parts.
- Install Aftermarket Systems: Integrate a new push-button start system safely and effectively.
- Modify Existing Systems: Customize features or troubleshoot issues related to modifications.
- Deepen Automotive Knowledge: Gain a better overall understanding of your car's electrical systems.
Key Specs and Main Parts
Before diving into the diagram itself, let's define the key components involved in a typical push-button start system:
- Push Button Switch: The heart of the system. This momentary switch initiates the starting sequence. It's a momentary switch meaning it only completes the circuit when pressed.
- Ignition Switch (Original): In many installations, the original ignition switch is retained for security and accessory power. It will be bypassed or interfaced with.
- Starter Relay: A high-current relay that handles the heavy lifting of sending power to the starter motor. This prevents frying your push-button switch.
- Accessory Relay: Controls power to the car's accessories (radio, climate control, etc.) when the button is pressed to the "ACC" position.
- Ignition Relay: Controls power to the ignition system (fuel pump, ignition coils, etc.) when the button is pressed to the "ON" position.
- ECU (Engine Control Unit): Some advanced systems integrate with the ECU for security features and other functions.
- Immobilizer System: Prevents the engine from starting without the correct key or security code. Often incorporated for theft prevention.
- Wiring Harness: Connects all the components together. The gauge (thickness) of the wire is critical; higher current circuits require thicker wires.
- Fuses: Safety devices that protect the circuits from overcurrent. Always use the correct fuse rating!
- Ground Connection(s): Critical for completing the electrical circuit. A poor ground can cause all sorts of problems.
Key Specs to consider are the amperage ratings of the relays and fuses, and the wire gauge used throughout the system. Using undersized components can lead to overheating and potential fire hazards.
Symbols – Deciphering the Diagram
Wiring diagrams use a standardized set of symbols to represent different components and connections. Here's a breakdown of common symbols you'll encounter:
- Straight Lines: Represent wires. Thicker lines usually indicate wires carrying higher current.
- Dashed Lines: Often represent wires that are optional or only present in certain configurations.
- Circles with an 'X': Represent wire splices or connections.
- Resistor Symbol (Zigzag Line): Represents a resistor, which limits current flow.
- Capacitor Symbol (Two Parallel Lines): Represents a capacitor, which stores electrical energy.
- Relay Symbol (Coil and Switch): Shows the relay coil and the switch contacts that it controls. You'll see both normally open (NO) and normally closed (NC) contacts.
- Ground Symbol (Stacked Horizontal Lines): Indicates a connection to the vehicle's chassis, providing a path for current to return to the battery.
- Fuse Symbol (S-shaped Line in a Rectangle): Represents a fuse. The diagram may also indicate the fuse's amperage rating (e.g., 10A).
- Switch Symbol (Line with a Break): Represents a switch. Different switch symbols exist for SPST (single-pole, single-throw), SPDT (single-pole, double-throw), and other switch types.
Color Coding: Wires are often color-coded to help identify their function. Common colors include:
- Red: Typically indicates a power wire connected directly to the battery.
- Black: Typically indicates a ground wire.
- Yellow: Often used for accessory power.
- Blue: Can be used for various signals or control wires.
- Green: Often used for lighting circuits.
Always refer to the specific wiring diagram for your vehicle or aftermarket system to confirm the color codes. Different manufacturers may use different conventions.
How It Works: The Starting Sequence
Let's walk through how a typical push-button start system functions, based on the wiring diagram:
- Button Press: When you press the push-button start, it sends a signal to the control module or relays.
- Accessory Power: Depending on how long you press the button, it might first activate the accessory relay, providing power to the radio and other accessories.
- Ignition Power: A longer press usually activates the ignition relay, powering up the engine's ignition system and fuel pump.
- Starter Activation: Finally, after the ignition system is powered, the system energizes the starter relay, which sends high current to the starter motor. This cranks the engine.
- Engine Running: Once the engine starts, the system disengages the starter motor and maintains power to the ignition system.
Some systems require the brake pedal to be depressed as a safety measure before the starter motor will engage.
Real-World Use: Basic Troubleshooting Tips
So, something's not working right? Here's how to use the wiring diagram to troubleshoot common issues:
- No Power to Anything: Check the main power wire (usually red) from the battery to the push-button start system. Verify the fuse is good. Use a multimeter to check for voltage at the input of the system. Also, verify proper ground connection.
- Accessories Work, But Engine Won't Crank: Check the ignition relay and the starter relay. Use a multimeter to see if the relays are receiving the correct signal when you press the button. If the relay is receiving the signal but not switching, the relay is likely faulty.
- Engine Cranks, But Won't Start: Check the ignition relay to ensure the ignition system is receiving power. Also check the fuel pump relay. The wiring diagram will show you the specific circuits to test.
- Button Doesn't Light Up: Check the wiring to the button itself. It might be a simple loose connection or a blown LED.
- Immobilizer Issues: If the engine cranks but won't start, and the immobilizer light is flashing, there's likely a problem with the security system. This might require professional diagnosis and reprogramming.
Always use a multimeter to check for voltage and continuity when troubleshooting electrical problems. This will help you pinpoint the source of the issue.
Safety – Handle with Care!
Working with automotive electrical systems can be dangerous. Keep these safety points in mind:
- Disconnect the Battery: Before working on any electrical components, disconnect the negative terminal of the battery to prevent short circuits and electric shock.
- Use Proper Tools: Use insulated tools designed for automotive electrical work.
- Avoid Water: Never work on electrical systems in wet conditions.
- Fuses are Crucial: Never bypass a fuse or use a fuse with a higher amperage rating than specified. This can lead to overheating and fire.
- Relays Handle Power: Be extremely careful when working with relays, especially the starter relay, as they handle high currents.
- Consult a Professional: If you're unsure about any aspect of the wiring or the troubleshooting process, consult a qualified automotive electrician.
Working with the vehicle's electrical system, especially around the immobilizer and ECU, can potentially damage those sensitive components if not done properly. If you are not comfortable or familiar with automotive electrical work, please seek the help of a qualified professional.
By understanding the wiring diagram and following these safety guidelines, you can confidently diagnose, repair, and even upgrade your push-button start system. Remember to always double-check your work and test the system thoroughly after making any changes.
We have a detailed PDF file for a common push-button start wiring diagram. This downloadable resource includes a comprehensive breakdown of all the components and connections discussed in this article.