
Wiring Diagram For Trailer Lights 4 Way
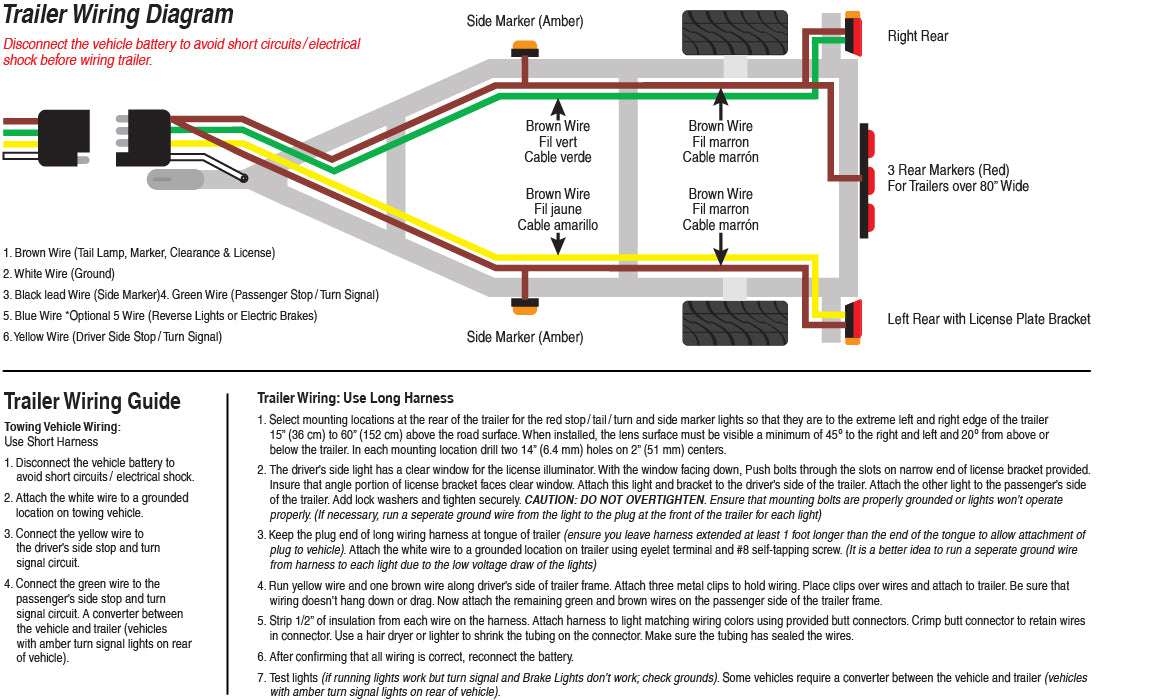
So, you're looking to wire up a 4-way trailer light connector. Maybe you're repairing a damaged harness, building a utility trailer, or just want a better understanding of how these circuits work. Whatever the reason, knowing how to read a 4-way trailer light wiring diagram is a valuable skill for any experienced DIYer. This article will break down the common 4-way flat connector wiring, explain the diagram, and give you the confidence to tackle this project safely and effectively. And the best part? We have a detailed wiring diagram available for you to download at the end of this article, so you can have a visual aid handy while you work.
Purpose: Understanding the 4-Way Trailer Light System
The 4-way flat connector is the most common and simplest type of trailer light connection. Its primary function is to provide the basic lighting required for safe and legal trailer towing. These lights include:
- Tail Lights: Illuminates when the vehicle's tail lights are on, making the trailer visible at night.
- Brake Lights: Illuminates when the vehicle's brakes are applied, alerting drivers behind you.
- Left Turn Signal: Flashes in conjunction with the vehicle's left turn signal, indicating an intention to turn left.
- Right Turn Signal: Flashes in conjunction with the vehicle's right turn signal, indicating an intention to turn right.
Understanding the wiring allows you to:
- Repair faulty wiring: Identify and fix broken wires, corroded connectors, or short circuits.
- Install a new trailer light harness: Wire up a new harness to your vehicle or trailer.
- Diagnose lighting problems: Quickly pinpoint the cause of malfunctioning lights.
- Modify or upgrade your system: Add or change lighting components.
Key Specs and Main Parts
The 4-way flat connector uses four wires, each dedicated to a specific lighting function. The standard color coding and pin assignments are as follows:
- White: Ground (Connects to the vehicle frame and trailer frame)
- Brown: Tail Lights (Also known as running lights)
- Yellow: Left Turn Signal and Brake Light
- Green: Right Turn Signal and Brake Light
Key Components:
- 4-Way Flat Connector (Vehicle Side): This is the female connector mounted on your towing vehicle.
- 4-Way Flat Connector (Trailer Side): This is the male connector attached to your trailer's wiring harness.
- Wiring Harness: The bundle of wires that connects the vehicle's electrical system to the trailer connector. Typically 16 or 18 gauge wire is used.
- Wire Connectors (Butt Connectors, Crimp Connectors): Used to join wires together. Always use properly sized connectors and crimp them securely.
- Electrical Tape or Heat Shrink Tubing: Used to insulate and protect wire connections. Heat shrink tubing provides a more durable and professional finish.
- Test Light or Multimeter: Essential tools for testing circuits and verifying proper voltage and continuity.
Symbols and Diagram Explanation
A typical 4-way trailer light wiring diagram will use symbols to represent the various components and connections. Here's a breakdown of common symbols:
- Lines: Represent wires. The thickness of the line doesn't usually indicate wire gauge, but rather visual clarity.
- Circles or Rectangles with Letters: Represent connectors or terminals. For example, a circle with "GND" indicates a ground connection.
- Light Bulb Symbol: Represents a light bulb, such as a tail light, brake light, or turn signal.
- Ground Symbol: Usually three horizontal lines decreasing in length, indicating a connection to the vehicle frame for grounding.
- Wire Colors: Diagrams often use colored lines or labels to indicate the wire colors (White, Brown, Yellow, Green).
- Splice: Represented with a dot when there are two or more wires connected together.
The diagram will show how each wire from the vehicle-side connector is connected to the corresponding wire on the trailer-side connector. It will also illustrate the connections to the tail lights, brake lights, and turn signal lights on the trailer.
How It Works: Following the Electrical Path
The 4-way trailer light system works by tapping into the vehicle's existing lighting circuits. When you activate a lighting function in your vehicle (e.g., turn on the headlights, apply the brakes, or activate a turn signal), the corresponding signal is sent through the wiring harness to the trailer connector.
Let's break down the individual circuits:
- Ground (White): This is the foundation of the electrical system. It provides a return path for the current, completing the circuit. A good ground connection is absolutely critical for proper operation.
- Tail Lights (Brown): When the vehicle's tail lights are turned on, power flows through the brown wire to the trailer's tail lights, illuminating them.
- Left Turn Signal/Brake Light (Yellow): This wire serves two purposes. When the left turn signal is activated, the yellow wire carries a pulsating current, causing the left turn signal light on the trailer to flash. When the brakes are applied, the yellow wire receives a constant current, illuminating the left brake light.
- Right Turn Signal/Brake Light (Green): Functions identically to the yellow wire, but for the right turn signal and brake light.
Important Note: Because the 4-way connector combines the brake light and turn signal functions on the same wire, the trailer's lights will function as both brake lights and turn signals simultaneously. This is different from some vehicles that have separate brake light and turn signal circuits.
Real-World Use: Basic Troubleshooting
Here are some common problems you might encounter and how to troubleshoot them using your understanding of the wiring diagram:
- No Lights at All:
- Check the vehicle's fuse for the trailer lights. It might be blown.
- Ensure the ground connection (white wire) is secure and free of corrosion on both the vehicle and the trailer. A bad ground is the most common culprit.
- Use a test light or multimeter to check for power at the vehicle-side connector. If there's no power, the problem lies in the vehicle's wiring.
- One or More Lights Don't Work:
- Check the light bulb itself. It might be burned out.
- Inspect the wiring and connectors for corrosion, loose connections, or damaged wires.
- Use a test light or multimeter to check for power at the light socket. If there's power, the bulb is the problem. If there's no power, trace the wiring back to the connector, looking for breaks or bad connections.
- Lights Flicker or Are Dim:
- Indicates a poor ground connection or corroded wiring. Clean and tighten all connections.
- Could indicate low voltage from the vehicle's battery or charging system.
Safety Considerations
Working with electrical systems can be dangerous. Here are some safety precautions to keep in mind:
- Disconnect the Battery: Before working on any electrical wiring, disconnect the negative terminal of the vehicle's battery to prevent accidental shorts.
- Use Proper Tools: Use insulated tools designed for electrical work.
- Inspect Wires: Carefully inspect wires for damage before making connections. Replace any damaged wires.
- Secure Connections: Ensure all wire connections are secure and properly insulated. Use heat shrink tubing for a professional and durable finish.
- Fuses: Always use the correct amperage fuse for the trailer light circuit. Using a higher amperage fuse can overload the wiring and cause a fire.
- Wiring near the hitch: Route trailer wiring carefully to avoid contact with the hitch or exhaust system. Use zip ties to keep the wires secure and prevent them from dragging on the ground.
The most risky component is the vehicle's electrical system. Short circuits can damage the vehicle's electrical components and even cause a fire. Always work carefully and double-check your connections before reconnecting the battery.
Now that you have a solid understanding of 4-way trailer light wiring, you're well-equipped to tackle your next project. Remember to always prioritize safety and double-check your work.
Ready to get started? We have a detailed 4-way trailer light wiring diagram available for you to download. It provides a clear visual representation of the wiring connections, making the process even easier. Click here to download the diagram!