Wiring Diagram How To Jump 3 Wire Ac Pressure Switch
Okay, let's dive into jumping a 3-wire AC pressure switch. This is a technique you might need for troubleshooting your car's air conditioning system, or potentially as a temporary fix while you wait for a replacement part. However, and I want to stress this, jumping any component is generally a diagnostic step, not a permanent solution. It's crucial to understand the implications and safety aspects before proceeding.
Purpose: Why Bother with Jumping the AC Pressure Switch?
The primary reason for jumping the AC pressure switch is to bypass it during troubleshooting. The AC pressure switch's job is to protect your AC compressor from damage. It monitors the refrigerant pressure in the system. If the pressure is too low (indicating a leak or low refrigerant charge) or too high (indicating a blockage or overcharge), the switch opens, cutting power to the compressor clutch. This prevents the compressor from running under potentially damaging conditions.
Jumping the switch simulates a condition where the refrigerant pressure is within the acceptable range, allowing you to see if the compressor clutch engages and the AC system starts to cool (even temporarily). This can help you isolate the problem. For example:
- If the AC works when you jump the switch, but doesn't normally, the pressure switch is likely faulty or the refrigerant pressure is out of range.
- If the AC still doesn't work when you jump the switch, the problem lies elsewhere in the system (compressor, wiring, relay, etc.).
Important Note: This procedure is for experienced DIYers familiar with automotive electrical systems. If you're uncomfortable working with electrical circuits or refrigerant systems, consult a qualified mechanic.
Key Specs and Main Parts of a 3-Wire AC Pressure Switch
Before we jump into the wiring diagram, let's briefly discuss the key components:
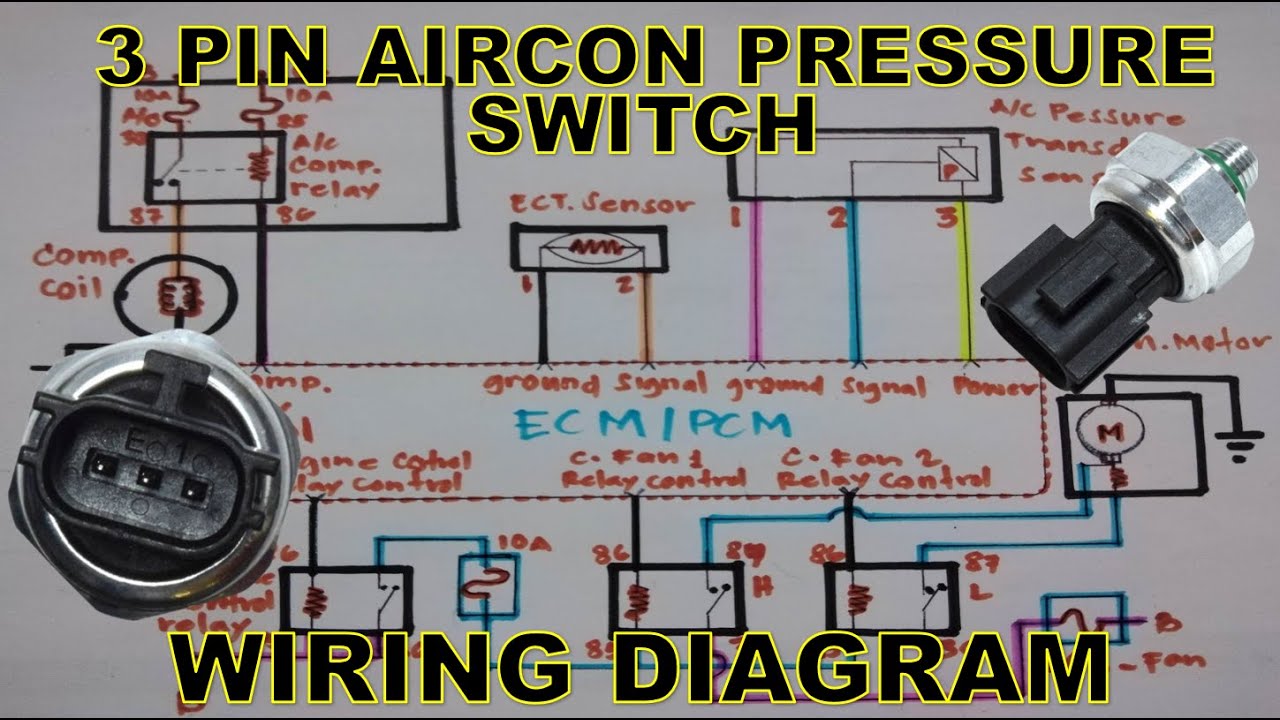
- AC Pressure Switch: The sensor that monitors refrigerant pressure. A 3-wire switch typically uses one wire for power, one for ground, and one for a signal that's sent to the ECU (Engine Control Unit) or another control module.
- AC Compressor Clutch: The electromechanical clutch that engages the compressor to the engine, allowing it to pump refrigerant.
- Relays: Electrically operated switches that control high-current circuits with a low-current signal. The AC compressor clutch often uses a relay.
- ECU (Engine Control Unit): The car's central computer, which controls various engine and accessory functions, including the AC system.
The 3-wire pressure switch differs from a 2-wire switch. A 2-wire switch is usually a simple open/closed circuit. The 3-wire switch provides more information, allowing the ECU to monitor pressure changes and potentially adjust the compressor operation. This is often referred to as a transducer as it converts pressure into an electrical signal.
Symbols, Lines, Colors, and Icons in the Wiring Diagram
A typical automotive wiring diagram uses standardized symbols and colors to represent different components and circuits. Here's a breakdown:
- Solid Lines: Represent wires. The thicker the line, the higher the current capacity of the wire.
- Dashed Lines: Often indicate shielded wiring or connections that are not always present.
- Colors: Each color represents a specific function or circuit. Common colors include:
- Red: Power (typically +12V)
- Black: Ground
- Blue/Green/Yellow: Signal wires (often for sensors or control signals)
- Circles: Represent connections or splices in the wiring harness.
- Rectangles: Represent components like relays, switches, and fuses. They may have labels inside indicating their function (e.g., "AC Clutch Relay").
- Resistor Symbol (Zig-zag line): Represents a resistor, which limits current flow.
- Ground Symbol (Three downward lines): Indicates a connection to the vehicle's chassis ground.
- Pressure Switch Symbol: A stylized switch with a pressure sensor indication.
In the diagram, trace the wires leading to and from the AC pressure switch. Note the wire colors and their destinations. This will help you understand the switch's role in the overall circuit.
How It Works: Jumping the 3-Wire Switch
The method for jumping a 3-wire AC pressure switch isn't as straightforward as a 2-wire switch because we're dealing with a signal, not just an on/off state. The goal is to *fool* the ECU into thinking the pressure is within range.
Here's a *general* procedure (always refer to the specific wiring diagram for your vehicle):
- Identify the wires: Using your wiring diagram, locate the power, ground, and signal wires of the pressure switch.
- Disconnect the switch: Unplug the connector from the AC pressure switch.
- Determine the signal voltage: With the key on, carefully measure the voltage on the signal wire with a multimeter. Note the voltage reading. This is the voltage the ECU expects to see when the pressure is within the acceptable range.
- Create a jumper: You need to *simulate* the correct signal voltage. This often involves a resistor. **Do NOT simply short the signal wire to power or ground! This can damage the ECU.** The value of the resistor needed depends on the circuit design. Using a potentiometer (variable resistor) might be helpful here. You will want to incrementally increase the resistance until the signal voltage at the ECU reads approximately the voltage you measured in step 3.
- Connect the jumper: Insert the resistor between the signal wire and a suitable voltage source (likely the power wire for the switch).
- Test the system: Turn on the AC system. If the compressor clutch engages, it suggests the pressure switch or the refrigerant pressure is the problem.
Important Considerations:
- The exact resistance value needed to simulate the correct signal voltage will vary depending on the vehicle.
- Use a multimeter to carefully monitor the voltage on the signal wire as you adjust the resistance.
- If the compressor clutch doesn't engage, even with the jumper, the problem lies elsewhere in the system.
Real-World Use: Basic Troubleshooting Tips
Here are some troubleshooting tips when dealing with an AC pressure switch:
- Check the refrigerant level: Use a manifold gauge set to measure the high-side and low-side pressures. If the pressures are outside the normal range, address the refrigerant issue before replacing the switch.
- Inspect the wiring: Look for damaged wires, corroded connectors, or loose connections.
- Test the switch: If you suspect a faulty switch, you can test it with a multimeter to see if it's opening and closing properly at the correct pressure. Refer to the service manual for the correct testing procedure.
- Listen for the clutch engagement: You should hear a distinct *click* when the compressor clutch engages. If you don't hear this click, the problem could be with the clutch itself, the relay, or the wiring to the clutch.
- Scan for codes: Use an OBD-II scanner to check for any trouble codes related to the AC system. These codes can provide valuable clues about the problem.
Safety: Highlighting Risky Components
Working on automotive electrical systems and refrigerant systems involves potential hazards. Always disconnect the negative battery cable before working on any electrical components.
Refrigerant: AC refrigerant is under high pressure and can cause frostbite if it comes into contact with your skin. If you suspect a refrigerant leak, take the vehicle to a qualified AC technician.
Electrical System: Be careful when working with electrical wires. Avoid shorting wires together, as this can damage the ECU or other components. Use a multimeter to test voltages and continuity before making any connections.
Compressor Clutch: The compressor clutch operates at high voltage. Be careful when working near the clutch to avoid electric shock.
Always wear safety glasses and gloves when working on your car.
Jumping the AC pressure switch is a diagnostic technique that should be performed with caution. It's not a substitute for proper repair. If you're not comfortable working on your car's AC system, consult a qualified mechanic.
We have a more detailed wiring diagram available that's specific to many makes and models. Please contact us via the support channels to request the document.