Wiring Diagram Two Lights One Switch
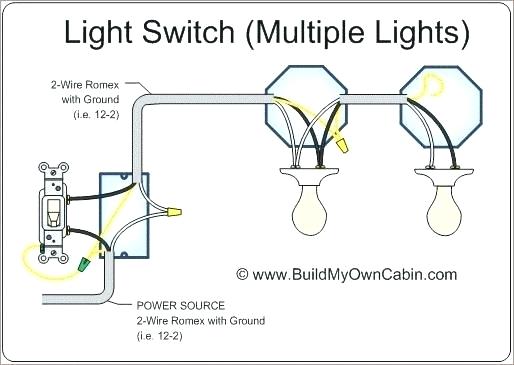
Let's talk about a fundamental wiring configuration: wiring two lights to operate from a single switch. This setup is incredibly common, popping up everywhere from auxiliary lights in your off-roader to custom lighting projects in your garage. Understanding this diagram isn't just about following instructions; it's about grasping the core principles of automotive electrical systems, making you a more confident and capable DIYer.
Purpose of Understanding This Wiring Diagram
Why bother diving into this? Well, having a solid grasp of this wiring diagram empowers you in several ways:
- Repair and Maintenance: Quickly diagnose and fix lighting issues. A flickering light or one that doesn't turn on could stem from a bad connection, a faulty switch, or a problem in the wiring. Knowing the diagram allows you to systematically trace the circuit and pinpoint the problem area.
- Modification and Customization: Adding aftermarket lights (fog lights, driving lights, rock lights, etc.) becomes significantly easier. You can confidently plan and execute your project, ensuring proper wiring and preventing electrical problems down the road.
- Learning the Fundamentals: This simple circuit is a building block for more complex electrical systems. Understanding how electricity flows, how switches control circuits, and how to connect multiple loads in parallel sets the stage for tackling more advanced automotive electrical projects.
- Avoiding Costly Repairs: Instead of taking your vehicle to a mechanic for a simple lighting issue, you can troubleshoot and fix it yourself, saving you money and time.
Key Specs and Main Parts
Before we dive into the diagram itself, let's identify the core components involved:
- Power Source (Battery): The heart of the system, providing the 12V DC (Direct Current) electrical energy. Automotive electrical systems typically operate at 12V, although some newer systems may use higher voltages (e.g., 48V for mild hybrids).
- Fuse: A crucial safety device. A fuse is designed to break the circuit if the current exceeds a safe level, protecting the wiring and components from damage (overcurrent protection). It's a thin wire or strip that melts when overloaded, preventing a fire or more serious electrical damage. Choose a fuse with an appropriate amperage rating for your lights; too low, and it will blow prematurely; too high, and it won't provide adequate protection.
- Switch: The on/off control. A switch interrupts or completes the circuit, allowing you to control the flow of electricity to the lights.
- Lights (Loads): The devices that consume electricity and produce light. These are your headlights, fog lights, auxiliary lights, etc. Each light will have a specific wattage rating, which helps determine the appropriate fuse size.
- Wiring: The conductive pathways that carry the electrical current. Choose the correct wire gauge (thickness) for the current draw of your lights. Thicker wires can handle more current without overheating. Using undersized wires can lead to voltage drop, dim lights, and potentially even fire hazards. Wire gauge is typically specified in AWG (American Wire Gauge).
- Ground Connection: Provides a return path for the current back to the battery. A good, clean ground connection is essential for proper circuit operation. Ensure the ground connection is made to a clean, rust-free metal surface.
Symbols in the Wiring Diagram
Understanding the symbols is essential for interpreting the diagram:
- Solid Lines: Represent wires connecting the components.
- Dashed Lines (Less Common): Sometimes used to indicate wires running through a harness or wires that are part of a control module.
- Battery Symbol: A series of short and long parallel lines (representing positive and negative terminals).
- Fuse Symbol: Often depicted as a wavy line within a rectangle or a simple rectangle with a line through it.
- Switch Symbol: A line with a break that can be closed by flipping the switch. The break represents the open circuit (switch off), and the closed line represents the closed circuit (switch on).
- Light Bulb Symbol: A circle with an "X" inside.
- Ground Symbol: Typically three horizontal lines of decreasing length, representing a connection to the vehicle's chassis.
- Color Codes: Wires are often color-coded to aid in identification. Common colors include:
- Red: Typically used for power wires (connected to the positive terminal of the battery).
- Black: Typically used for ground wires (connected to the negative terminal of the battery or the vehicle chassis).
- Other Colors (e.g., Blue, Green, Yellow, White): Used for various circuits and functions. Always refer to the specific wiring diagram for the color code designations.
How It Works: The Electrical Flow
The circuit works on a simple principle: completing the path allows electricity to flow.
- Electricity flows from the positive terminal of the battery.
- It passes through the fuse, providing overcurrent protection.
- The wire then leads to the switch.
- When the switch is on (closed), it completes the circuit, allowing current to flow to the lights.
- The current flows through both lights (connected in parallel).
- From the lights, the current returns to the negative terminal of the battery through the ground connection, completing the circuit.
Important Note: The lights are wired in parallel. This means that each light receives the full 12V voltage. If one light fails, the other light will continue to operate because the circuit remains complete for that light. Wiring in series would mean one light failure would stop current flow to both.
Real-World Use: Troubleshooting Tips
Here's how to apply this knowledge when things go wrong:
- Neither light works:
- Check the fuse. A blown fuse is the most common culprit. Replace it with a fuse of the same amperage rating. If the fuse blows repeatedly, there's likely a short circuit somewhere in the wiring.
- Test the switch. Use a multimeter to check for continuity when the switch is on. If there's no continuity, the switch is faulty and needs to be replaced.
- Inspect the wiring for loose connections, corrosion, or damage. Clean or repair any faulty connections.
- Verify the ground connection. Ensure the ground connection is clean and secure.
- One light works, the other doesn't:
- Check the bulb of the non-working light. Replace it if it's blown.
- Inspect the wiring to the non-working light for loose connections or damage.
- Lights are dim:
- Check the battery voltage. A low battery can cause dim lights.
- Inspect the wiring for undersized wires. Using wires that are too thin can cause voltage drop.
- Check the ground connection. A poor ground connection can cause voltage drop.
Safety First: Risky Components
Working with automotive electrical systems can be dangerous if proper precautions are not taken. Here are a few key safety considerations:
- The Battery: Disconnect the negative terminal of the battery before working on any electrical components. This prevents accidental shorts and potential shocks. Always disconnect the negative terminal first, and reconnect it last.
- Fuses: Never replace a fuse with one of a higher amperage rating. This can bypass the overcurrent protection and lead to a fire.
- Wiring: Use appropriately sized wiring for the current draw of the circuit. Undersized wiring can overheat and cause a fire.
- Short Circuits: Be extremely careful to avoid short circuits. A short circuit occurs when a wire carrying power comes into contact with a ground. This can cause a large current to flow, blowing fuses, damaging components, and potentially starting a fire.
- Personal Protective Equipment (PPE): Wear appropriate PPE, such as safety glasses and gloves, to protect yourself from electrical hazards.
Remember, if you're not comfortable working with electrical systems, it's always best to consult a qualified mechanic.
We have a detailed wiring diagram for a two-light, one-switch setup available for download. This diagram includes color codes, component specifications, and detailed instructions. Download it now to guide you through your lighting project!