
Wiring Harness After Market Radio Bmw
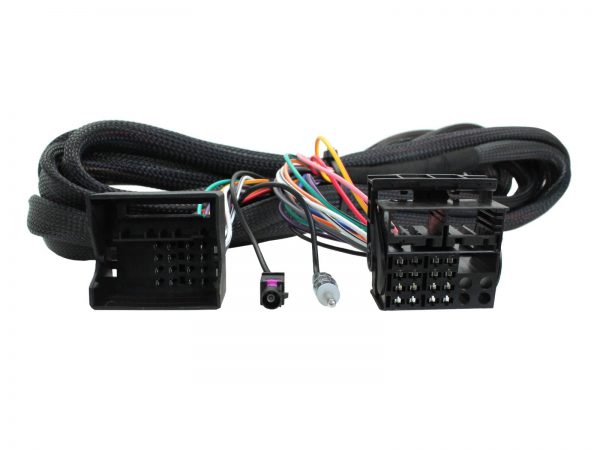
Upgrading the factory radio in a BMW can dramatically improve your driving experience, bringing modern features like Bluetooth, navigation, and improved sound quality. However, BMWs, particularly older models, often have complex wiring systems that can be intimidating. Using an aftermarket wiring harness adapter and understanding its associated diagram is critical for a successful and safe installation. This article will provide a detailed guide to deciphering BMW aftermarket radio wiring harness diagrams, empowering you to tackle this project with confidence. We assume you already have a basic understanding of automotive electrical systems.
Why This Diagram Matters
A BMW aftermarket radio wiring harness diagram serves as a roadmap for connecting your new radio to your car's existing electrical system. It bridges the gap between the factory BMW wiring (often proprietary and not directly compatible with aftermarket units) and the standardized connections of your new radio. These diagrams are essential for several reasons:
- Preventing Damage: Incorrect wiring can damage both your new radio and your BMW's electrical system. Short circuits can fry components, trigger airbags erroneously (a VERY expensive mistake!), or even cause a fire.
- Ensuring Proper Functionality: The diagram ensures that all functions of the radio, such as power, ground, speakers, illumination, and accessory power, are connected correctly.
- Troubleshooting: If your new radio isn't working as expected, the diagram is invaluable for troubleshooting connection problems.
- Learning: Even if everything works perfectly, understanding the diagram deepens your knowledge of automotive electrical systems and allows you to better diagnose and repair future issues.
Key Specs and Main Parts of a BMW Aftermarket Radio Wiring Harness
Let's break down the key components and specifications you'll encounter:
- The Connector(s): The most prominent part of the harness is the connector that plugs directly into your BMW's factory radio harness. BMW used various connector types over the years (e.g., ISO, Quadlock), so ensure you select the correct harness for your specific model and year. Using the wrong harness will render it useless.
- The Wires: These are the conductors that carry electrical signals. They are color-coded according to industry standards (mostly).
- The Fuse Tap (Optional): Some harnesses include a fuse tap, which allows you to safely tap into an existing circuit in your fuse box for accessory power (ACC) or other functions. This eliminates the need to cut or splice into factory wiring.
- The Antenna Adapter (Often Separate): BMWs typically use a proprietary antenna connector. An antenna adapter converts this to a standard male or female connector that will plug into your new radio. This is usually a separate purchase.
- The Steering Wheel Control Adapter (Optional and Usually Separate): If you want to retain your steering wheel controls (volume, track change, etc.), you'll need a separate steering wheel control adapter. This adapter plugs into the wiring harness and is programmed to communicate with your specific car and radio.
Decoding Wiring Harness Symbols and Color Codes
Understanding the symbols and color codes in the wiring diagram is crucial. Here's a breakdown of common elements:
- Wires: Wires are represented by lines. Solid lines typically indicate a direct connection, while dashed lines might indicate a connection through a resistor or other component. The thickness of the line often doesn't represent anything meaningful in this context.
- Ground Symbol: The ground symbol (often resembling a series of downward-pointing triangles or a horizontal line with shorter lines descending from it) indicates a connection to the vehicle's chassis ground. It's the return path for the electrical circuit.
- Power Symbol: Often represented by a "+" sign or the abbreviation "BAT" (for battery), this indicates a connection to the vehicle's positive battery terminal (usually through a fuse).
- Color Codes: Wire colors are universally standardized (mostly!), although slight variations may exist. Common colors and their typical functions include:
- Red: +12V Constant (Battery power)
- Yellow: +12V Switched (Accessory power)
- Black: Ground
- Blue: Power Antenna or Remote Turn-On
- Gray/White: Speaker wires (front/rear, left/right; often twisted pairs)
- Orange: Illumination (dims the radio display when headlights are on)
- Icons: Icons represent components like fuses, resistors, diodes, and capacitors. The diagram will usually have a key explaining these icons.
How It Works: The Electrical Flow
The wiring harness acts as an intermediary, re-routing the BMW's original wiring to match the needs of your aftermarket radio. For example:
- Power: The red wire from the harness connects to the BMW's +12V constant power wire, providing continuous power to the radio for things like clock memory. The yellow wire connects to the BMW's +12V switched (accessory) power wire, which only provides power when the ignition is on.
- Ground: The black wire connects to a suitable grounding point on the vehicle's chassis (usually a metal bolt connected directly to the frame). A secure ground connection is essential for proper radio operation.
- Speakers: The speaker wires (typically gray, white, green, and purple, sometimes with stripes) connect to the corresponding speaker outputs on the BMW's harness. The diagram clearly shows which wire goes to which speaker (e.g., front left +, front left -, front right +, front right -).
- Illumination: The orange wire connects to the BMW's illumination wire, allowing the radio's display to dim when the headlights are turned on, preventing excessive brightness at night.
Real-World Use: Basic Troubleshooting Tips
Here are some common issues and troubleshooting steps:
- Radio Won't Turn On:
- Check the fuses (both in the radio and in the car's fuse box).
- Verify that the ground connection is secure and making good contact with the chassis.
- Use a multimeter to test the +12V constant and +12V switched wires to ensure they are receiving power.
- No Sound:
- Double-check all speaker wire connections. Ensure the + and - wires are connected correctly for each speaker.
- Make sure the radio's speaker output settings are configured correctly (e.g., speaker impedance).
- Dimming Not Working:
- Verify the orange illumination wire is properly connected to the BMW's illumination wire.
- Check the radio's settings to ensure the dimming function is enabled.
Safety First: Handling Risky Components
Working with automotive electrical systems can be dangerous. Always observe the following safety precautions:
- Disconnect the Battery: Before working on any electrical components, disconnect the negative terminal of the battery. This will prevent accidental shorts and potential damage to your car's electrical system.
- Use Proper Tools: Use properly insulated tools designed for automotive electrical work.
- Never Cut or Splice Factory Wiring: Use the wiring harness adapter to connect to the factory wiring. Cutting or splicing factory wires can void your warranty and create potential electrical problems.
- Airbags: Be extremely cautious around airbag wiring. Do not cut or splice into any wires near airbags. Incorrect wiring can cause airbags to deploy, which can result in serious injury. It's advisable to consult a professional if you are unsure about any wiring near airbag components.
- Fuses: Always use the correct amperage fuse for each circuit. Using a fuse with a higher amperage can overload the circuit and cause a fire.
Remember, if you are uncomfortable working with electrical systems, it's best to consult a qualified professional. Incorrect wiring can be costly and even dangerous. The most important thing is your safety and the safety of your vehicle.
We have a sample BMW aftermarket radio wiring diagram file available for download. This diagram provides a visual representation of the information discussed in this article and can be a valuable reference during your installation. Please note: This diagram is a generic example and may not be specifically applicable to your BMW model. Always verify the wiring connections with the documentation provided with your wiring harness adapter and consult your vehicle's wiring diagram (if available) to ensure compatibility.