Wiring Harness Nissan Wiring Diagram Color Codes
Understanding your Nissan's wiring harness and its corresponding wiring diagram is crucial for any serious DIY mechanic or car enthusiast. Whether you're diagnosing electrical issues, installing aftermarket components, or simply expanding your automotive knowledge, being able to decipher these diagrams is an invaluable skill. This article will break down the essentials of Nissan wiring diagrams, focusing specifically on color codes, symbols, and practical application. We have a Nissan wiring diagram file available for download to aid in your learning.
Purpose of a Nissan Wiring Diagram
A wiring diagram is essentially a roadmap of your vehicle's electrical system. It details the interconnections between various components, including the battery, alternator, sensors, actuators, and control modules. The purpose of a wiring diagram is multifaceted:
- Diagnosis and Repair: Pinpointing the source of electrical problems, such as shorts, opens, or excessive resistance, becomes significantly easier with a wiring diagram. You can trace the circuit and test individual components.
- Installation of Aftermarket Components: Installing stereos, alarms, lights, or other modifications requires connecting into the existing electrical system. A wiring diagram ensures you're tapping into the correct wires and circuits.
- System Understanding: Even without specific issues, studying a wiring diagram gives you a deeper understanding of how your vehicle's electrical systems function.
- Preventative Maintenance: Identifying potential weak points or problematic connections can prevent future failures.
Key Specs and Main Parts of a Nissan Wiring Diagram
Nissan wiring diagrams, like those from other manufacturers, contain key specifications and representations that are essential to understanding their layout and function. Here are some fundamental elements:
- Component Representation: Each electrical component is represented by a symbol. These symbols are usually standardized, though slight variations may exist across different years and models. For example, a resistor is often represented by a zig-zag line, a capacitor by two parallel lines, and a diode by a triangle pointing to a line.
- Wire Representation: Wires are represented by lines, and their color codes are crucial for identification. The wiring diagram will also show the gauge (thickness) of the wire, which affects its current-carrying capacity.
- Connectors: Connectors are points where wires are joined together. They are typically represented by symbols indicating the type of connector and the number of pins. Understanding connector locations is vital for testing and troubleshooting.
- Grounds: Ground connections are often represented by a series of downward-pointing lines or a grounding symbol. All circuits require a ground to complete the electrical path.
- Fuses and Relays: Fuses protect circuits from overcurrent, and relays are used to switch high-current circuits using a low-current signal. These are represented by specific symbols, typically a rectangle for a fuse and a coil symbol for a relay.
- Voltage and Current Values: In some diagrams, voltage levels and current ratings are specified for different parts of the circuit. This information is helpful for verifying proper operation.
- Control Modules (ECU, BCM, etc.): Engine Control Units (ECUs), Body Control Modules (BCMs), and other control modules are represented by boxes or rectangles, with pins clearly numbered and labeled.
Understanding Wiring Diagram Symbols and Color Codes
A core element of interpreting a Nissan wiring diagram is knowing what the different symbols and color codes mean. These elements are the keys to tracing circuits and identifying specific wires.
Lines and Connections
- Solid Lines: Represent wires, indicating the path electricity flows.
- Dotted Lines: May indicate shielded wiring or wiring that is part of a specific harness assembly. It could also represent a connection that only exists in specific vehicle configurations.
- Line Intersections: If two lines cross without a dot at the intersection, it means the wires are not connected. A dot indicates a connection or splice.
Color Codes
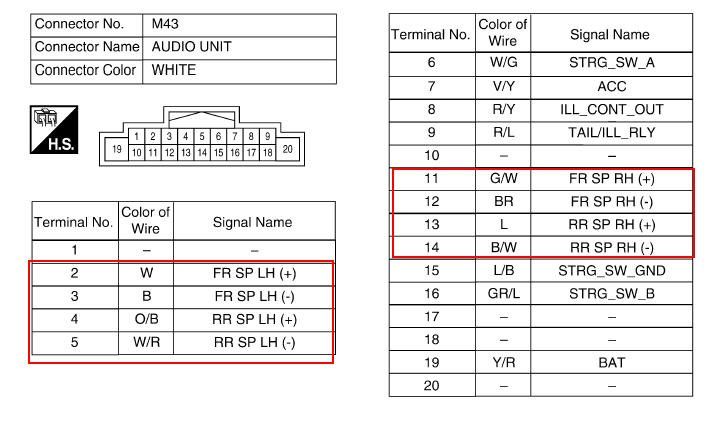
Nissan, like most automotive manufacturers, uses a standardized color-coding system for wires. Each color corresponds to a specific wire. Here's a breakdown of commonly used color codes (but always refer to the specific diagram for your vehicle):
- B: Black (usually ground)
- W: White
- R: Red (often power, especially battery voltage)
- G: Green
- Y: Yellow
- L: Blue
- BR: Brown
- OR: Orange
- P: Pink
- PU: Purple (Violet)
- LG: Light Green
- LB: Light Blue
- GR: Gray
Wires can also have stripes. For instance, a wire labeled "W/B" means a white wire with a black stripe. The base color is listed first, followed by the stripe color. Remember to carefully examine the diagram for specific color code definitions as they can vary slightly between models and years.
Icons
Various icons represent components like sensors, actuators, relays, switches, and lamps. While manufacturers don't always strictly adhere to standard symbols, common representations include:
- Switches: A line connecting to one of two (or more) alternate paths.
- Relays: A coil symbol that, when energized, closes a switch in a separate circuit.
- Sensors: A symbol representing the type of sensor (e.g., temperature, pressure, position). These often include a circle with an element inside.
- Lamps: Usually represented by a circle with an 'X' inside.
- Motors: A circle with an 'M' inside.
How It Works: Tracing a Circuit
Let's imagine you're troubleshooting a non-functioning tail light. Here's how you would use a wiring diagram:
- Locate the Tail Light Circuit: Find the section of the diagram that pertains to the tail lights.
- Identify Key Components: Identify the tail light bulb, the switch that controls it (e.g., headlight switch), any relays, fuses, and the ground connection.
- Trace the Circuit: Start at the power source (battery, via a fuse) and follow the wires through the switch, relay (if any), to the tail light bulb. Then, trace from the bulb to the ground connection.
- Check for Breaks: Use a multimeter to check for voltage at the bulb connector when the switch is on. If there's no voltage, work your way back along the circuit, checking for voltage at each point (fuse, switch output, relay output).
- Check for Ground: Verify that the ground connection is solid. Measure the resistance between the ground point and the chassis ground; it should be close to zero ohms.
Real-World Use: Basic Troubleshooting Tips
Here are some basic troubleshooting tips using a Nissan wiring diagram:
- No Power: Check the fuse first. Refer to the diagram to locate the fuse for the affected circuit.
- Short Circuit: If a fuse keeps blowing, there's likely a short circuit (a direct connection to ground). Use the wiring diagram to identify potential areas where the wiring insulation might be damaged.
- Open Circuit: An open circuit means there's a break in the wire. Use a multimeter in continuity mode to check the wire's integrity.
- High Resistance: Excessive resistance can cause dim lights or sluggish performance. Check connections for corrosion or loose terminals. Clean and tighten as needed.
- Connector Problems: Inspect connectors for damage, corrosion, or loose pins. Refer to the diagram to identify the connector's pinout for testing.
Safety Precautions
Working with automotive electrical systems can be dangerous. Here's what to remember:
- Disconnect the Battery: Before working on any electrical system, disconnect the negative battery terminal to prevent accidental shorts.
- High-Voltage Circuits: Be extremely cautious when working on high-voltage circuits, such as the ignition system or hybrid vehicle components. These circuits can deliver a dangerous shock. Consider them off-limits unless you have specific training and experience.
- Airbag Systems: Airbag systems contain explosive components. Incorrect handling can cause serious injury. Refer to the service manual for proper deactivation procedures before working near airbags.
- Proper Tools: Use insulated tools and a multimeter designed for automotive use.
- Wiring Modifications: Make sure that any modifications you do will not compromise the safety of the car. Do not overload a circuit with aftermarket accessories that pulls too much current than designed.
- Consult Professionals: If you are not comfortable working on the electrical system, seek help from a qualified mechanic.
With a Nissan wiring diagram and a basic understanding of electrical principles, you can confidently diagnose and repair many electrical issues in your vehicle. Remember always to consult the specific wiring diagram for your vehicle's year and model, as variations can occur. We have the file, and you can download the diagram.